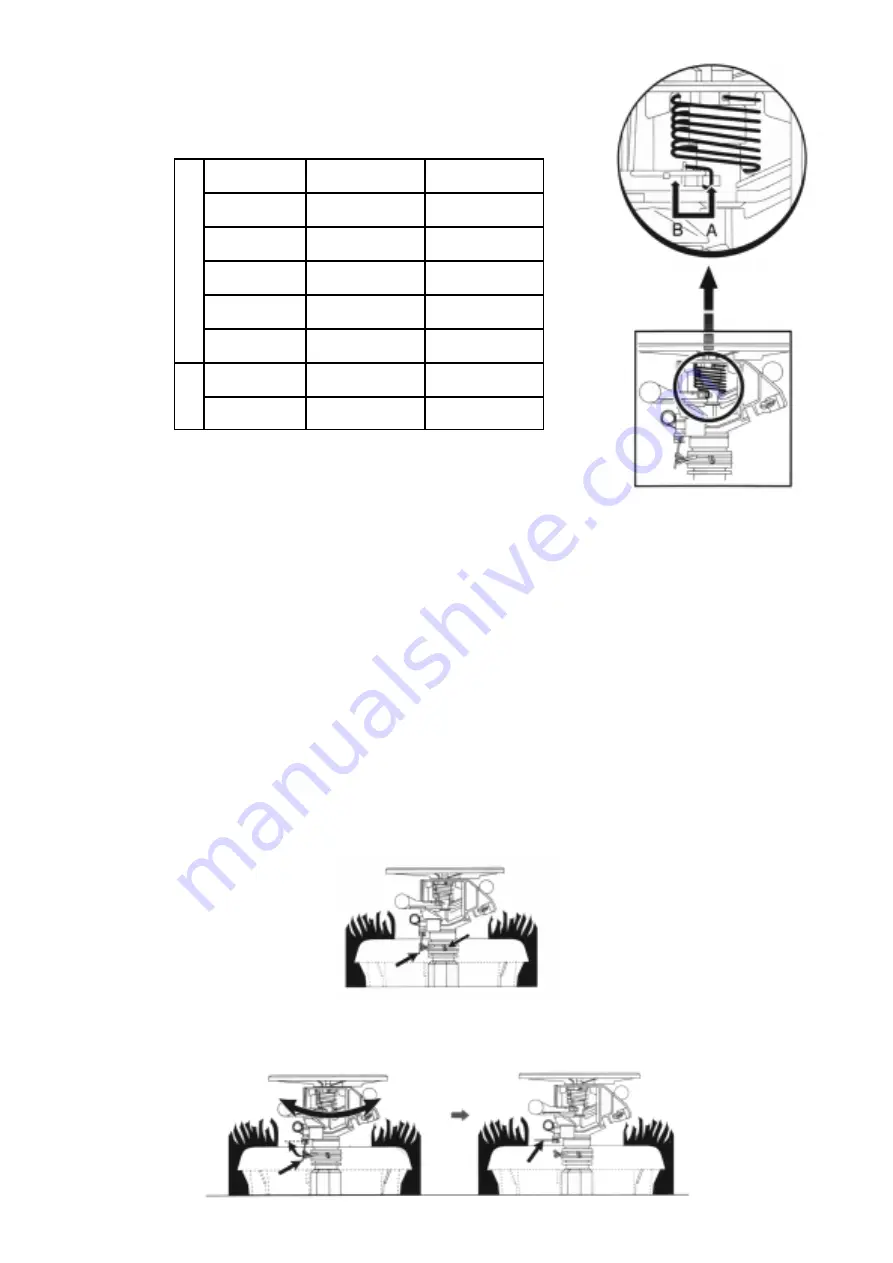
Spring placement, Ubicación del resorte
U
se the following chars to determine correct spring placement:
U
se el siguiente gráfico para determinar la ubicación correcte del resorte:
Regular - Regular
Low - Bajo
Nozzle - Boquilla
Color - Color
Position - Posición
06
07
08
10
12
07
10
Red - Roja
Black - Negra
Blue - Azul
Yellow - Amarilla
Red - Roja
Black - Negra
Yellow - Amarilla
B
B
A
A
A
A
B
M
ake sure that the arm spring is in its correct position
.
The red (#6) and the black
(#7) nozzles require "A" position of the spring be changed from position "A" to posi-
tion "B". the spring must be in its correct position for the spring to trip properly.
A
ssegure se que el resorte del brazo esté en la posición correcta.Las boquillas #6
(roja) y #7 (negra) requieren que la posición del resorte sea cambiada de "A" a "B".
El resorte debe estar en la posición apropriada para que el brazo se devuelva
correctamente.
Setting the Arc – Ajuste del arco
T
he Maxi-Paw is a universal head offering Part Circle or Full Circle performance in one head.
A
fter mounting the head, pull up on the lid to access the internal assembly of the sprinkler. Residing below the
nozzle and splash arm assembly, you will find two adjustment tabs mounted horizontal to the bowl. There is also a
trip mechanism mounted vertical to the adjustment tabs.
E
l Maxi-Paw ofrece un número infinito de arcos, de círculo parcial o completo, en un solo aspersor.
D
espués de instalar et aspersor, levante la tapa para goder alcanzar el ensamblaje interno. Debajo de la boquilla y
el brazo, hay dos ganchos metállicos ajustables alrededor del elevador. Hay también un clip rectangular («trip»)
movible hacia arriba y hacia abajo.
T
he two adjustment tabs allow setting
of the arc by simply positioning the
arms such that reversing of the arc
occurs at the point you desire. The
tabs each have two fingers. By
pushing on one finger you will be able
to move the tab in one direction, the
other finger will move it in the opposite
direction. Position the two trip tabs as
required, turn on the water source,
and make final fine tuning
adjustments while the system is running.
L
os dos ganchos metálicos permiten
el ajuste del arco con solo moverlos a
la posición deseada. Ambos ganchos
tienen dos orejas. Empuje una de las
orejas para mover el gancho en una
dirección, y la otra para moverlo en la
dirección opuesta. Coloque los dos
ganchos en una posición aproximada,
abra la llave del agua y haga los ajus-
tes finales mientras el sistema esté
funcionando.


