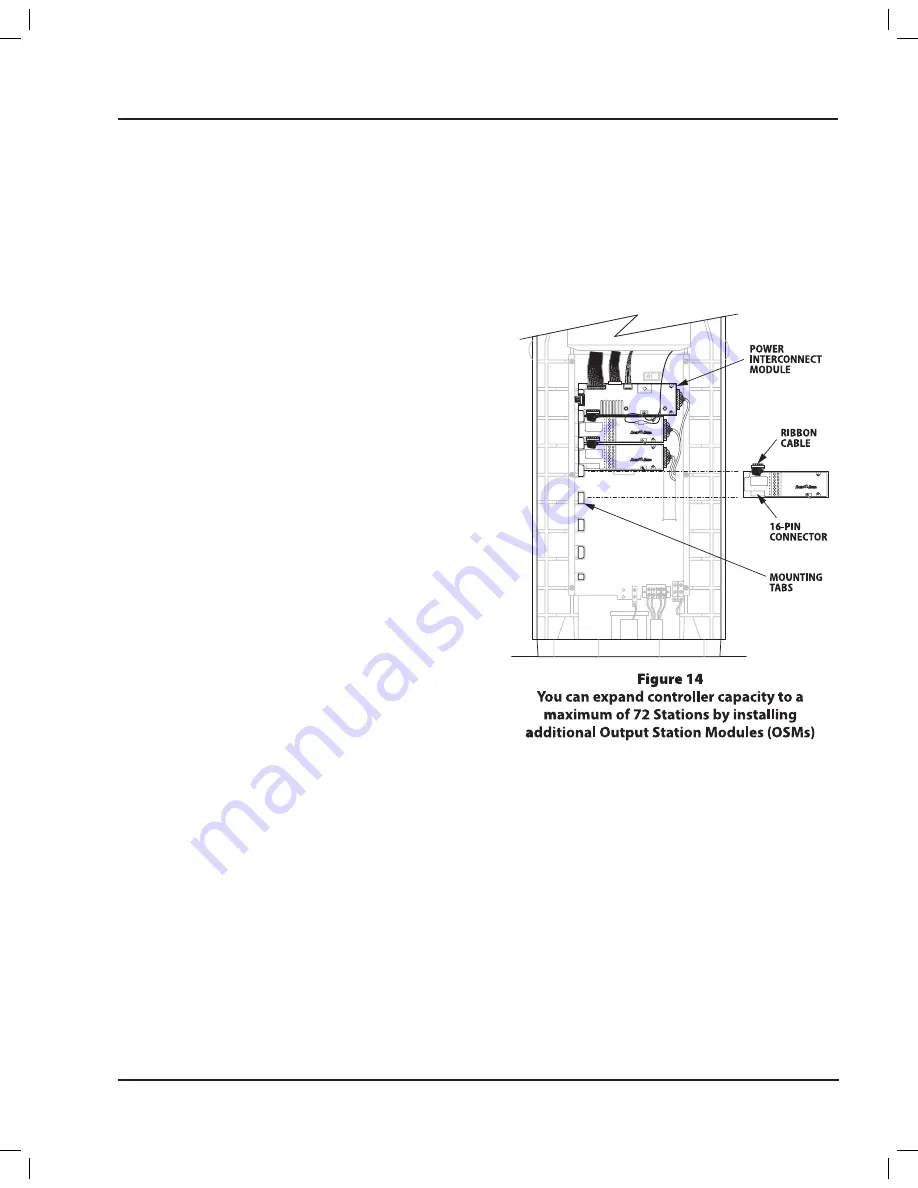
Install an Additional Output Station Module (OSM)
The basic PAR+ES controller comes with a minimum of
two OSMs (Output Station Modules) already installed�
The OSMs are mounted at the top of the power-board
mounting plate, just below the Power Interconnect
Module�
OSMs are held in place by two tabs on the left side of
the mounting plate, and by two screws on the right
side of the OSM board�
Each OSM can control up to eight stations, so the basic
2-OSM configuration can control a total of 16 stations
(each station can control up to four remote- control
valves)�
You can install a maximum of seven additional OSM
boards, expanding the controller’s capacity to a
maximum of 72 stations�
Installing Additional Output Station Modules
To install the new OSM(s), slide the left end of the
1.
OSM under the mounting tabs on the left side of
the power-board mounting plate�
Secure the right side of the OSM to the mounting
2.
plate with two #6-32 machine screws� OSMs for
stations 49-72 should be installed on swing out
of bracket� Refer to “Upgrade Kit Installation” for
instructions�
Repeat Steps 1 and 2 for each additional OSM�
3.
Ribbon Cable Connections
Insert the 16-wire ribbon cable coming from the
1.
top left of the new OSM into the 16-pin connector
on the bottom left of the OSM above it�
Repeat Step 1 to connect the ribbon cable for any
2.
other OSM(s) being installed�
Field Wire Connections
On the right end of each OSM board is an eight-pin
terminal station output connector�
Each station wire bundle is labeled with the numbers
of the stations it controls� Connect the bundled station
wires to the OSMs as follows:
Insert the appropriate eight-wire terminal block
1.
into the eight-pin connector on the right side of
the new OSM� For example, for OSM 3, insert the
field wire bundle labeled “Stations 17-24”�
Repeat Step 1 to connect the field wires for any
2.
other OSM(s) being installed�
Remember, each OSM controls eight station� (OSM
1 controls stations 1-8, OSM 2 controls stations 9-16,
OSM 3 controls stations 17-24, and so on)�
Make sure to connect the correct labeled field wire
bundle to the correct OSM�
PAR+ES Installation Manual
15
635778 Rev B (PAR+ES installation manual (1of2 ENG)) source.indd 15
9/2/2008 4:09:49 PM


