24
Connecting the Crossover to headunit or amplifier
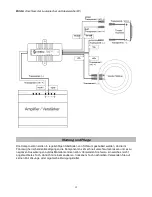
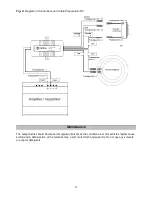
Run loudspeaker cable per each channel (left/right) from cable crossover (
W
) “Amp Input” to the head
unit / amplifier output according to
fig.6
making sure the polarity corresponds with that on the head unit /
amplifier side.
Run tweeter cable to the cable crossover (
W
) and attach negative tweeter cable (TW-) to the crossover
cable (TW-) on the “OUT” side of the cable crossover. Attach positive tweeter cable (TW+) at the cable
crossover “OUT” side to “TW-3dB+” for a gliding treble frequency response or to “TW-0dB+” for a flat
treble frequency response in vehicle.
ATTENTION! Danger of short circuit.
The unused tweeter cable of the tweeter crossover must be
insulated by insulating tape against short circuit resulting otherwise in destruction of the tweeter
crossover.
With all component systems, the tweeter range has been provided with a thermal protection device in the
crossover. This added measure protects the high-quality tweeter against overly high performance levels.
However, with extremely high performance levels, the thermal protection device will shut down the
tweeter to a low level. Once reduced the power to a normal level the thermal protection device will cool
down and will release tweeter from protection status after a few minutes.
In general, the loudspeaker cables should run in such a way that they are kept separate from the auto’s
electrical system, thereby preventing distortion from the generator and electrical wiring. The loudspeaker
cables can also be twisted together to help prevent distortion. Rolling up excess loudspeaker cable
length is not helpful, as it merely increases chances of distortion.

