background image

N24

48

26

79

N4

79

26

N15

N13

N27

N26

N11

81

N17

50

50

28

12

28

32

31

15

34

13

14

16

29

50

4

5

11

6

75

17

57

58

6

25

51

N20

N10

N1

N21

PARTS IDENTIFICATION

13

Summary of Contents for Super Funhouse

Page 1: ...in this playground equipment Read this manual before you start assembly Follow all instructions Be sure to educate all children who use this playground and all adult supervisors about the rules for sa...

Page 2: ...L RAINBOW PLAYGROUNDS AMERICA INC CUSTOMER SERVICE CENTER AT 1 888 201 1570 or E Mail customerservice rainbowplaygroundsamerica com Website www rainbowplaygroundsamerica com CUSTOMER SERVICE HOURS MON...

Page 3: ...your owner s registration card on the back cover in order to validate your warranty WARNING Failure to follow the assembly location use and maintenance instructions in this manual could result in seri...

Page 4: ...both ends 12 VERIFY all suspended items such as climbing ropes are tight so they cannot be looped back on themselves 13 INSTRUCT CHILDREN NOT TO attach items to the play system not specifically inten...

Page 5: ...en properly maintained Materials should be checked periodically and replenished to maintain correct depth as determined necessary for your equipment The choice of a material depends on the type and he...

Page 6: ...should be checked at least twice a month to ensure proper fastening 2 Oil all metallic moving parts and grease tire swivel monthly during the usage period 3 Verify all moving parts including swing se...

Page 7: ...Locate an area to sort your hardware in accordance to each step A solid surface such as the empty boxes are best to ensure you do not lose any hardware 4 Before starting each Step thoroughly read the...

Page 8: ...paration of the wood fibers running with the grain This is caused by varying temperature and moisture conditions By coating your Play System annually with a sealant or preservative you can help protec...

Page 9: ...4 x 4 3 3 8 x 3 3 8 2 x 4 1 3 8 x 3 1 4 2 x 6 1 3 8 x 5 1 4 1 x 6 5 8 x 5 1 4 1 x 4 5 8 x 3 1 4 2 x 10 1 1 2 x 9 1 4 PICTURE NOT SHOWN 4 x 6 3 3 8 x 5 3 8 Wood Legend 8...

Page 10: ...x 34 1 2 2 Hole Inside RW Board 1 1 x 6 x 34 1 2 RW Board w Rope Hole 2 1 x 6 x 34 1 2 2 Hole Outside RW Board 16 1 x 6 x 58 3 4 Roof Board 2 2 x 4 x 27 1 2 Rail Upright 2 2 x 4 x 84 Swing Beam Wing...

Page 11: ...ard 4 2 x 6 x 18 Ladder Step 1 2 x 6 x 55 1 2 Left Ladder Leg 1 2 x 6 x 55 1 2 Right Ladder Leg 2 2 x 6 x 42 Right Roof Support 2 2 x 6 x 42 Left Roof Support 2 2 x 10 x 10 Fan Center 2 4 x 4 x 93 Cor...

Page 12: ...3 1 4 PC Pipe Yellow 4 Safety Handle Yellow 1 Plaque 12 Rock 8 90 Bracket Brown 4 RW Ladder Bracket Brown 1 Ship s Wheel w Cap 1 Telescope 6 Rebar Stake 1 Swing Beam Plate Brown 2 Swing Beam Support P...

Page 13: ...shaped C Link 6 Wide jaw C Link 1 Half Bucket Swing Designed for ages 3 5 2 Swing Seat Blue 2 Trapeze Chain 6 Swing Chain 6 Swing Hanger 1 Trapeze Bar Yellow 2 Trapeze Ring Yellow N24 N1 Parts Not Sho...

Page 14: ...N24 48 26 79 N4 79 26 N15 N13 N27 N26 N11 81 N17 50 50 28 12 28 32 31 15 34 13 14 16 29 50 4 5 11 6 75 17 57 58 6 25 51 N20 N10 N1 N21 PARTS IDENTIFICATION 13...

Page 15: ...7 9 8 60 51 6 N71 27 75 76 N17 50 54 56 55 34 49 N9 33 29 N19 6 48 81 17 PARTS IDENTIFICATION 14...

Page 16: ...2 3 4 5 6 7 8 9 H30 H32 H34 H28 H17 H192 H170 H163 H164 H158 H152 H155 H11 H7 H1 H3 H4 H24 H93 H108 H116 NOTE Hardware is drawn to actual size except for H139 and H140 on page 16 15 HARDWARE FOR ASSEM...

Page 17: ...0 1 2 3 4 5 6 7 8 9 H124 H135 H131 H129 H126 H50 H56 H60 H140 H139 NOTE Thread length may vary from what is pictured H140 is 3 8 x 10 H139 is 3 8 x 9 16 HARDWARE FOR ASSEMBLY...

Page 18: ...ck Nut 3 8 5 46 0410 4 5 46 0506 8 H28 Acorn Nut 3 8 5 46 0410 4 5 46 0506 13 5 46 0514 2 H30 Round Pallet Nut 3 8 5 46 0506 6 5 46 0514 4 H32 4 Prong T Nut 1 4 5 46 0514 32 H34 4 Prong T Nut 3 8 5 46...

Page 19: ...lag bolts in first and check that measurements are correct and assembly is square before inserting top lag bolts 2 Attach 4 Hole Facia 50 to Corner Uprights 76 using 5 16 Hardware H108 and 1 4 Hardwa...

Page 20: ...ole Facias 50 must be offset as shown in Detail A 1 Stand up assemblies from Step 1 and attach 4 Hole Facias 50 to Corner Uprights 75 76 using 5 16 Hardware H108 and 1 4 Hardware H1 2 Ensure assemblie...

Page 21: ...h Rope Hole 52 and the Top Joist with Swing Holes 77 NOTE If installing Double Wall Wave Slide opposite of the swing beam B 4 Hole Facia w Rope Hole 52 and Arched Facia 51 must be installed as shown i...

Page 22: ...3 to 2 Hole Facias 28 using 8 Hardware H155 3 Center and attach Seat Runners 32 to Seat Boards 30 53 using 8 Hardware H155 NOTE Pre drill all holes for Lag Bolts with the appropriate drill bit 1 Attac...

Page 23: ...s 4 5 11 between Uprights and attach Deck Boards to Main Beams 49 using 8 Hardware H152 NOTE Deck Boards 4 5 11 must be evenly spaced and gaps between boards must not exceed 3 16 2 Center and attach D...

Page 24: ...ll bit 1 Attach Angled Braces 78 to Corner Uprights 75 76 using 5 16 Hardware H108 and 1 4 Hardware H1 The tops of the Angled Braces 78 should be touching the bottom of the Deck Boards 2 Attach Angled...

Page 25: ...Deck Boards NOTE Main Beams 49 must be oriented with the offset counter sunk holes down 2 Attach Main Beams 49 to Angled Braces 78 using 5 16 Hardware H108 and 1 4 Hardware H1 3 Attach Corner Facias...

Page 26: ...from the under side of the deck DETAIL A N8 H164 H164 35 49 1 Attach 90 Bracket N8 to Deck Runner 35 and Main Beams 49 on both ends of the Deck Runner 35 using 14 Hardware H164 as shown in Detail A 2...

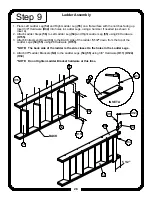
Page 27: ...Ladder Steps 56 to Left Ladder Leg 54 and Right Ladder Leg 55 using 8 Hardware H155 3 Attach Entrapment Board 33 to the BACK side of the ladder 5 1 2 down from the top of the Ladder Legs 54 55 using...

Page 28: ...the Main Beam 49 and 90 Ladder Brackets N9 should be centered vertically on the Facia NOTE Pre drill holes for 14 Hardware H164 with a 1 8 drill bit 2 Attach 90 Ladder Brackets N9 to Main Beam 49 usin...

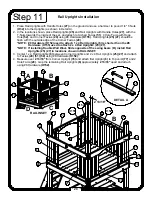
Page 29: ...25 27 should be flush with the outside edge of the Corner Facias 29 NOTE 8 Hardware H152 used to attach 1 x 4 Rail Uprights 6 is shorter than the 8 Hardware H155 used to attach 2 x 4 Rail Uprights 25...

Page 30: ...Pre drill holes for 14 Hardware H163 H164 with a 1 8 drill bit NOTE Position 90 Brackets so that the hardware does not hit the gaps between Deck Boards 2 Position 90 Brackets N8 on Deck and up agains...

Page 31: ...Rockwall Boards should be tight against each other and should not have gaps between boards 5 Check to make sure Rockwall Legs are still 33 7 8 apart and attach Rockwall Board with Rope Hole 15 to Roc...

Page 32: ...152 TOP ROCKWALL BOARDS WILL BE INSTALLED LATER 14 DETAIL A N9 H124 H11 H34 33 7 8 5 16 5 16 1 2 11 34 15 13 14 14 16 14 14 16 14 INSET B 14 13 16 H32 N21 H7 H170 INSET A 34 H34 13 14 16 H32 31 Step 1...

Page 33: ...Hardware H164 with a 1 8 drill bit 2 Attach Rockwall to the set by attaching 90 Degree Brackets N9 to the 4 Hole Facia 50 using 14 Hardware H164 NOTE Tighten all Hardware from Step 13 at this time 3 A...

Page 34: ...H30 NOTE Support Plates N11 must be oriented as shown 3 Position Swing Beam 81 between Support Plates and attach Swing Beam 81 to Swing Beam Support Legs 79 and Support Plates N11 using 3 8 Hardware H...

Page 35: ...NOTE Ground Runner 48 must be square with the Swing Beam Support Legs 79 2 Attach Swing Beam Support Legs 79 together with 3 1 4 PC Pipe N4 using 3 8 Hardware H3 H11 H17 H28 H139 Tighten hardware unti...

Page 36: ...Seat N15 and C Links N30 for the Half Bucket Swing N17 as shown in Inset A 3 Attach two Trapeze Chains N12 to Trapeze Bar N18 using C Links N30 as shown in Inset A 4 Attach Trapeze Rings N14 to Trapez...

Page 37: ...e H4 and 3 8 Hardware H56 H60 H3 H11 H17 NOTE Check level of Swing Beam at this time Slight adjustments can be made by adding or removing soil from under the Swing Beam Support If Swing Beam cannot be...

Page 38: ...ard Tie three single knots evenly spaced along the remaining Rope Insert end of Rope N1 into hole in Rockwall Board 15 and tie a double knot on the back side of the Rockwall NOTE Rope must be secure a...

Page 39: ...N24 H164 H7 NOTE Predrill holes for 14 Hardware H164 with a 1 8 drill bit 1 Center Slide N24 in the opening and attach to Facia using 1 4 Hardware H7 and 14 Hardware H164 38 Step 20 Slide Installation...

Page 40: ...in Ship s Wheel bag Snap Ship s Wheel Cover N20 into the center of Ship s Wheel NOTE Do not over tighten Ship s Wheel or it will not rotate freely 2 Attach Telescope Base N19 to Top Joist with Swing...

Page 41: ...barely move 3 While standing on the deck attach top Roof Board 17 to Roof Supports 57 58 using 8 Hardware H152 The top edge of the Roof Board 17 should be flush with the top edge of Roof Supports as...

Page 42: ...f Supports NOTE Roof Supports 57 58 must be 52 apart and pilot holes in Roof Boards 17 should line up with the center of the Roof Supports NOTE It may be necessary to stand on a ladder beside the set...

Page 43: ...Hardware H152 2 Attach Fan Rays 9 to the Fan Center 60 using 8 Hardware H152 The Fan Rays should be at approximately 45 angles between the Fan Horizontal and the Fan Vertical 3 Repeat 1 and 2 to make...

Page 44: ...nd attach to Corner Uprights and Swing Beam Support Legs using 1 4 Hardware H93 Stakes N28 should stick out 2 4 above the ground NOTE Stakes must be as close as possible to the Corner Uprights and Swi...

Page 45: ...les receipt or other means of proof of purchase 4 Provide a photo of the part or parts for your warranty claim and a photo of the complete set NOTE Failure to supply any information may result in clai...

Page 46: ...tomer s sole and exclusive remedy and lasts only as long as the original purchaser owns the playset and terminates if the original purchaser sells or otherwise transfers the unit It is recommended tha...

Page 47: ...LATION OF YOUR PLAY SET THIS WARRANTY CARD WILL BE USED ONLY FOR INTERNAL RECORDKEEPING PURPOSES AND TO VERIFY ORIGINAL OWNERSHIP OF YOUR PLAY SET IMPORTANT The wooden vcomponents in your Rainbow Play...

Page 48: ...nc 500 Rainbow Parkway Brookings SD 57006 Place Stamp Here If you would like to order replacement parts please contact Rainbow Playgrounds America Inc at 1 888 201 1570 or Email us at customerservice...

Page 49: ...____________ State______ Zip_________ Phone ____ ______________ 2 Number of children in family______ Ages_________________________________________ 3 Where purchased_________________________ City______...

Reviews: