background image


Installation into Rear Package Shelf  

 
Place the tweeter as close to the woofer as possible. Keep distance to rear window and headrests. The rear window 
reflects and increases the reproduction of trebles (shrill and piercing). Arrange the loudspeakers centred between 
rear window and headrests into the very right and left side. This is important for the stereophony. Should the rear 
package shelf vibrate it must be reinforced or attenuated. 
 

Positioning of the speaker at the rear-soundboard: 


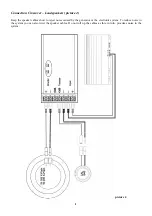
Installation and Mounting of Woofer  (illustration 1) 

 
Fix installation template on installation place and mark drilling holes. Make the cut-out for the chassis according to 
the template (for the woofer 160 mm Æ and 200 mm Ø you can use the grille as a template). Drill the holes in 
indicated size. Remove all metal chips carefully. File edges and use possibly profile protection or protective 
lacquer. Fasten the loudspeaker (B) as shown in illustration 1 on the installation place in a way that the loudspeaker 
connections will always be easily accessible. Use only the provided screws (G) 3.9 x 38 DIN 7981 and the 
provided sheet metal nuts (I) 3.9 mm. 

Do not touch the membrane and don't damage it with the screw driver! 

Align chassis, make sure that an even 

position is guaranteed and tighten finally. Do not over- tighten screws. Insert grille (A) into the adapter ring (C) and 
push in firmly. Prepare the cable connections according to instructions and check the system with low power (after 
the tweeter has been installed). After having checked the polarity and mechanical connections you can operate the 
system. 
 

Illustration 1: 


Summary of Contents for X-Line CS 265 X-Plain Pro

Page 1: ...ensystem 120 Watt Art Nr 231577 CS 220 X Plain 2 Wege Komponentensystem 150 Watt Art Nr 231148 Bitte Einbauanleitung vor Beginn der Arbeiten sorgf ltig lesen RAC GmbH Co KG y Postfach 12 25 y 74899 Ba...

Page 2: ...Frequenzweiche zum Zwecke der Ver nderung der Bauteile oder der Funktion Umbau auf Bi Amping ist nicht erlaubt Bei Nichtbeachtung erl schen die Garantieanspr che wegen Fremdeingriffs Aus sicherheitste...

Page 3: ...ise beachten Tieft ner ben tigen f r die Wiedergabe ein gro es Volumen Die Heckablage mit gro volumigem Kofferraum oder die T ren mit gro em Luftpolster zwischen T rverkleidung und Au enblech bieten d...

Page 4: ...echten Sitz und der rechte Hocht ner die linke T re bzw den linken Sitz anstrahlt Bitte f hren sie zur Hocht nerplazierung den oben genannten Versuch durch Die Tieft ner sollten nach M glichkeit im Fu...

Page 5: ...ufschieben Kabelverbindungen entsprechend den Anweisungen Seite 8 phasenrichtig herstellen und Tieft ner mit geringer Leistung auf Funktion berpr fen Lautsprecherchassis B in den Einbauring C einsetze...

Page 6: ...ng der Unterlegscheibe M4 T verwendet werden nicht zu fest anziehen Kompletthocht ner je nach vorgegebener Betriebsart Aktiv oder Passiv mit dem Verst rker oder der Frequenzweiche verbinden und Pegela...

Page 7: ...en die Hocht ner stark besch digt werden Achtung Sollten Kabel mit gr erem Querschnitt als 2 5 mm f r die Installation eingesetzt werden m ssen diese mit den entsprechenden Kabelschuhen nach DIN 46244...

Page 8: ...rit t am besten mit geeigneten Steckkontakten mit den vorhandenen Anschlu kabeln des Hocht ners rot schwarz verbinden Bei den Komponentensystemen besteht die M glichkeit an der Frequenzweiche die Inte...

Page 9: ...tauschen der Polarit t des Hocht ners sollte beim CS 220 X Plain grunds tzlich durchgef hrt werden Die Polarit t 0 bzw 180 welche das sch nere Klangbild erzeugt sollte danach beibehalten werden Bild 5...

Page 10: ...nicht mehr wiedergegeben werden Nur die Frequenzen ab 60 Hz bis 30 kHz stehen voll zur Verf gung Daher ist bei dieser Betriebsart ein Subwoofer unbedingt erforderlich welcher alle Frequenzen unterhal...

Page 11: ...Pro 120 watts art no 231577 CS 220 X Plain 150 watts art no 231148 Please read carefully before you start installation RAC GmbH Co KG y P O Box 12 25 y 74899 Bad Rappenau y Germany Phone 49 7066 9006...

Page 12: ...t the inner safety in your car and safety specifications of the car manufacturer Caution Important Operation Instructions Read carefully before you start installation Operate the loudspeakers only wit...

Page 13: ...hermal protection in the tweeter range is as important as the fundamental 12 dB slope in each range It is Rainbow standard to provide the SLC systems with complete mounting hardware To give your car a...

Page 14: ...to find a suitable installation place by using them as templates on the doors or the rear package shelf If you have experience with electrical and mechanical procedures you can install Rainbow loudspe...

Page 15: ...200 mm you can use the grille as a template Drill the holes in indicated size Remove all metal chips carefully File edges and use possibly profile protection or protective lacquer Fasten the loudspea...

Page 16: ...eter screws Fasten the angle mount cup O with the provided screw 3 9 x 13 R Insert the tweeter J into the angle mount cup O and pull the cables through the appropriate holes Adjust the tweeter J to th...

Page 17: ...washer M5 U and the hexagon nut M5 V Prepare the cable connections according to instructions and check the system with low power after installation of the woofer After having checked the polarity and...

Page 18: ...Keep the speaker cables short to reject noise caused by the generator or the electronic system To reduce noise in the system you can also twist the speaker cables Do not roll up the cables as this in...

Page 19: ...in the lower part of the door in the rear package shelf near the headrests or at the bottom of the kick space Also if an extensive upholstering in the car interior leads to an absorption of high frequ...

Reviews: