background image

Soil Preparation

4

* To build a full firm bed with no hollow spots, soil has to be 

  prepared properly.
* Proper soil moisture is important to form nice firm beds. For best  

   results, soil should not be powder dry or in muddy condition.
* There are many different types of soil. You will need to know what  

  soil preparation works best with your soil. 
* Machine performs the best if plowed 6” to 8” deep.
* Soil should be harrowed or roto-tilled until free of sod lumps.
* Sandy loam soils are the easiest to make square, uniform beds.

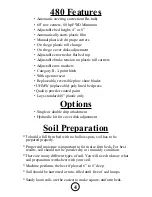
480 Features

Options

•  Automatic steering correction (Ro-trak)

•  60” row centers, 80 hp FWD Minimum

•  Adjustable bed height; 4” or 8”

•  Automatically starts plastic film

•  Manual plastic & drip tape cutters

•  On the go plastic roll change

•  On the go cover disks adjustment

•  Adjustable crowned or flat bed top

•  Adjustable brake tension on plastic roll carriers

•  Adjustable row markers

•  Category II, 3-point hitch

•  With operator seat

•  Replaceable, reversible plow share blades

• UHMW (replaceable) poly lined bed press

• Quality powder coated paint

•  Lays standard 48” plastic only

•  Single or double drip attachment

•  Hydraulic kit for cover disk adjustment

Summary of Contents for 480

Page 1: ...MODEL 480 RAISED BED PLASTIC MULCH LAYER OPERATING MANUAL...

Page 2: ...Tape Down Pipe 9 Features 4 Getting Started 5 Helpful Tips 5 17 Options 4 Parts Breakdown Descriptions Coming Soon Parts Breakdown Exploded Views Coming Soon Plastic Rolls Installing 8 Plastic Tension...

Page 3: ...owering the machine Use caution when turning around machine is 9 long Do not crawl under the machine when lifted Disk blades are sharp stay clear Do not sit on machine except designated seat Tractor o...

Page 4: ...s are the easiest to make square uniform beds 480 Features Options Automatic steering correction Ro trak 60 row centers 80 hp FWD Minimum Adjustable bed height 4 or 8 Automatically starts plastic film...

Page 5: ...hine 2 Load plastic roll into bottom roll cradle and spare roll into top cradle 3 Feed plastic through rollers page 8 4 Load driptape roll s onto carrier and feed through guides page 9 5 Compression r...

Page 6: ...2 Remove the four hand pins 3 Use the handles on the side plates to lift the bottom section until the top section is in a flat position 4 Reinstall the hand pins in the bed width setting preferred 5 R...

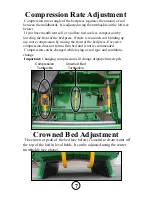
Page 7: ...il building up use more compression by raising the front of the bed press Excessive compression does not form a firm bed and is not reccommended Compression can be changed while laying as soil type an...

Page 8: ...almost empty the spare roll can be started without stopping This leaves only a seam across the bed 1 Adjust the spare roll tension so it can spin freely page 10 2 Feed plastic through rollers D and pu...

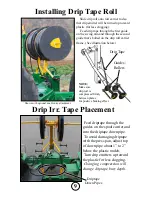
Page 9: ...carrier frame See illustration below NOTE Make sure drip roll is compressed firmly between plates for positive braking effect Feed driptape through the guides on the spool carrier and into the driptap...

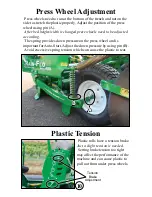
Page 10: ...ccording The spring provides down pressure on the press wheel and is important for Auto Start Adjust the down pressure by using pin B Avoid excessive spring tension which can cause the plastic to tear...

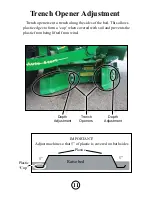
Page 11: ...covered on both sides 5 Plastic 5 Trench openers cut a trench along the sides of the bed This allows plastic edges to form a cup when covered with soil and prevents the plastic from being lifted from...

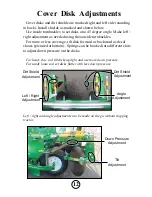
Page 12: ...Make left right adjustment as needed using the outside turnbuckles For more or less coverage tilt disk forward or backward as decal shows pictured at bottom Springs can be hooked into different slots...

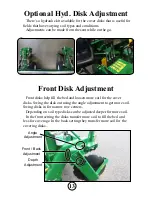
Page 13: ...soil type disks can be adjusted deeper for more soil In the front setting the disks transfer more soil to fill the bed and less for coverage In the back setting they transfer more soil for the coveri...

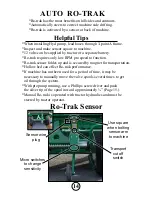
Page 14: ...d to function Ro trak sensor foldes up and is secured by magnet for transportation Hollow bed can effect Ro trak performance If machine has not been used for a period of time it may be necessary to ma...

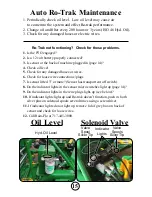
Page 15: ...ght up see below 10 If indicator lights light up and Ro trak doesn t function push in both silver pins on solenoid spools several times using a screwdriver 11 If indicator lights do not light up remov...

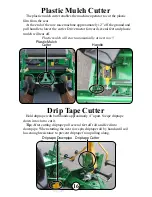
Page 16: ...tor forward several feet and plastic mulch will tear off Plastic mulch will start automatically at next row Drip Tape Cutter Hold driptape with both hands approximatly 4 apart Swipe driptape down into...

Page 17: ...ks and tires can be removed for this application Avoid over steering rear cover disk will move far and cut into plastic Careful steering will also provide more uniform coverage Stretching plastic in l...

Page 18: ...ig in more page 12 Adjust front disks deeper or move to back setting page 13 PROBLEM Plastic edges not staying under press wheels SOLUTION Tension too tight on plastic roll carrier page 10 Adjust pres...

Page 19: ...19...

Page 20: ...2019 Edition Rain Flo Irrigation 929 Reading Road East Earl PA 17519 PH 717 445 3000...

Reviews: