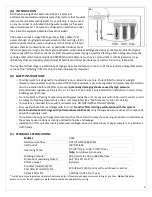
5
Step 5 : Start up
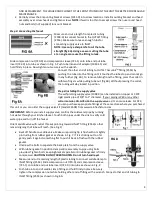
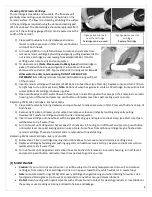
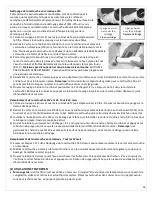
Remove wrapping from carbon cartridge (CF2) and carefully place it
into the sump (on the side of the inlet fitting – see page 8) with blue
gasket facing up. Align the sump under the filter head and pull the
cartridge up with one hand and push blue gasket over boss of white
head (see fig 9). Pull sump up and rotate clockwise 1/8 turn to align
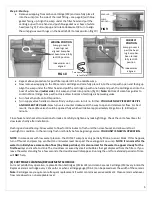
the sump grooves with lugs on the head (2501) to lock position (fig 10)
Repeat above procedure for post filter model LR1 in the middle sump
Now remove wrapping on the 1M ceramic cartridge and carefully place it into the sump with open end facing up.
Align the sump under the filter head and pull the cartridge up with one hand and push the cartridge seal into the
boss of white head (
outlet side
). Pull sump and lock into position (fig 10).
Note:
Bottom of sump has guides to
contain 1M cartridge. Sump will not lock unless bottom of cartridge is between guides.
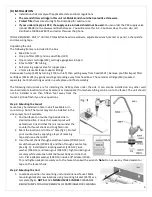
Turn faucet handle on to ON position.
Turn supply valve handle clockwise firmly until you can turn it no further.
YOU HAVE NOW PIERCED THE PIPE
AND CLOSED THE VALVE.
Now turn valve counter clockwise all the way to open and start water flow. For best
results, the saddle valve should be opened fully which will deliver approximately 3/4 gallons (2.8 litres) per
minute.
Close faucet and check all connections for leaks. Carefully retighten any leaking fittings. Check the unit a few times for
slow leaks shortly after installation.
Flushing and conditioning
: Allow water to flow for 10 minutes to flush unit then close faucet and allow unit to sit
overnight to condition. In the morning flush unit briefly before beginning service.
YOUR UNIT IS NOW IN OPERATION.
NOTE:
In some cases with low water pressure, the OUTLET sump may only partially fill due to an air block. If this happens,
turn off faucet and press top vent button until water level rises past the sealing point on sump.
NOTE: It is normal for the
water to initially have some carbon fines (tiny black particles). It is also normal for the water to appear cloudy for the
first few
days and is safe to drink. The cloudiness is caused by small air bubbles that get displaced from the filters. If you
leave the water standing for a few seconds, the cloudiness will disappear. Running the unit for extended periods of time
will
NO
T help.
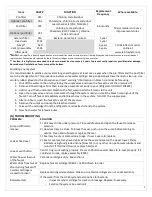
(E) CARTRIDGE CLEANING/REPLACEMENT SCHEDULE
For most satisfactory operation, replace Carbon Cartridges (CF2 & LR1) and clean Ceramic Cartridge (1M) every 6 months.
Replace ceramic cartridge every 12 months or when cartridge gauge (703-4) can be passed over the width of the ceramic.
Note:
Cartridges may require more frequent replacement if water contains excessive sediment. Clean ceramic whenever
flow rate slows to an unacceptable level.
WRONG POSITION
Sump grooves &
head lugs not
aligned. Sump has
not been turned fully
to LOCK position.
Index marks not
aligned
CORRECT
POSITION
Sump grooves is
past the head
lug. Sump has
been turned
fully to LOCK
position.
Index marks
aligned
Turn sump clockwise
to lock fully
HEAD LUG
SUMP
GROOVE
FIG 9
FIG 10


