6
Cleaning 1M Ceramic Cartridge
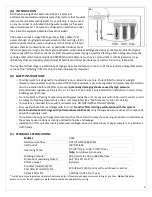
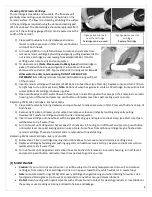
This cartridge is cleanable and reusable. The flow rate will
gradually slow during use as contaminants build up on the
ceramic surface. The flow is restored by scrubbing the surface
of the cartridge as required using the abrasive cleaning pad
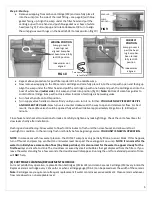
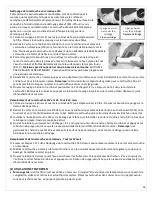
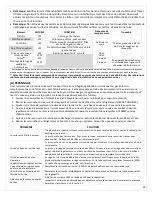
(811-0) enclosed. The 1M cartridge should be replaced after 1
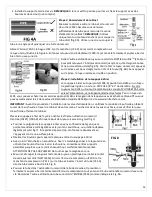
year or if the cartridges gauge (703-4) can be passed over the
width of the ceramic.
1)
Close saddle valve by turning clockwise and open
faucet to relieve pressure in filter. Press vent buttons
on top of both heads.
2)
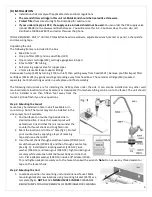
Turn sump 1/8th turn to left and lower to remove and at same time
remove ceramic cartridge by twisting and gently pulling downwards. Do
not remove cartridge by unscrewing from adaptor (2560). Transfer
cartridge and sump to sink and dump water.
3)
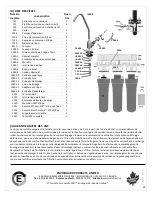
To clean ceramic,
(Note: Please wear rubber gloves)
hold cartridge in
palm of hand with nozzle up and gently scrub entire surface with
abrasive screen cleaner (811-0) provided under running water.
Do not
allow water to enter nozzle opening. DO NOT USE SOAP OR
DETERGENTS.
Scrubbing removes trapped particulates along with part
of the ceramic.
4)
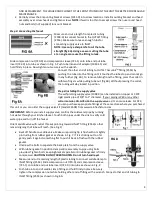
Insert ceramic cartridge with adaptor (2560) back into head boss (see
Start Up
).
Replace sump and turn 1/8 turn
to right fully to stop (lock position).
Note:
Bottom of sump has guides to contain 1M cartridge. Sump will not lock
unless bottom of cartridge is between guides.
5)
Open saddle valve to start water flow with faucet open until all trapped air has escaped. If air remains in ceramic
housing, turn off faucet and press top vent button until water level rises past sealing point on sump.
Replacing CF2 & LR1 Cartridges - Every 6 months
1)
Close saddle valve by turning clockwise and open faucet to relieve pressure in filter. Press vent buttons on top of
both heads.
2)
Remove right sump and lower and at same time remove carbon cartridge by twisting and gently pulling
downwards. Transfer cartridge and sump to sink and dump water.
3)
Insert new cartridge onto head boss with blue gasket facing up and replace and lock sump (see
Start Up
). Open
saddle valve to start water flow.
4)
Turn on faucet until trapped air has escaped. If air remains in housing, turn off faucet and press top vent button
until water level rises past sealing point on sump. Note: Some fines from carbon cartridge may be flushed onto
ceramic cartridge. These are harmless and are removed with next cleaning.
Replacing 1M Ceramic Cartridge - Every 12 months
1)
Follow steps 1 & 2 in cartridge cleaning instructions above to remove sump and ceramic cartridge only.
2)
Replace cartridge by twisting and pushing up gently on head boss (see
Start Up
). Replace and lock sump. Open
saddle valve to start water flow.
3)
Turn on faucet until trapped air and carbon fines are flushed. If air remains in ceramic housing, turn off faucet
and press top vent button until water level rises past sealing point on sump.
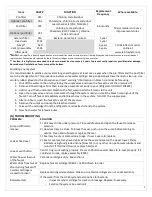
(F) MAINTENANCE
Caution:
If your unit is not used in winter, or will be subject to freezing temperatures, drain unit and remove
cartridges from sumps. Place cartridges in sink or on a paper towel to dry, which will occur in several days.
Note:
Lubricate Head O-rings (2502) after every cartridge change/cleaning and when draining for winter. Use
food grade silicone grease (i.e. Dow 111 compound) or any other non-petroleum lubricant.
Do Not
clean housing with organic solvents such as those found in sprays for cleaning products or insecticides as
these may cause cracking or crazing and lead to failure and leakage.
If gauge does not pass
over the cartridge
Cartridge can be reused
If gauge passes over the
cartridge
Replace Cartridge


