9
RainWise MK-III Users Guide
201
6
Revision
5)
Troubleshooting
Before calling customer support, check the cable connections to the receiver box and the display.
Make sure the cable is plugged in correctly - it should snap and lock into position on both ends.
If you do call, please have the serial number of your MK-III available, and please have the
display with you near the phone.
5.1)
Interference from Nearby RainWise Weather Stations
If your weather station is within signal range of another RainWise weather station, the rainfall
counts on your receiving unit will increase rapidly by 2.36" blocks until it reaches 99.99". This
will occur with or without actual rain. The solution to this problem is to change the station ID
code in your system as outlined below.
5.11)
418Mhz Weather Station
You must call RainWise to request firmware chips to physically swap out with your existing
firmware chips in the outside sensor assembly and display receiving devices. The IP 100 and
CC3000 must be sent to RainWise for reprogramming.
5.12)
LR Weather Station
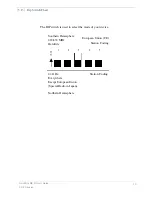
The code may be changed by dip switches located in the upper left corner of the motherboard.
The switches that change the code are #1 and #2.
1. Remove the solar panel cover by loosening the 4 screws in the corners. Carefully pull the
cover away far enough to unplug the solar panel from the motherboard and set aside.
2. Placing switch #1 in the "ON" position changes the code to 1, placing switch #2 in the
"ON" position changes the code to 2. Placing switches #1 and #2 in the "ON" position
changes the code to 3.
3. Plug the solar panel back into the motherboard and secure the solar panel cover to the
enclosure by replacing and tightening the 4 screws.
The code in your receiving devices must match the code set in your sensor assembly. Refer to
the Owner’s Manual of the appropriate receiving device for instructions to change the codes.

