background image

68

7

18,19

1,2,3,6

11,12,13

4

1,2,3,6
5

9

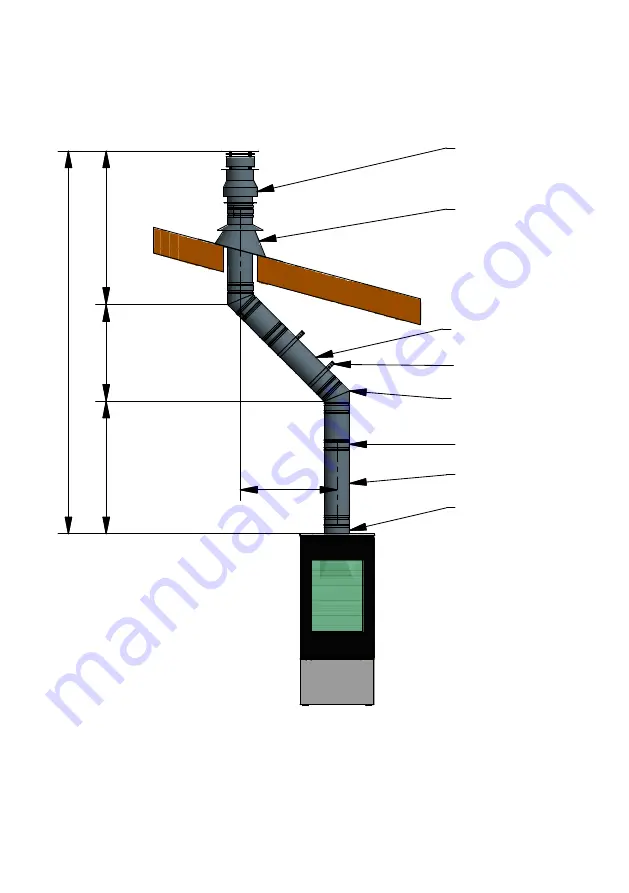
V1

V2

V3

V

H

Vertical Pitched Roof Terminal

Distance ”H” 

= 0-3m (Min - Max)

Distance ”V1”  = 500mm - 10m (Min - Max)

Distance ”V2”  = 200mm - 10m (Min - Max)

Distance ”V3”  = 500mm - 10m (Min - Max)

Distance ”V”   = (=V1+V2+V3) = 1.2m - 12m 

(Min - Max)
Distance ”V” = 2 X ”H” (Min)

UK

Summary of Contents for NEXO Series

Page 1: ...1 POSITIV N E X O G A S GB UK...

Page 2: ...G31 30 mbar G31 37 mbar G31 50 mbar G30 G31 30 mbar G30 G31 50 mbar 9 1 9 1 9 1 8 4 7 5 8 5 8 7 8 8 8 8 36 27 36 36 28 27 36 16 6 13 4 13 2 16 4 13 2 13 2 AT BG CH CZ DK EE ES FI GB GR HR IE IT LT LV...

Page 3: ...ss NEXO 120 Gas without side glass NEXO 120 G Gas with side glass NEXO 120 Classic Gas without side glass NEXO 120 G Classic Gas with side glass NEXO 140 Gas without side glass NEXO 140 G Gas with sid...

Page 4: ...ALL 25 CHIMNEY VENT 26 LOCATION OF CHIMNEY TERMINALS 27 HORIZONTAL WALL TERMINAL TYPE C11 28 VERTICAL ROOF TERMINAL C31 29 ASSEMBLY OF SECONDARY BURNER 30 Arrangement of Embers and Logs 31 START UP BA...

Page 5: ...leasure and benefit from your new stove it is important that you read the manual thoroughly before it is installed and put to use For the purpose of the guarantee and all contact regarding the stove i...

Page 6: ...mishes batteries The guarantee is invalidated in the event of damage due to overfiring damage due to external influences and the use of unsuitable fuels failure to comply with statutory or recommended...

Page 7: ...180 Approx 180 Stove width depth height mm 446 398 1025 446 398 1235 446 398 1426 446 398 1601 446 398 1861 Weight kg min depending on model approx 125 approx 140 approx 156 approx 166 approx 190 Eff...

Page 8: ...les fitted with a gas regulator Low pressure regulator providing the correct gas pressure may be connected For this reason gas bottles without a regulator must not be connected This stove must only be...

Page 9: ...r combustion This product is a heating appliance so the surfaces become very hot and should not be touched during use It is therefore recom mended that you use an approved stove screen to protect chil...

Page 10: ...off the stove at the isolation tap and the gas meter Ventilate the room by opening windows and doors do not use electrical appliances in the vicinity of the stove Or operate any electrical switches Th...

Page 11: ...ing gas type and pressure is in accordance with the local gas supply conditions under which the stove is to be installed You should ensure that the gas supply can supply the required quantity of gas a...

Page 12: ...t the gas supply and stove can be connected As this stove has a sealed combustion chamber and a built in plinth there is no need for a floor slab The installation must comply with the Building Regulat...

Page 13: ...r than the distances stated in the following sections with regard to installation risk of fire When you choose where you wish to position your stove you should consider the heat distribution to the ot...

Page 14: ...the bot tom surface of the stove And remove it 4 Unscrew the outer cover plate at the rear of the stove and move it to the upper sur face of the stove 3 To open the door a 14mm open ended span ner is...

Page 15: ...emoved and the inter nal cover plate dismounted 7 If the ceramic logs are fitted remove these 10 The internal cover plate is now fitted to the un derside of the top plate as shown It is vital that thi...

Page 16: ...ed gas LPG The conversion must only be carried out by a Gas Safe Registered engineer Conversion kit Use article number 3713595 This set contains 4 new injectors suitable for propane LPG gas The inject...

Page 17: ...tor for the pilot light for LPG is marked 27 The injector for the pilot light for natural gas is marked 32 The injector for the main burner for LPG is marked 80 The injector for the main burner for na...

Page 18: ...eds to be dismantled to gain access to the injectors Do this in the following manner Lift the perforated plate up and out of the stove Loosen the four screws holding the gas unit in place UK Remove th...

Page 19: ...Loosen the locknut and then unscrew the injector Fit the LPG injector and tighten the lock nut Finally re tighten the coupling Once the gas unit has been dismounted replace the four injectors and adj...

Page 20: ...en unscrewing the injec tor Fit the LPG injector and tighten the lock nut Finally re tighten the coupling Replace the injector for the pilot light by loosening the coupling and carefully pull ing the...

Page 21: ...ke by 90 So that both holes in the vertical pipe are now open the small one at the rear and the large one at the front Small hole at the rear Large hole at the front The air intake to the main burner...

Page 22: ...ured for LPG The gas unit is reassembled using the four screws Replace the perforat ed plate and fully assemble the stove See Section Assembly of secondary burners UK Burner pressure is adjusted accor...

Page 23: ...e you can contact your building architect or the local building authorities It must be ensured that flammable objects e g furniture are not positioned closer than the distances stated in the following...

Page 24: ...Drawing n INDUSTR Phon E ma 1 50 300 198 223 Normal installation at right angle With side glass A Furniture distance min 700 mm Distance to flammable material min D rear wall 50 mm E to side to wall...

Page 25: ...25 Project Drawing nam INDUSTRIV Phone E mail 10 50 50 4 8 5 3 293 293 Corner installation 45 Without side glass A Furniture distance min 700 mm Distance to flammable material min D rear wall 50 mm UK...

Page 26: ...26 Projec Drawin INDU P E 150 150 626 7 293 293 Corner installation 45 With side glass A Furniture distance min 700 mm Distance to flammable material min D rear wall 150 mm UK...

Page 27: ...o Revision Project Drawing name INDUSTRIVEJ 20 9900 FREDERIKSHAVN DENMARK Phone 45 98 47 90 33 Fax 45 98 47 92 91 E mail info rais dk Homepage www rais dk Corrections D M Y ksj NEXO GAS ikke br ndbar...

Page 28: ...s are Jeremias Muelink Grol Pou joulat PGI Joints at vent pipes must be airtight and protected against separation by using locking bands or suitable rivets screws If possible a measuring connection pi...

Page 29: ...tical drainpipe or earth pipe 300 H From an internal or external corner 600 I Overground roof or balcony level 300 J From a surface facing the terminal 600 K From a terminal facing the terminal 600 L...

Page 30: ...1 for 130 200 pipe 2 X Vertical outlet pipe length V for 100 150 pipe Maximum permissible length H 15M Minimum vertical height of outlet pipe 0 5m vertical length of out let pipe V in metres Maximum...

Page 31: ...0 Adapter can be used so that you can use 130 200 after the adapter Outlet terminal 130 200 Art no USDVC 130 100 150 Art no USDVC 100 Minimum vertical length of outlet pipe 0 5m Flue gas Limiter to 10...

Page 32: ...ed above the pipes sticking through the perforated plate Note that there is a right burner and a left one so it is important that they are posi tioned as shown i e that the side with the extra holes f...

Page 33: ...r are not covered over And that no glowing material finds its way down under the pilot plate guard The other thermosensor must also be kept free of the ceramic Embers When commissioning or servicing t...

Page 34: ...34 ceramic Logs Log 1 Log 2 Log 3 Log 4 Log 6 Log A Log B UK Log 5...

Page 35: ...Be sure not to block the holes of the center burner Position the 8 logs as shown Note the two special logs marked A and B have a groove moulded on their undersides that fits on top of the two seconda...

Page 36: ...36 4 3 5 Log 3 Log 4 Log 5 UK...

Page 37: ...37 6 A B Log 6 Log A Log B UK...

Page 38: ...ut of the box The receiver uses 4 x AA 1 5 V batteries Remember to replace the battery cover Start up Insertion of Batteries The receiver on the stove and the remote con trol use batteries A set of ba...

Page 39: ...39 The batteries in the receiver must face the directions shown in the illustration The remote control uses 2 x AA 1 5 V batteries UK...

Page 40: ...mote control are synchronised in the following manner Press and hold down the Reset button until you hear a short beep followed by a long beep Release the button Now you have 20 seconds to press the D...

Page 41: ...ns ignited 3 Turn off the pilot light Check the functioning of the main burner 1 Turn on the pilot light 2 Turn on the main burner 3 Check that the cross ignition from the pilot light to the main burn...

Page 42: ...when the stove only has the pilot light ignited 5 If the pressure is low check that the gas supply pipes are the correct size 6 If the inlet pressure is too high more than 5 mbar over the gas sup ply...

Page 43: ...the initial ignition This is because the paintwork and ma terial need to harden but the smell will quickly disappear Ensure there is a lot of ventilation preferably a draught Children and pets should...

Page 44: ...e version is displayed Model number of the handset Press on the and buttons at the same time Now the model number of the handset is dis played NOTE When you press on a deactivated button nothing happe...

Page 45: ...on the or button 7 This is confirmed by pressing the and buttons at the same time or waiting Change between C and F by pressing and holding the and buttons at the same time NOTE When F is selected a...

Page 46: ...a short beep and a se ries of flashing lines confirm that the start sequence has commenced Then release the buttons The main gas supply starts as soon as pilot ignition is confirmed The handset automa...

Page 47: ...erature set The flame height is then adjusted automatically to reach the temperature set Program mode PROGRAMS 1 and 2 can both be programmed to start or stop at specific times at a set temperature Ec...

Page 48: ...efly and HOUR flashes 13 Select hour by pressing on the or button 14 This is confirmed by pressing on the button 1 OFF is displayed ALL is displayed briefly and Min utes flashes 15 Select minutes by p...

Page 49: ...or several week days or for all days of the week Wait until set up is complete HELP MODE After ignition burner 1 is ignited and burner 2 is in the last setting ON A burner is ignited by pressing the b...

Page 50: ...50 UK...

Page 51: ...51 UK...

Page 52: ...sors must not be bent or adjusted 7 Put on the gas supply and check for leaks Check that the burners and pilot unit are in good condition and work 8 Refit the perforated plate 9 Refit embers and ceram...

Page 53: ...External cleaning is done using a soft dry cloth or brush only Before each new heating season the chimney and flue gas connection piece should always be checked for blockages Check the stove external...

Page 54: ...can be raised a little Fittings on the underside of the pilot unit can be loosened by means of a 10 mm open ended span ner The thermosensor and pilot burner can be replaced To gain access to the nozzl...

Page 55: ...work 3713507 MyFire Wi Fi Box incl cable App based control of the stove 10 0000 060980 Topplate B O Stainless Back Outlet 10 0000 061080 Topplate T O Stainless Top Outlet 10 0000 061170 Top plate NEXO...

Page 56: ...56 UK...

Page 57: ...the stove door and inserting the narrow plug on the Wi Fi lead into the opening marked SI The wide plug on the Wi Fi lead is inserted into the Wi Fi box When connecting the Wi Fi box use the mains ada...

Page 58: ...you need to ensure That a home network is available That the name and access code of the home network are correct That the Wi Fi router s SSID key is not hidden That the home network s signal is withi...

Page 59: ...laceable parts can be purchased as spare parts from your RAIS atti ka dealer See spare part drawings back of the manual xx optional colour code UK Pos Number Article no Description 1 1 10 0000 100490...

Page 60: ...ings back of the manual xx optional colour code Pos Number Article no Description 1 1 10 0000 100490 Glass door 2 1 10 0000 1005XX Classic Glass door 3 1 10 0000 0601XX Top plate for rear outlet 4 1 1...

Page 61: ...RA10L76 Burner Raised Assembly Left 13 RA10R76 Burner Raised Assembly Right 14 RK10P07 Complete Burner Assembly Natural RK10N07 Complete Burner Assembly LPG 15 RK10 SEAL 05 Burner Seal Set 16 3711213...

Page 62: ...1 at 37 mbar I3B P 50 G30 G31at 50 DE Germany I2ELL G25 at 20 mbar I2E G20 at 20 mbarI 3P 50 G31 at 50 mbar I3B P 50 G30 G31 at 50 DK Denmark I2H G20 at 20 mbar I3B P 30 G30 G31 at 30 mbar EE Estonia...

Page 63: ...r NL The Neth erlands I2L G25 at 25 mbar I2EK G25 3 at 25 mbar I3P 50 G31 at 50 mbar I3P 30 G31 at 30 mbar I3P 37 G31 at 37 mbar I3B P 30 G30 G31 at 30 mbar NO Norway I2H G20 at 20 mbar I3B P 30 G30 G...

Page 64: ...m hr 0 84 0 840 0 905 0 89 0 8 Burner Pressure hot mbar 13 2 13 2 16 4 16 6 13 4 Injector Marking 120 Centre 260 Left 260 Right Pilot G30 ZP2 312 31 2 inj Efficiency Class 2 Nox Class 5 Type C11 C31...

Page 65: ...5 Consumption m hr 0 225 0 225 0 29 0 29 0 29 0 253 Burner Pressure hot mbar 27 27 36 36 36 28 Injector Marking 80 Centre 100 Left 100 Right Pilot G30 ZP2 271 27 1 inj Efficiency Class 2 Nox Class 5 T...

Page 66: ...66 0 5m V 0 5m 5 4 20 1 2 3 6 839 7 EXAMPLES OF CHIMNEY SOLUTIONS Vertical Roof Terminal Distance V 500mm 12m min Max UK...

Page 67: ...F 17 2 3 17 1 3 1 2 3 6 5 Vertical Roof Terminal Renovation kit PT 3 of 3 PT 1 of 3 PT 2 of 3 Flexible flue insert 100 AISI 316Ti If the existing chimney is not completely sound the air inlet must al...

Page 68: ...1 2 3 6 5 9 V1 V2 V3 V H Vertical Pitched Roof Terminal Distance H 0 3m Min Max Distance V1 500mm 10m Min Max Distance V2 200mm 10m Min Max Distance V3 500mm 10m Min Max Distance V V1 V2 V3 1 2m 12m M...

Page 69: ...8 19 1 2 3 6 9 1 2 3 6 11 4 1 2 3 6 5 4 20 Vertical Roof Terminal with Bend Distance H 0 3m Min Max Distance V1 500mm 10m Min Max Distance V2 500mm 10m Min Max Distance V V1 V2 1m 12m Min Max Distance...

Page 70: ...ations kit PT 3 of 3 PT 1 of 3 PT 2 of 3 Flexible flue insert 100 AISI 316Ti Distance V 1m 12m Min Max Existing chimney Flue must be inspected by a qualified technician If the existing chimney is not...

Page 71: ...of 3 Distance H 0 3m Min Max Distance V1 500mm 10m Min Max Distance V2 200mm 10m Min Max Distance V3 500mm 10 m Min Max Distance V V1 V2 V3 1 2m 12m Min Max Distance V 2 X H Min Existing chimney with...

Page 72: ...72 Vertical Roof Terminal with Back outlet for more information see paragraph Location of chimney terminals UK...

Page 73: ...73 Horizontal wall Terminal for more information see paragraph Location of chimney terminals UK...

Page 74: ...74 Snorkel Snorkel Top outlet Back outlet Horizontal wall Terminal for more information see paragraph Location of chimney terminals UK...

Page 75: ...2 US 50 100 100 US 50 130 130 Length 500mm 3 US 100 100 100 US 100 130 130 Length 1000mm 4 USKB 100 100 USKB 130 130 Locking band 5 USAB 100 100 USAB 130 130 Protective band UK 1 US 25 100 100 US 25...

Page 76: ...0 USPP 130 130 Adjustable length 7 USDV2 100 100 Vertical Terminal USKB 8 USDHCE 10 Horizontal Terminal Eccentric outlet 9 USEB 100 100 USEB 130 130 Fitting strap 10 USMB 100 100 USMB 130 130 Adjustab...

Page 77: ...w bend 14 USSR 100 100 USSR 130 130 Cover 12 USB 45 100 100 USB 45 130 130 45 elbow bend 15 USDPAL 100 100 USDPAL 130 130 Flat roof Cover Aluminium 13 USB 15 100 100 USB 15 130 130 15 elbow bend 16 US...

Page 78: ...ustable Cover Supplied as a pair 18 USDH 100 100 USDH 130 130 Angular Cover 5 30 21 USMPG 100 100 USMPG 130 130 Wall Cover 19 USLS 100 100 USLS 130 130 Angular Cover 20 45 22 ADAPTOR UNIVERSAL SYSTEM...

Page 79: ...in conformity with the declared performance in point 8 This declaration of performance is issued under the sole responsibility of the manufacturer identified in point 4 Signed for and on behalf of the...

Page 80: ...0 n134 n187 0 115 853 1025 0 271 278 439 869 1025 NEXO 100 Gas dimensional drawing A A 361 390 440 n30 n134 n187 0 115 853 1025 0 271 278 439 869 1025 A A 361 390 440 n30 n134 n187 0 115 853 1025 0 27...

Page 81: ...nal drawing A A 571 390 0 481 488 649 1079 1235 440 n187 n134 n30 0 115 1063 1235 A A 571 390 0 481 488 649 1079 1235 440 n187 n134 n30 0 115 1063 1235 A A 571 390 0 481 488 649 1079 1235 440 n187 n13...

Page 82: ...NEXO 140 Gas dimensional drawing 390 440 n187 n134 n30 0 115 1063 1221 1426 0 481 488 649 1079 1426 390 440 n187 n134 n30 0 481 488 649 1079 1426 390 440 n187 n134 n30 0 481 488 649 1079 1426...

Page 83: ...s M ltegning 390 440 0 481 488 649 1079 1601 0 115 1063 1221 1601 n134 n30 n187 390 440 0 481 488 649 1079 1601 0 115 1063 1221 1601 n134 n30 n187 390 440 0 481 488 649 1079 1601 0 115 1063 1221 1601...

Page 84: ...s M ltegning 390 440 n187 n134 n30 0 481 488 649 1079 1861 0 115 1063 1221 1861 390 440 n187 n134 n30 0 481 488 649 1079 1861 0 115 1063 1221 1861 390 440 n187 n134 n30 0 481 488 649 1079 1861 0 115 1...

Page 85: ...1 2 3 4 5 NEXO Gas 100 120 140 160 185...

Page 86: ...86 1 2 3 4 5 8 6 9 8 7 10 NEXO G Gas 100 120 140 160 185...

Page 87: ...87...

Page 88: ...RAIS A S Industrivej 20 DK 9900 Frederikshavn Denmark www rais dk ATTIKA FEUER AG Brunnmatt 16 CH 6330 Cham Switzerland www attika ch...

Reviews: