background image

88

Vlaams                       Gebruikershandleiding voor RAIS Rina, RAIS Viva, RAIS Juno

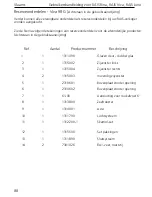
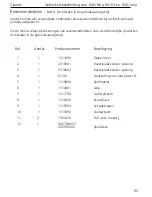
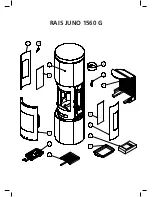
Reserveonderdelen - Viva 98 G (

Achteraan in de gebruiksaanwijzing

)

Verder kunnen alle vervangbare onderdelen als reserveonderdelen bij uw RAIS-verkoper 

worden aangekocht.

Zie de hierna volgende tekeningen van reserveonderdelen voor de afzonderlijke producten
(Achteraan in de gebruiksaanwijzing)

          Ref. 


Aantal           Productnummer  

Beschrijving


   1   

    1 


1311090 


Glazen deur - dubbel glas

        2   

    1 


1315002 


Zijvenster links

        3   

    1 


1315004 


Zijvenster rechts

        4   

    2 


1315003 


Inwendig zijvenster

        5   

    1 

             2310601 


Bovenplaat zonder opening

        6   

    1 


2310602 


Bovenplaat zonder opening

        7   

    1 


61-00   


Aansluiting voor rookafvoer


6”

        8   

    1 


1313800 


Zeefrooster

        9   

    1 


1314001 


Asla

        10  

    1 

             1311790 


Luchtsysteem

        11  

    1     

1312200-1 


Skamol-set


        12  

    1 


1315500 


Set pakkingen          

        13  

    1 


1311890 


Sluitsysteem

        14  

    2 


7301026 


BA1-veer, roestvrij

Summary of Contents for RINA

Page 1: ...S Manual for RAIS Rina RAIS Viva RAIS Juno U S E R M A N U A L M A N U A L D U T I L I S AT E U R G E B R U I K E R S H A N D L E I D I N G RAIS Rina RAIS Viva RAIS Juno N O R D I S K MILJ M RKN I N G...

Page 2: ...en und befolgen Sie die Bedienungsanleitung Zeitbrandfeuerst tte Nur empfohlene Brennstoffe einsetzen UK Fuel types only recommended Follow the installation and operating instruction manual Intermitte...

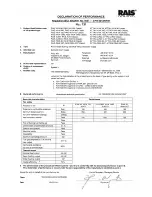
Page 3: ...20 Classic JUNO JUNO Classic EN 13240 2001 A2 2004 Raumheizer f r feste Brennstoffe Appliance fired by wood Po le pour combustibles solides Produced at RAIS A S Industrivej 20 9900 Frederikshavn Danma...

Page 4: ...rning stove Utilisation du po le Gebruik van de kachel Adjustment of the air damper R glage du volet d air Insellen van de klep Position 1 Position 1 Stand 1 Position 2 Position 2 Stand 2 Position 3 P...

Page 5: ...1 Effective lighting Use dry brushwood kindling and possible a piece of news paper Open the air damper so plenty of air is fed to the stove and the gases from the heated wood can burn rapidly 2 Light...

Page 6: ...THE INSTALLER 18 OPERATING INSTRUCTIONS 19 FUEL 19 20 DRYING AND STORAGE 21 REGULATION OF COMBUSTION AIR 21 ROOM VENTILATION AND STOVES 21 USING THE WOOD BURNING STOVE 22 ADJUSTMENT OF AIR DAMPER 22...

Page 7: ...ove it is important that you read the manual thoroughly before installing and using it In the case of warranty coverage and for general queries regarding your wood burning stove it is important that y...

Page 8: ...ight mm 295 225 393 295 225 393 320 225 393 295 225 393 320 225 393 295 225 393 320 225 393 Recommended amount of wood when fuelling kg Distributed on 2 3 logs of wood of approx 25 cm 1 2 1 2 1 2 1 2...

Page 9: ...e The installation of this heating appliance is governed by the Health and Safety at Work Act 1974 It is the responsibility of the installer to ensure that all requirements of this Act are met during...

Page 10: ...ure given in BS 5854 1980 may be used as the basis for deciding whether a particular chimney design will provide sufficient draught The outlet from the chimney should be above the roof of the building...

Page 11: ...off the flue entirely but should in its closed position leave a minimum continuous opening free area of at least 20 of the total cross sectional area of the flue or fluepipe Adequate provision e g ea...

Page 12: ...aced in such a man ner that the air supply is not blocked The floor structure must be able to carry the weight of the wood burning stove as well as the weight of a chimney if necessary When you choose...

Page 13: ...knock out plate at the rear of stove Remove the blanking plate and the packing and position them in the hovle at the top Ensure that the packing is positioned correctly Screw all elements together wit...

Page 14: ...tible hearth of a size and construc tion that is in accordance with the provisions of the current UK Building Regulations Ap proved Document J If the stove is to be installed on a wooden floor it must...

Page 15: ...na RAIS Viva RAIS Juno Normal set up corner setting Rais Rina A Distance to furniture 700 mm Distance to flammable materials B in front floor 300 mm C to the side floor 150 mm D to the rear wall 150 m...

Page 16: ...p corner setting Rais Viva Rais Juno Rais Viva G Rais Juno G A Distance to furniture 700 mm 650 mm Distance to flammable materials B in front floor 300 mm 300 mm C to the side floor 150 mm 150 mm D to...

Page 17: ...IS Rina RAIS Viva RAIS Juno Corner setting 45 Rais Rina A Distance to furniture 700 mm Distance to flammable materials B in front floor 300 mm C to the side floor 150 mm D to the rear wall 150 mm E to...

Page 18: ...setting 45 Rais Viva Rais Juno Rais Viva G Rais Juno G A Distance to furniture 700 mm 650 mm Distance to flammable materials B in front floor 300 mm 300 mm C to the side floor 150 mm 150 mm D to the...

Page 19: ...RAIS Manual for RAIS Rina RAIS Viva RAIS Juno 360 swivel base Rais Viva Rais Juno Rais Viva G Rais Juno G A Distance to furniture 700 mm 650 mm Distance to flammable materials B to the side floor 300...

Page 20: ...Rina RAIS Viva RAIS Juno Installation distance in case of non combustible wall We recommend a minimum distance to non combustible material of 50 mm F for cleaning considerations It should always be po...

Page 21: ...appliance connections to the chimney Ensure that the appliance and chimney flue are functioning correctly before finally hand ing over to the user If necessary read the later parts of this manual for...

Page 22: ...inated or impregnated wood wood with a synthetic surface painted refuse wood chipboard plywood domestic waste paper bri quettes and pit coal as this will produce malodorous smoke which could be poison...

Page 23: ...om b Let the fire out or eject and safely dispose of fuel from the appliance c Check for flue or chimney blockage and clean if required d Do not attempt to relight the fire until the cause of the fume...

Page 24: ...n chamber and is pre heated through the side channels and then emitted as hot scav enging air onto the glass The hot air rinses the glass and keeps it soot free The tertiary channel which can be seen...

Page 25: ...f Start with a small fire so that the wood burning stove can get accustomed to the high temperature This gives the best start and any damage is avoided Be aware that a strange but harmless odour and s...

Page 26: ...et the air damper to fully open position Light the fire and close the door 3 4 When the flames are clear after approx 10 15 min close the door completely 5 Damper see adjustment of air damper When the...

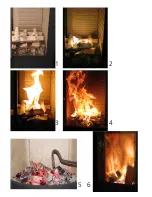
Page 27: ...t ndes op i ovnen Hvis der kun er f gl der tilbage skal der t ndes op forfra Hvis man bare l gger br nde p t ndes b let ikke derimod udvikles der uforbr ndte r ggasser Her er der lagt tr p et for lill...

Page 28: ...on chamber the wood will burn at its best with a layer of ashes of approx 20 mm Prolonged period of non use If the stove is to be left unused for a prolonged period of time then it should be given a t...

Page 29: ...d too little air supply for room ventilation unclean smoke channels leaky chimney leakage between chimney and flue If your stove continues to malfunction we recommend that you contact your RAIS dis tr...

Page 30: ...er for wood compartment 3 1 3310601 Top plate without hole 4 1 3310602 Top plate with hole 5 1 61 00 Flue collar 6 6 1 1313800 Shaking grate 7 1 1314001 Ash pan 8 1 1311790 Air box 9 1 1312200 Fire br...

Page 31: ...ividual products Pos Ref Quantity Part no Description 1 1 1311090 Glass door double glass 2 1 1315002 Left side glass 3 1 1315004 Right side glass 4 2 1315003 Inner glass side 5 1 2310601 Top plate wi...

Page 32: ...ibutor See the following spare parts diagrams for the individual products Ref Antall Varenr Beskrivelse 1 1 1312090 Glass door 2 1 2310601 Top plate without hole 3 1 2310602 Top plate with holel 4 1 6...

Page 33: ...dividual products Pos Ref Quantity Part no Description 1 1 1311090 Glass door double glass 2 1 1315002 Left side glass 3 1 1315004 Right side glass 4 2 1315003 Inner glass side 5 1 2310601 Top plate w...

Page 34: ...tor See the following spare parts diagrams for the individual products Pos Ref Quantity Part no Description 1 1 1312090 Glass door 2 1 2310601 Top plate without hole 3 1 2310602 Top plate with hole 4...

Page 35: ...ms for the individual products Pos Ref Quantity Part no Description 1 1 1311090 Glass door double glass 2 1 1315002 Left side glass 3 1 1315004 ight side glass 4 2 1315003 Inner glass side 5 1 61 00 F...

Page 36: ...RAIS distributor See the following spare parts diagrams for the individual products Pos Ref Quantity Part nuo Description 1 1 1312090 Glass door 2 1 61 00 Flue collar 6 3 1 1313800 Shaking grate 4 1 1...

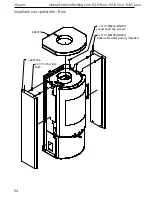
Page 37: ...Manual for RAIS Rina RAIS Viva RAIS Juno 2 x 3327006 4 x 0110 M5x16 BN272 socket head cap screws 3327002 4 x 0110 15x7x5 2 Bush 2 x 0110 M8x35 BN433 slotted set screws partialy threaded Installation o...

Page 38: ...35 English RAIS Manual for RAIS Rina RAIS Viva RAIS Juno...

Page 39: ...des brindilles du petit bois bien sec et ventuelle ment un peu de papier journal Ouvrir le volet d air primaire pour assurer un apport d air suffisant pour la combustion rapide des gaz d gag s par le...

Page 40: ...MURS NON COMBUSTIBLES 49 BOIS DE CHAUFFAGE 50 S CHAGE ET STOCKAGE DU BOIS 51 R GLAGE DE L APPROVISIONNEMENT D AIR COMBURANT 51 UTILISATION DU PO LE BOIS 52 R GLAGE DU VOLET D AIR 52 CONTR LE 52 ALLUMA...

Page 41: ...mportant de lire atten tivement ce manuel avant d installer et d utiliser le po le des fins de garantie et de r f rence future veuillez noter le num ro de fabrication de votre po le Nous vous conseill...

Page 42: ...m 295 225 393 295 225 393 320 225 393 295 225 393 320 225 393 295 225 393 320 225 393 Quantit de bois recommand e au remplissage kg R partie sur 2 3 b ches de 25 cm env 1 2 1 2 1 2 1 2 Tirage min pasc...

Page 43: ...n cessaire de la chemin e n est pas disponible et si la chemin e n est pas correctement install e La chemin e doit tre suffisamment haute un minimum de 3 m pour assurer le tirage correct de 14 18 pasc...

Page 44: ...ait tre signal e au ramoneur local avant d utiliser le po le Afin d assurer une combustion efficace il est important que la pi ce dans laquelle le po le va tre install soit suffisamment aliment e en a...

Page 45: ...coup sur le rev tement du four Enlevez le couvercle protecteur et sa garniture puis ins rez le dans l orifice sur le dessus du po le en vous assurant que la garniture est bien positionn e Fixez le l...

Page 46: ...r pr s duquel votre po le va tre plac est combustible ou non veuillez contacter l architecte qui a con u le b timent ou encore les autorit s de la con struction locales Dans le cas o le sol est combus...

Page 47: ...les mod les RAIS Rina RAIS Viva RAIS Juno Installation standard angle droit Rais Rina A D gagement 700 mm Distance de s curit aux mat riaux combustibles B devant sol 300 mm C lat rale sol 150 mm D arr...

Page 48: ...IS Juno Installation standard angle droit Rais Viva RAIS Juno Rais Viva G RAIS Juno G A D gagement 700 mm 650 mm Distance de s curit aux mat riaux combustibles B devant sol 300 mm 300 mm C lat rale so...

Page 49: ...pour les mod les RAIS Rina RAIS Viva RAIS Juno Installation d angle 45 Rais Rina A D gagement 700 mm Distance de s curit aux mat riaux combustibles B devant sol 300 mm C lat rale sol 150 mm D arri re...

Page 50: ...va RAIS Juno Installation d angle 45 Rais Viva Rais Juno Rais Viva G Rais Juno G A D gagement 700 mm 650 mm Distance de s curit aux mat riaux combustibles B devant sol 300 mm 300 mm C lat rale sol 150...

Page 51: ...es RAIS Rina RAIS Viva RAIS Juno Socle pivotant 360 g n ralement plac de fa on compartimenter l espace Rais Viva Rais Juno Rais Viva G Rais Juno G A D gagement 700 mm 650 mm Distance de s curit aux ma...

Page 52: ...Viva RAIS Juno D gagements par rapport aux mat riaux non combustibles Nous recommandons un d gagement minimum par rapport aux mat riaux non combus tibles d au moins 50 mm F de mani re faciliter le net...

Page 53: ...artificiels d gagent des gaz nocifs comme combustible dans votre po le bois RAIS Si de tels mat riaux ou une plus grande quantit de bois de chauffage que celle recommand e sont utilis s votre po le se...

Page 54: ...aises Cet air qui est froid n est seulement utilis que durant la phase de d marrage L air secondaire assure la combustion des gaz des temp ratures lev es air pr chauff qui est utilis pour le lavage l...

Page 55: ...isamment sec Allumage du premier feu Commencez utiliser votre nouveau po le en douceur et vous en serez r compens Commencez par un petit feu de sorte habituer votre po le aux temp ratures lev es Cela...

Page 56: ...tement ouverte Allumer le feu et refermer la porte 3 4 Lorsque les flammes sont claires apr s environ 10 15 min fermez compl tement la porte 5 Volet d air voir R glage du volet d air Lorsque les derni...

Page 57: ...Hvis man bare l gger br nde p t ndes b let ikke derimod udvikles der uforbr ndte r ggasser Her er der lagt tr p et for lille gl delag og der tilf res for lidt luft r g udvikling begynder Undg meget kr...

Page 58: ...ur faire tomber les cendres que vous gardez dans un r cipient non combustible jusqu ce qu elles aient refroidi Les cendres peuvent ensuite tre jet es avec les ordures ordinaires Rappelez vous de ne JA...

Page 59: ...e de la chemin e peut tre trop important 22 Pa si c est le cas veuillez installer un registre r gulateur Le po le br le trop lentement Quantit insuffisante de bois de chauffage Il n y a pas assez d ai...

Page 60: ...rte de foyer 3 1 3310601 Plaque sup rieure sans orifice 4 1 3310602 Plaque sup rieure avec orifice 5 1 61 00 Tuyaux d vacuation de fum e 6 6 1 1313800 Grille 7 1 1314001 Tiroir cendre 8 1 1311790 Syst...

Page 61: ...ces de rechange suivants pour les diff rents produits la fin du manuel d instruction Pos Num ro N produit Description 1 1 1312090 Porte vitr e 2 1 3310404 Porte de foyer 3 1 3310601 Plaque sup rieure...

Page 62: ...roduits la fin du manuel d instruction Pos Num ro N produit Description 1 1 1311090 Porte vitr e double vitrage 2 1 1315002 Verre lat ral gauche 3 1 1315004 Verre lat ral droit 4 2 1315003 Verre lat r...

Page 63: ...essins de pi ces de rechange suivants pour les diff rents produits la fin du manuel d instruction Pos Num ro N produit Description 1 1 1311090 Porte vitr e 2 1 2310601 Plaque sup rieure sans orifice 3...

Page 64: ...produits la fin du manuel d instruction Pos Num ro N produit Description 1 1 1311090 Porte vitr e double vitrage 2 1 1315002 Verre lat ral gauche 3 1 1315004 Verre lat ral droit 4 2 1315003 Verre lat...

Page 65: ...essins de pi ces de rechange suivants pour les diff rents produits la fin du manuel d instruction Pos Num ro N produit Description 1 1 1311090 Porte vitr e 2 1 2310601 Plaque sup rieure sans orifice 3...

Page 66: ...ants pour les diff rents produits la fin du manuel d instruction Pos Num ro N produit Description 1 1 1311090 Porte vitr e double vitrage 2 1 1315002 Verre lat ral gauche 3 1 1315004 Verre lat ral dro...

Page 67: ...deur RAIS Consultez les dessins de pi ces de rechange suivants pour les diff rents produits la fin du manuel d instruction Pos Num ro N produit Description 1 1 1311090 Porte vitr e 2 1 61 00 Tuyaux d...

Page 68: ...ur pour les mod les RAIS Rina RAIS Viva RAIS Juno 2 x 3327006 4 x 0110 M5x16 BN272 socket head cap screws 3327002 4 x 0110 15x7x5 2 Bush 2 x 0110 M8x35 BN433 slotted set screws partialy threaded L ins...

Page 69: ...og gloeiende houtskool over is kunt u de luchttoevoer nog lager zetten zodat nog juist aan uw behoefte aan warmte wordt voldaan Met minder luchttoevoer brandt de houtskool langzamer en wordt het warmt...

Page 70: ...RAAIBARE SOKKEL VIVA JUNO 78 VRIJE RUIMTE TOT NIET BRANDBARE MATERIALEN 79 BRANDHOUT 80 DROGEN EN OPSLAAN 81 DE VERBRANDINGSLUCHT AFSTELLEN 81 GEBRUIK VAN DE KACHEL 82 INSTELLEN VAN DE LUCHTKLEP 82 CO...

Page 71: ...handleiding grondig leest v r u de kachel installeert en gebruikt In verband met de waarborg en latere referenties kunt u best het productienummer van uw kachel noteren We bevelen u aan het in het vak...

Page 72: ...Breedte diepte hoogte stookplaats mm 295 225 393 295 225 393 320 225 393 295 225 393 320 225 393 295 225 393 320 225 393 Aanbevolen hoeveelheid hout kg 2 3 blokken van elk 25 cm lang 1 2 1 2 1 2 1 2...

Page 73: ...orrecte en noodzakelijke trek niet beschikbaar is en wanneer de schoorsteen niet correct is ge nstalleerd De schoorsteen moet hoog genoeg zijn minimum 3 meter om de nodige trek van 14 18 Pascal mogeli...

Page 74: ...chel wordt gebruikt moet u de installatie melden aan uw schoorsteenveger Om een effici nte verbranding te garanderen moet er voldoende verse luchttoevoer zijn in de ruimte waar de kachel wordt geplaat...

Page 75: ...rkel eruit op de bekleding van de kachel Verwijder het deksel en de pakking en plaats ze op het gat bovenaan Zorg ervoor dat de pakking op de juiste plaats terechtkomt Schroef alles aan elkaar vast me...

Page 76: ...ndbare wanden Contacteer uw architect of de bevoegde overheidsinstanties om te weten of de wand in de buurt van uw kachel brandbaar is Als de vloer brandbaar is moet de kachel op niet brandbaar materi...

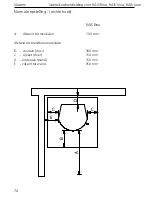
Page 77: ...oor RAIS Rina RAIS Viva RAIS Juno Normale opstelling rechte hoek RAIS Rina A Afstand tot meubelen 700 mm Afstand tot brandbare materialen B vooraan vloer 300 mm C zijkant vloer 150 mm D achteraan wand...

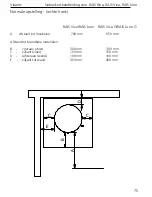
Page 78: ...ormale opstelling rechte hoek RAIS Viva RAIS Juno RAIS Viva G RAIS Juno G A Afstand tot meubelen 700 mm 650 mm Afstand tot brandbare materialen B vooraan vloer 300 mm 300 mm C zijkant vloer 150 mm 150...

Page 79: ...eiding voor RAIS Rina RAIS Viva RAIS Juno Hoekmontage 45 Rais Rina A Afstand tot meubelen 700 mm Afstand tot brandbare materialen B vooraan vloer 300 mm C zijkant vloer 150 mm D achteraan wand 150 mm...

Page 80: ...S Juno Hoekmontage 45 Rais Viva RAIS Juno Rais Viva G RAIS Juno G A Afstand tot meubelen 700 mm 650 mm Afstand tot brandbare materialen B vooraan vloer 300 mm 300 mm C zijkant vloer 150 mm 150 mm D ac...

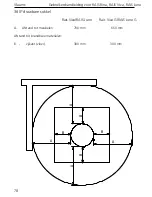
Page 81: ...kershandleiding voor RAIS Rina RAIS Viva RAIS Juno 360 draaibare sokkel Rais Viva RAIS Juno Rais Viva G RAIS Juno G A Afstand tot meubelen 700 mm 650 mm Afstand tot brandbare materialen B zijkant vloe...

Page 82: ...or RAIS Rina RAIS Viva RAIS Juno Vrije ruimte tot niet brandbare materialen We bevelen een afstand van minimum 50 mm F tot niet brandbare materialen aan zo dat u makkelijk kunt schoonmaken De reinigin...

Page 83: ...ic en andere soorten kunststoffen stoten schadelijke gassen uit als brandstof voor uw RAIS houtkachel Gebruikt u dergelijke materialen of meer brandhout dan aanbevolen dan wordt uw kachel blootgesteld...

Page 84: ...laag Deze koude lucht wordt enkel gebruikt bij het opstarten Secundaire lucht zorgt voor het verbranden van de gassen bij hoge temperaturen voorverwarmde lucht die wordt gebruikt voor luchtspoeling en...

Page 85: ...de luchttoevoer correct was en dat het brandhout voldoende droog was Eerste gebruik Behandel uw kachel met zachtheid en u zult er later de vruchten van plukken Begin met een klein vuur zodat uw kachel...

Page 86: ...edig open Steek het vuur aan en zet het deurtje op een kier 3 4 Als de vlammen helder zijn na 10 15 minuten sluit u het deurtje volledig 5 Klet zie instelling van luchtklep Als de laatste vlammen gedo...

Page 87: ...ndes op i ovnen Hvis der kun er f gl der tilbage skal der t ndes op forfra Hvis man bare l gger br nde p t ndes b let ikke derimod udvikles der uforbr ndte r ggasser Her er der lagt tr p et for lille...

Page 88: ...koopt Hardnekkige vlekken die de verdunner niet kan oplossen moeten lichtjes worden geschuurd De stookplaats schoonmaken Verwijder de as en bewaar hem in een niet brandbare houder tot hij is afgekoeld...

Page 89: ...los De trek in de schoorsteen kan te hoog zijn 22 Pa is dat het geval installeer dan een demper De kachel brandt te langzaam Te weinig brandhout Er komt onvoldoende lucht in de kachel Het rookkamersys...

Page 90: ...zen deur 2 1 3310404 Magazijndeur 3 1 3310601 Bovenplaat zonder opening 4 1 3310602 Bovenplaat zonder opening 5 1 61 00 Aansluiting voor rookafvoer 6 6 1 1313800 Zeefrooster 7 1 1314001 Asla 8 1 13117...

Page 91: ...jke producten Achteraan in de gebruiksaanwijzing Ref Aantal Productnummer Beschrijving 1 1 1311090 Glazen deur dubbel glas 2 1 1315002 Zijvenster links 3 1 1315004 Zijvenster rechts 4 2 1315003 Inwend...

Page 92: ...e tekeningen van reserveonderdelen voor de afzonderlijke producten Achteraan in de gebruiksaanwijzing Ref Aantal Productnummer Beschrijving 1 1 1311090 Glazen deur 2 1 2310601 Bovenplaat zonder openin...

Page 93: ...jke producten Achteraan in de gebruiksaanwijzing Ref Aantal Productnummer Beschrijving 1 1 1311090 Glazen deur dubbel glas 2 1 1315002 Zijvenster links 3 1 1315004 Zijvenster rechts 4 2 1315003 Inwend...

Page 94: ...e tekeningen van reserveonderdelen voor de afzonderlijke producten Achteraan in de gebruiksaanwijzing Ref Aantal Productnummer Beschrijving 1 1 1311090 Glazen deur 2 1 2310601 Bovenplaat zonder openin...

Page 95: ...n voor de afzonderlijke producten Achteraan in de gebruiksaanwijzing Ref Aantal Productnummer Beschrijving 1 1 1311090 Glazen deur dubbel glas 2 1 1315002 Zijvenster links 3 1 1315004 Zijvenster recht...

Page 96: ...serveonderdelen voor de afzonderlijke producten Achteraan in de gebruiksaanwijzing Ref Aantal Productnummer Beschrijving 1 1 1311090 Glazen deur 2 1 2310601 Bovenplaat zonder opening 3 1 2310602 Boven...

Page 97: ...andleiding voor RAIS Rina RAIS Viva RAIS Juno 2 x 3327006 4 x 0110 M5x16 BN272 socket head cap screws 3327002 4 x 0110 15x7x5 2 Bush 2 x 0110 M8x35 BN433 slotted set screws partialy threaded Installat...

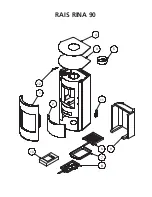
Page 98: ...4 3 5 1 2 10 8 7 6 9 12 11 RAIS RINA 90...

Page 99: ...6 5 7 4 3 11 2 4 1 10 12 8 9 14 13 RAIS VIVA 98 G...

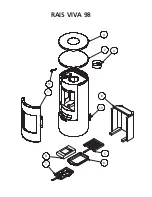
Page 100: ...3 2 4 1 8 5 6 9 7 11 10 RAIS VIVA 98...

Page 101: ...6 5 7 2 4 14 1 10 12 8 9 4 3 11 13 RAIS VIVA 120 G...

Page 102: ...3 2 4 11 1 10 8 9 7 6 5 RAIS VIVA 120...

Page 103: ...1 2 3 4 4 5 6 7 8 9 10 11 12 13 RAIS JUNO 1560 G...

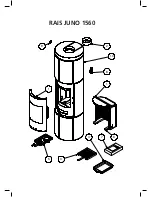
Page 104: ...1 2 10 8 1 9 5 3 4 6 7 RAIS JUNO 1560...

Page 105: ......

Page 106: ...4 6 1 2 3 5...

Page 107: ...RAIS A S Industrivej 20 DK 9900 Frederikshavn www rais dk N O R D I S K MILJ M RKN I N G 5 7 8 0 0 5...

Reviews: