background image

21 / 34

OPERATING INSTRUCTIONS 

FOR OEM USE ONLY

© 2016 Mertik Maxitrol GmbH & Co. KG, 

All Rights Reserved.

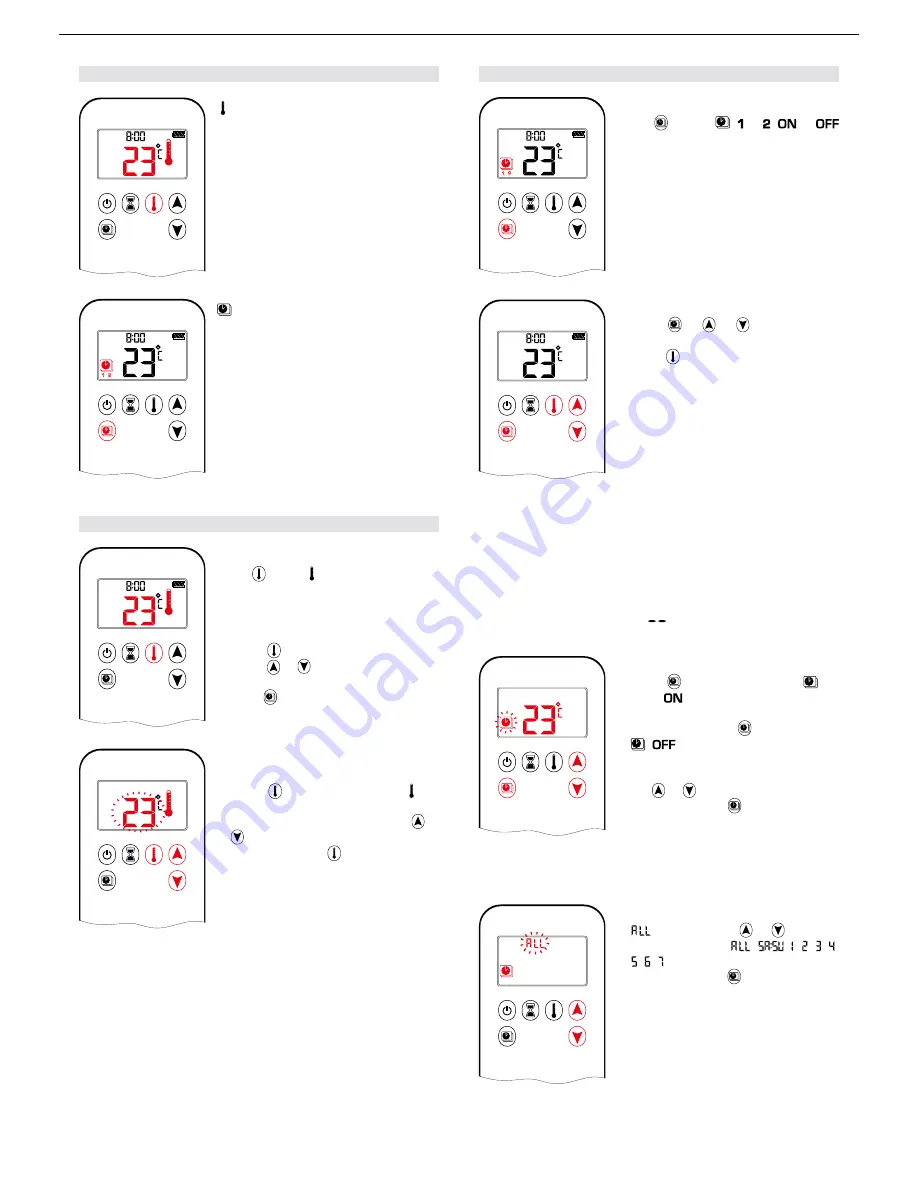
PROGRAM MODE

1  2

ON

AM

PM

OFF

ON: 

Press   button.  ,   or  , 

 or 


displayed. 

1  2

ON

AM

PM

OFF

OFF: 

1.   Press 

 or   or   button to enter 

Manual Mode.

2.   Press   button to enter Thermostatic 

Mode.

NOTE:

  The set temperature for Thermostatic Mode is the tem-

perature for the on time in Program Mode. Changing the 

Thermostatic Mode set temperature also changes the 

on time temperature in Program Mode.

Default settings: 

ON TIME (Thermostatic) TEMPERATURE: 21 °C (70 °F) 

OFF TIME TEMPERATURE: “

” (pilot flame only)

1  2

ON

AM

PM

OFF

TEMPERATURE SETTING: 

1.   Press   button and hold until   fla-

shes. 

 and set temperature (setting 

in Thermostatic Mode) displayed. 

2.  To continue press   button or wait. 

 , 

 displayed, temperature flash-

es.

3.  Select off temperature by pressing 

the   or   button.

4.   To confirm press   button. 

NOTE:

  The on (Thermostatic) and off set temperatures are the 

same for each day.

1  2

ON

AM

PM

OFF

DAY SETTING: 

5.    flashes. Press   or   button to 

choose between 

,   ,  ,  ,   , 

 ,   ,  .

6.  To confirm press   button. 

MODES of OPERATION

1  2

ON

AM

PM

OFF


Thermostatic Mode

 The room temperature is measured and 

compared to the set temperature. The 

flame  height  is  then  automatically  ad-

justed to achieve the set temperature.

1  2

ON

AM

PM

OFF


Program Mode

 Programs 1 and 2, each can be pro-

grammed  to  go  on  and  off  at  specific 

times at a set temperature. 

THERMOSTATIC MODE

1  2

ON

AM

PM

OFF

ON: 

Press   button.   displayed, preset tem-

perature displayed briefly, and then room 

temperature displayed.

OFF: 

1.   Press   button.

2.   Press   or   button to enter Manual 

Mode.

3.   Press   button to enter Program Mode.

1  2

ON

AM

PM

OFF

SETTING: 

1.   Press 

 button and hold until   dis-

played, temperature flashes.

2.  To adjust set temperature press   or 

 button.

3. To confirm press   button or wait.

Summary of Contents for VIVA L Series

Page 1: ...ecter l appareail et remplacer toute partie du syst me de commande et toute commande qui a t plong e dans eau Attention Au moment de l entretien des com mandes tiquetez tous les fils avant de les d br...

Page 2: ...valve during any pressure testing of the gas supply piping system at test pressures equal to or less than 1 2 psi 3 5 kPa The installation must provide for adequate ventilation air to the appliance T...

Page 3: ...ropane LP Input Rating Btu hr 31 000 25 600 Min Input Btu hr 8 000 8 000 Orifice Marking Front 120 80 Orifice Marking Rear 260 x2 100 x2 GAS SUPPLY Manifold Pressure 4 0 w c 1 0kPa 10 8 w c 2 7kPa Min...

Page 4: ...ct must be installed by a licensed plumber or gas fitter when installed within the Commonwealth of Massachusetts If this appliance is installed in a dwelling building or structure used in whole or in...

Page 5: ...s specific installation requirements that must be followed to insure a safe and functional venting system for your VIVA L SEE PAGE 13 FOR INFORMATION ABOUT REAR VENTING DIRECTLY THROUGH THE WALL TO A...

Page 6: ...x8 Expander may be used so that 5x8 flue can be used thereafter Flue Terminal 4x6 Alternatively 5x8 Minimum Vertical Flue Height 20 0 5m Flue Restrictors to be fitted 4x6 Vertical Rise 3 feet 1m No Re...

Page 7: ...13 Vertical Roof Termination on angle 14 Vertical Roof Termination with bends...

Page 8: ...CTLY THROUGH THE WALL TO A STANDARD HORIZONTAL VENT TERMINATION The Viva L Gas Stove can be vented in rear exit with up to 18 of horizontal pipe and no vertical pipe util izing a standard horizontal v...

Page 9: ...sure all four leveling bolts are screwed in all the way They can be adjusted later See the illustration below for leveling bolt locations Move the VIVA L to location where it will be installed Using a...

Page 10: ...area clear Position the 8 logs as shown noting the 2 special logs labelled A and B These have a slot cast into the underside this slot fits on top of the 2 raised burner sections Lay the glow strands...

Page 11: ...ery important Take care in handling these gaskets as they will be re used They are somewhat fragile and will tear if handled roughly Next break out the rear exit cover plate from the rear plate Remove...

Page 12: ...and or installing of gas piping should only be performed by a qualified individual Schedule 40 Black Iron Pipe Inside Diameter Inches Schedule 40 Pipe Natural Propane Length feet Gas Gas 0 10 10 40 4...

Page 13: ...LIGHTING THE FIRE FOR YOUR SAFETY READ BEFORE LIGHTING WARNING If you do not follow these instructions exactly a fire or explosion may result causing property damage personal injury or loss of life 2...

Page 14: ...24 25...

Page 15: ...26 27...

Page 16: ...ility of the manufacturer INSPECT the external vent cap on a regular basis to make sure that no debris plants trees shrubs are interfering with the air flow CLEANING THE GLASS WARNING Never clean the...

Page 17: ...ANER TO CLEAN THE LOGS OR BURNER A vacuum cleaner may be used to clean the metal parts of the firebox Replace the logs and embers after cleaning Follow the instructions on pages 18 21 of this manual t...

Page 18: ...available will greatly expedite trouble shooting should any problem arise with your stove The installer should keep a duplicate of this form for their records Manufactured by RAIS A S Industrivej 20...

Page 19: ...31 Viva 100 LG with side glass 32 Viva 120 L without side glass...

Page 20: ...33 Viva 120 LG with side glass 34 Viva 160 L without side glass...

Page 21: ...35 Viva 160 LG with side glass 36 Appendix 2 Mertik Symax controls...

Page 22: ...atic Shut Off 33 INSTALLATION INSTRUCTIONS Application 3 Components 3 Technical Specifications 4 Mounting Positions 5 Gas Connections 5 Perform Gas Leak Test 6 Wiring 6 Basic 8 Additional Function 9 2...

Page 23: ...not try to repair it Call a qualified service technician Force or attempted repair can result in a fire or explosion Do NOT use a product if you suspect it has been subjected to high temperatures dama...

Page 24: ...BU E Figure 6 2nd Thermocouple Option Figure 5 Mains Adapter Receiver B6R R8 9 PT 2nd Thermocouple Cable G60 ZCTC 2000 Figure 1 Handsets Figure 3 Basic Thermocurrent Cable Interrupter Block Receiver...

Page 25: ...d Consult the dealer or an experienced radio TV technician for help POWER SUPPLY Handset 2 x 1 5V AAA quality alkaline recommended Receiver 4 x 1 5V AA quality alkaline recommended AnAC mains adapter...

Page 26: ...nnections Overtightening can damage the control body resulting in a leak or a control malfunction see MAXIMUM ALLOWED TORQUE page 4 Main Gas Tubing Connections 1 Do not use pipe joint compound Mertik...

Page 27: ...re 13 After successful synchroniza tion the current state of the gas fire is displayed on the handset Main Gas Pipe Connections 1 Mertik Maxitrol does NOT recommend the use of Teflon PTFE tape 2 Pipe...

Page 28: ...ransfer Press reset button on the myfire Wi Fi Box for 1 second to change current channel NOTICE If myfire Wi Fi Box is not connected to the receiver or is not used it will leave the Access Point Mode...

Page 29: ...k G60 ZUS Mains Adapter optional G60 ZMA3 Ignition Cable G60 ZKIS RESET Button Additional functions The receivers can be used to start a power flue control 2pin outlet or to operate a second burner or...

Page 30: ...erated in accordance with all codes and local regula tions Service and installation must be performed by a trained experienced service technician D o not use the module if you suspect it may be damage...

Page 31: ...inal of the G60 ZCTCR 2000 cable into the open connector hole of the plug see image 1 Listen for a click 3 I nsert the insulated receptacle into the insulated 2 nd thermocouple terminal 4 Insert the p...

Page 32: ...has to close both burners If the Solenoid Valve is installed upstream of the valve a pilot gas position would not be possible Solenoid Valve Required for Power Flue Control Gas Combination Control GV...

Page 33: ...R ZWSE N Mains Adapter G60 ZMA3 115 230 V AC Cable G60 ZCSW1000 myfire Wi Fi Box B6R W Receiver B6R R8 9 P B6R R8 9 PT Main Burner myfire App for Android iOS Handset B6R H8 9 P Light Fan Relay with Ca...

Page 34: ...NOTE Throttle model s pressure is increased by turning coun terclockwise or decreased by turning clockwise 4 After adjustment replace the plug 5 If no other adjustments are required close pressure ta...

Page 35: ...a custom er specific setting are factory set at maximum flow 3 Turn the screw clockwise to decrease the minimum flow 4 Care should be taken to screw the fixed orifice until it stops 5 Close pressure t...

Page 36: ...Low battery indication frequent beeps for 3 seconds when mo tor turns An AC mains adapter may be used instead of batteries The V module for fan speed control and light dimmer provides the receiver wi...

Page 37: ...process The home screen is displayed and the myfire app is ready to go NOTICE The active device Symax handset or smart device is the one last used An exception is if the non active devise is used to...

Page 38: ...ess or but ton 7 To confirm press and buttons simultaneously or wait CHILD PROOF 1 2 ON AM PM OFF ON To activate press and buttons simultaneously displayed and the handset is rendered inoperable excep...

Page 39: ...or high fire and low fire double click operation AM To go to low fire double click but ton is displayed NOTE Flame goes to high fire first be fore going to low fire AM To go to high fire double click...

Page 40: ...d nesday Thursday Fri day Sat urday Sunday 3 Press and buttons simultane ously Hour flashes 4 To select hour press or button 5 Press and buttons simultane ously Minutes flash 6 To select minutes press...

Page 41: ...me TO TURN OFF FIRE 1 2 ON AM PM OFF Handset Press button to turn off NOTE A new ignition is possible after the OFF icon stops flashing FLAME HEIGHT ADJUSTMENT 1 2 ON AM PM OFF Handset To increase fla...

Page 42: ...ct off temperature by pressing the or button 4 To confirm press button NOTE The on Thermostatic and off set temperatures are the same for each day 1 2 ON AM PM OFF DAY SETTING 5 flashes Press or butto...

Page 43: ...nd or off tem perature has been set that temperature becomes the new default setting NOTE If or Daily Timer are programmed for PRO GRAM 1 and PROGRAM 2 on and off times these be come the new default t...

Page 44: ...y Wed nesday Thursday Fri day Sat urday Sunday 3 Press and buttons simultane ously Hour flashes 4 To select hour press or button 5 Press and buttons simultane ously Minutes flash 6 To select minutes p...

Page 45: ...TURN OFF FIRE 1 2 ON AM PM OFF Handset Press button to turn OFF NOTE A new ignition is possible after the OFF icon stops flashing FLAME HEIGHT ADJUSTMENT 1 2 ON AM PM OFF Handset To increase flame he...

Page 46: ...flashes Press or button to choose between 6 To confirm press button MODES of OPERATION 1 2 ON AM PM OFF Thermostatic Mode The room temperature is measured and compared to the set temperature The flam...

Page 47: ...flashes 8 To select hour press or button 9 To confirm press button displayed displayed shortly and minutes flash 10 To select minutes press or but ton 11 To confirm press button OFF TIME SETTING PROG...

Page 48: ...day Sat urday Sunday 3 Press and buttons simultane ously Hour flashes 4 To select hour press or button 5 Press and buttons simultane ously Minutes flash 6 To select minutes press or but ton 7 To confi...

Page 49: ...TURN OFF FIRE 1 2 ON AM PM OFF Handset Press button to turn off NOTE A new ignition is possible after the OFF icon stops flashing FLAME HEIGHT ADJUSTMENT 1 2 ON AM PM OFF Handset To increase flame he...

Page 50: ...FF DAY SETTING 5 flashes Press or button to choose between 6 To confirm press button MODES of OPERATION 1 2 ON AM PM OFF Thermostatic Mode The room temperature is measured and compared to the set temp...

Page 51: ...1 7 displayed is displayed shortly and hour flashes 8 To select hour press or button 9 To confirm press button displayed displayed shortly and minutes flash 10 To select minutes press or but ton 11 To...

Page 52: ...ght works independently of the Pilot flame If you want the light on but no flame press button MYFIRE APP NOTICE Before theApp can be used the myfire Wi Fi Box must be wired and plugged into mains powe...

Page 53: ...ut tons to switch Decorative Burner on NOTE The latching solenoid valve cannot operate manually If the receiver battery runs down it will remain in the last operating position SWITCH PANEL Figure 31 S...

Page 54: ...gnitor optional ON OFF Switch optional in ON Position Connection Piezo Ignitor Tab 2 8 x 0 8 mm TO TURN OFF GAS TO APPLIANCE 1 Place ON OFF switch if equipped in O OFF position 2 If gas control is acc...

Page 55: ...23555 Telegraph Rd PO Box 2230 Southfield MI 48037 2230 USA Tel 1 248 356 1400 Fax 1 248 356 0829 www maxitrol com Exclusive Distributor Europe for Maxitrol Company Mertik Maxitrol GmbH Co KG Warnsted...

Reviews: