


Pro3 Series
3D Printer
/ User Manual
F.
Hardware Installation
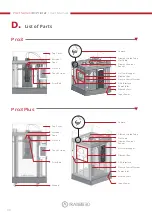
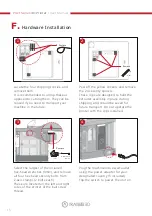
Locate the four shipping zip ties, and
remove them.
It is recommended to unclip these as
opposed to cutting them. They can be
reused if you need to transport your
machine in the future.
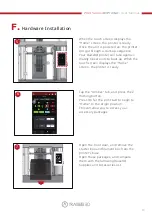
3
Remove
(×2)
Hex Wrench
(3 mm)
Select the largest of the included
hex-head wrenches (3mm), and remove
all four hex head security bolts from
Z-axis clamps (2 bolts each).
These are located on the left and right
sides of the printer of the ball screw
thread.
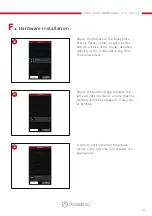
Peel off the yellow stickers and remove
the 24 security spacers.
These clips are designed to hold the
extruder assembly in place during
shipping, and should be saved for
future transport. Do not operate the
printer with the clips installed.
1
Remove
Plug the machine into a wall outlet
using the power adapter for your
designated country (5 included).
Flip the switch to power the unit on.
4
2
Remove
(×24)
15