background image

Documentation Center

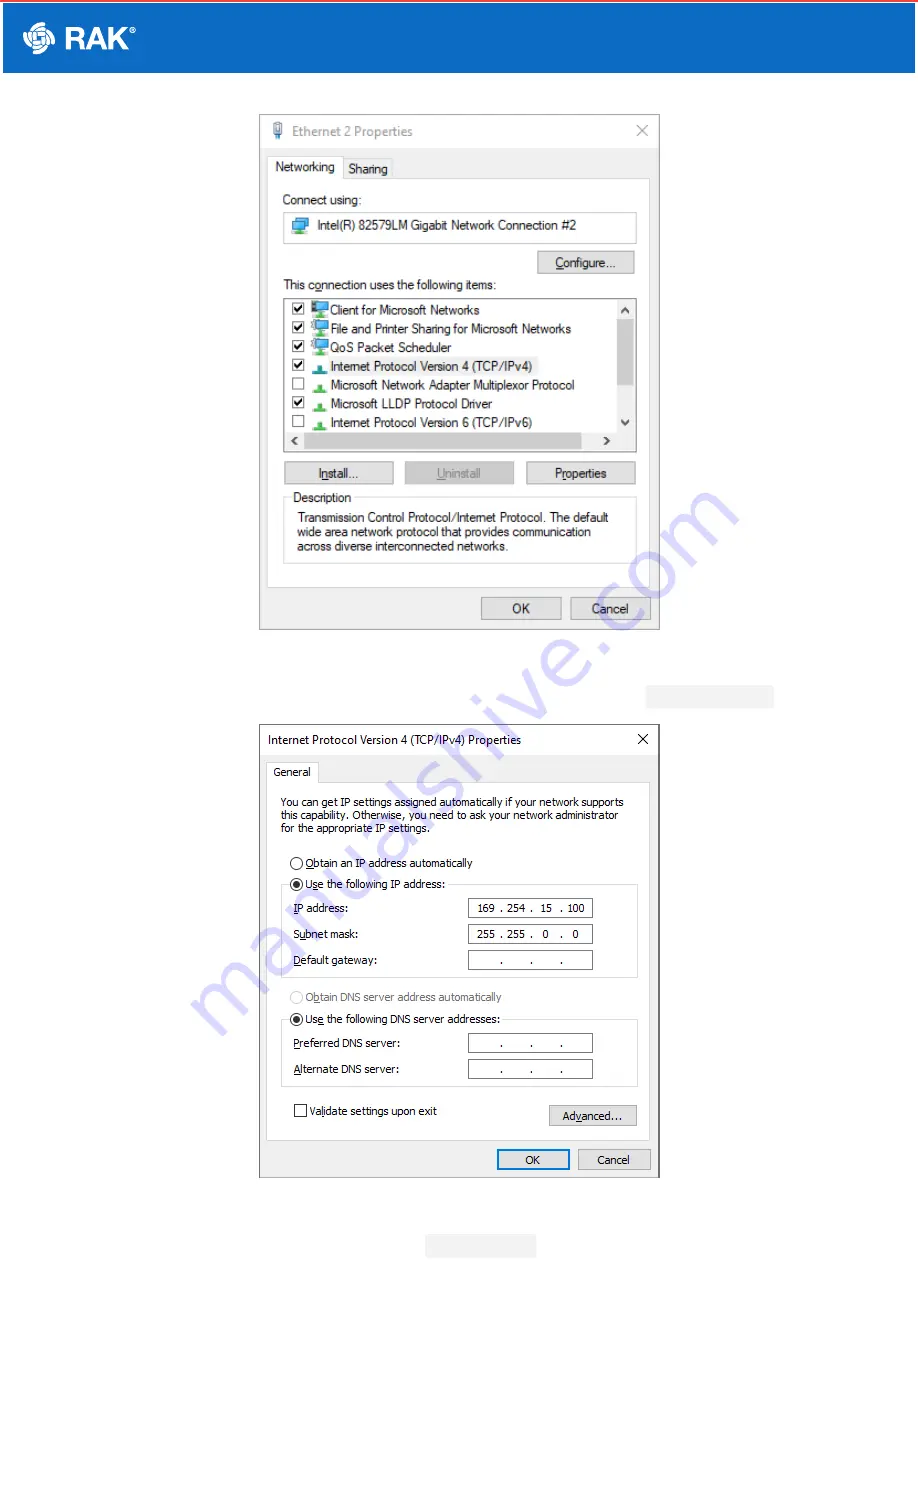
Figure 5: Internet properties

4. Select Use the following IP address and set the IP address (for this example to 

169.254.15.100

).

Figure 6: Setting IP address of the PC

In this example, you can access the gateway on the 

169.254.15.1

 address.

Set Login Password

1. For security reasons, upon the first login, the user must set a login password. This is done by filling in the

desired password and confirming it in the provided fields.

The password needs to comply with the following rules:

Summary of Contents for RAK7268V2

Page 1: ...different logs and data are stored on it Product Configuration Power on the Gateway 1 Attach the LoRa Antenna First and foremost screw the antenna onto the RP SMA connector on the back panel of the R...

Page 2: ...on when device power is on Breathing LED Breathing after system up ETH LED ON Linkup OFF Linkdown Flicker Data transmitting and receiving LoRa LED ON LoRa is working OFF LoRa is not working Flicker In...

Page 3: ...left open to avoid potential damage to the RAK7268 RAK7268C V2 WisGate Edge Lite 2 V2 Wi Fi AP Mode By default the gateway will work in Wi Fi AP Mode which means that you can find an SSID named RAK726...

Page 4: ...The default IP is 169 254 X X The last two segments X X are mapped from the last four bits of the MAC address of your gateway For example the last four bits of the MAC address are 0F 01 and the IP add...

Page 5: ...gure 6 Setting IP address of the PC In this example you can access the gateway on the 169 254 15 1 address Set Login Password 1 For security reasons upon the first login the user must set a login pass...

Page 6: ...n letter used in the English alphabet Figure 7 Web UI login page 2 When the fields are filled in click the Set password button to apply it The Web UI is now accessible and it will load the LoRaWAN Sta...

Page 7: ...gh Wi Fi 1 Access the gateway s Web UI Navigate to Network WAN Wi Fi Menu Expand the Wi Fi field and click on Settings Make sure to enable the Interface as it is disabled initially Figure 10 Accessing...

Page 8: ...assigned by your Wi Fi router s AP built in DHCP server You can use this new IP address to log in via a web browser the same way as in AP mode Connect through Ethernet 1 Connect the Ethernet cable to...

Page 9: ...Documentation Center Figure 13 Connect through Ethernet settings Last Updated 11 9 2022 8 19 58 AM...

Reviews: