background image

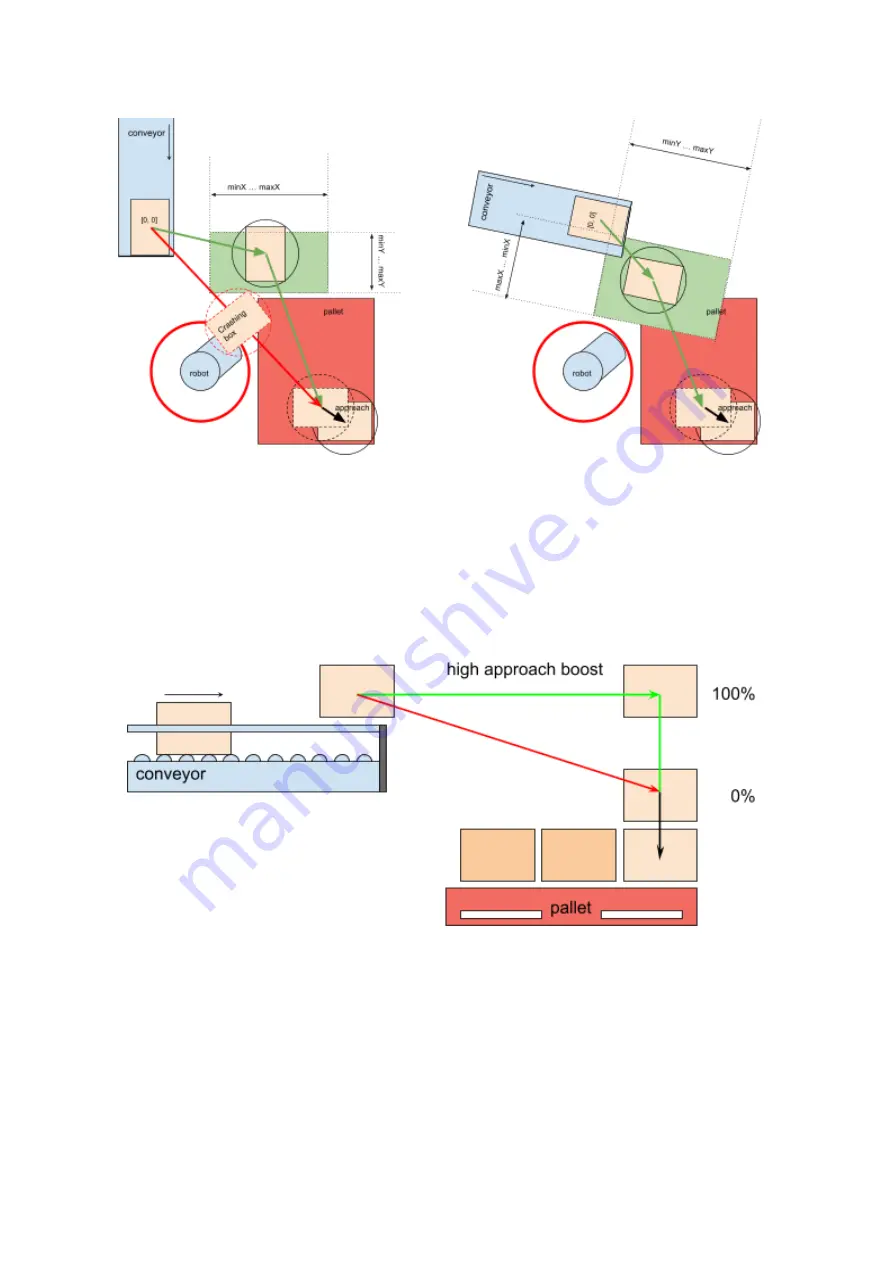
Figure 61:

Illustration of the

smart exit

search area parameters.

High approach boost

This value must be between 0% and 100%. It determines how high above the other boxes
the alternative path planning algorithm moves the box. Lower values let the box move closer
to the top of the other boxes on the pallet, higher values keep the box closer to the

box free

height (

figure 62

).

Figure 62:

Illustration of the

High approach boost

parameters.

Version 2.9.1

© Rocketfarm AS 2021. All rights reserved.

72

Summary of Contents for URCap

Page 1: ...Pally URCap User Manual Version 2 9 1 ...

Page 2: ...ty notes for version 2 9 and above 10 3 3 4 1 URCap API 1 12 10 3 3 4 2 Definition of multi zone grippers gripper json 10 3 3 4 3 Multi pick fewer boxes 10 3 3 4 4 Optional posData in zones json 10 3 3 4 5 New callback onNextTask 10 3 4 Compatibility with CB 3 0 robots 11 3 4 1 Memory usage limitations on CB 3 0 11 3 4 2 Computational limitations on CB 3 0 11 4 Functional description 12 4 1 The pa...

Page 3: ...olumn 26 5 1 3 Attach the gripper properly 27 5 1 4 Lifting column 28 5 2 Layout 29 5 2 1 Supported pickup positions 30 5 2 2 Suggested sensor placements 33 5 3 Dimensions 34 5 3 1 Pallet 34 5 3 2 Pickup from Conveyor 34 5 3 3 Important parameters to be measured 37 5 4 Gripper 37 5 5 I O Connections 38 6 Installing and Configuring the URCap 39 6 1 Installation settings 39 6 1 1 Overview 39 6 1 2 L...

Page 4: ... palletizer program 87 7 1 Creating the main program 87 7 2 Starting the program 87 7 3 Using the program 88 7 3 1 Single Product Mode 88 7 3 2 Dual Product Mode 90 7 3 3 Partial Pallet 95 7 3 3 1 Edit Total Boxes 96 7 3 3 2 Edit Start Conditions 97 7 4 Recovery from error 98 7 5 Shutting down the robot 98 8 Creating Patterns 98 8 1 The pallet pattern definition file 98 8 2 Project overview 99 8 3...

Page 5: ...uration at runtime 106 9 4 List of available configuration variables 106 9 4 1 Speed and acceleration 107 9 4 2 Calibration points 107 9 4 3 Path planning 108 9 4 4 Gripper 110 9 4 5 Lifting column 110 9 4 6 Other Special 111 10 PalletManager daemon process 114 10 1 Using the PalletManager daemon 114 10 2 Pallet dimensions 114 10 3 Product dimensions 114 10 4 Pallet completion state 115 11 Trouble...

Page 6: ...Partial Pallet feature ME 27 03 2020 Installation process with new GUI ME 18 05 2020 Description of json format new functions in 2 5 0 CM 26 05 2020 New Advanced tab in installation node ME 28 09 2020 New functions in 2 6 0 CM 11 01 2021 Updates related to 2 6 1 CM 29 01 2021 Dual product mode updated for v2 7 0 ME 26 04 2021 Updates related to 2 7 1 new illustrations CM 14 06 2021 Updates related...

Page 7: ...part without prior written approval of Rocketfarm AS The information herein is subject to change without notice and should not be construed as a commitment by Rockerfarm AS Rocketfarm AS assumes no responsibility for any errors or omissions in this document The Pally logo is a registered trademark of Rocketfarm AS Version 2 9 1 Rocketfarm AS 2021 All rights reserved 7 ...

Page 8: ...fting columns Ewellix LiftKit Vention MachineMotion V1 and V2 Custom lifting column with 24V digital Up Down signal Grippers UniGripper CoLight Schmalz FXCB Foam Schmalz FXCB Suction cups Custom vacuum gripper with 24V digital signal Custom gripper Grippers with one or more individually controllable grip areas 3 3 Compatibility notes Please read the following compatibility notes carefully before u...

Page 9: ... variables should be verified 3 3 3 Compatibility notes for version 2 8 and above 3 3 3 1 Execution of beforeZone and afterZone callbacks From version 2 8 0 the beforeZone callback will be invoked when the lifting column has already reached the specified position but palletizing has not yet started Similarly the afterZone callback will be invoked after palletizing the last box has finished but the...

Page 10: ...te system which means the X and Y directions are inverted This applies to all new gripper json files that have the new format with the properties structure included otherwise the old behavior is kept for compatibility reasons 3 3 4 3 Multi pick fewer boxes From version 2 9 0 the optimizer will try to pick fewer boxes when the specified maximum amount of boxes cannot be palletized for some reasons ...

Page 11: ...apital letters and small letters are properly written The operating system is case sensitive and requires the parameter names to be written exactly as shown above Note Repeat the above steps every time after upgrading Polyscope If you are not familiar with operating system parameter tuning follow the steps below Connect a keyboard to the Teach Pendant or an USB connector in the control box Press C...

Page 12: ... Continue an incomplete pallet i e specify the starting layer box position Palletize from 2 pickup positions Palletize 2 different products from 2 pickup positions on 2 pallets simultaneously Note Every pallet is built of one specific product type Thus it is not possible to palletize different products on the same pallet 4 2 Pallet patterns Every product has its own pallet layout depending on the ...

Page 13: ... by the operator 4 4 Pickup position The pickup position is at the end of the conveyor belt where the boxes stop and wait until the robot picks them up Note The pickup position must be stationary i e the conveyor should be fixed to the floor One side of the conveyor should have a fixed side guide which the boxes can be aligned to The other side guide should be adjustable for different product size...

Page 14: ...all boxes the pick position is out of reach the target position is out of reach collision free path planning is not possible Figure 2 Pickup position with two products Notice that the tool coordinate system is aligned to the conveyor direction 4 4 2 Gripper alignment at the pickup position offset grip To avoid accidental multi picking the front edge of the gripper is always aligned with the rear e...

Page 15: ...he pallet corners or avoid collision with the base frame The allowed rotations can be configured Figure 4 gripper rotation at pickup 4 4 4 Grip quality value smart acceleration Based on the actual product and gripper dimensions and the number of boxes being picked the program estimates the risk of dropping boxes due to high acceleration with insufficient grip strength The parameters of this algori...

Page 16: ...he box es without collision to the robot base or the existing boxes on the pallet The approach position is the last waypoint in the proximity of the final target position The robot uses lower acceleration and speed from the approach to the final target position to improve the pallet accuracy Note To ensure a smooth palletizer experience some properties of the production line should be carefully me...

Page 17: ...position of the already palletized boxes and finds a collision free path to the target position It is often necessary to move the box above all other boxes and then lower vertically to the target position see figure 7 This path is normally longer than a direct linear movement and hence more time demanding Figure 7 Path planning with an extra waypoint Boxes on the same layer define a collision area...

Page 18: ...tance which is shown on figure 8 Figure 8 Approaching the target position with lower speed and acceleration Note To keep the necessary distance from the existing boxes on the pallet the approach position may be recalculated dynamically if rotation occurs between the pickup and the target position This default behavior can be changed by selecting fixed approach see 6 2 3 Movement Version 2 9 1 Rock...

Page 19: ...Figure 9 Dynamically calculated approach distance for rotating boxes Version 2 9 1 Rocketfarm AS 2021 All rights reserved 19 ...

Page 20: ...ify the return path by removing one or more waypoints or implementing a user defined path 4 5 5 User defined path It is possible to override the default Pally path planning by implementing custom movement for one or more specific box positions or even replace the default path planning in the entire project It is also possible to implement custom code to sort out boxes from the conveyor that should...

Page 21: ...uration is supported 4 7 1 Positioning the lifting column for each layer In this operational mode the lifting column position is calculated for each layer or group of layers The first layer is palletized at position 0 then the lifting column is elevated by the height of one layer until the maximum stroke is reached However the maximum number of lifting column operations is limited to 5 which means...

Page 22: ... low as possible as high as possible keep it in the center of the possible range Figure 13 selecting the best lifting column position 4 7 3 Custom positioning zones It is possible to override the default behavior and take full control of the lifting column positioning by creating a special configuration file In this case the pallet will be split into smaller regions and each region palletized at d...

Page 23: ...sed to solve problems that could not have been done otherwise e g Avoid collision between upper arm and boxes nearest to the robot on the top layers Take full control of the lifting column positioning Control external machines for example start a stretch wrapper to wrap the pallet after N layers are completed Version 2 9 1 Rocketfarm AS 2021 All rights reserved 23 ...

Page 24: ...from the pickup position beforeRelease Before releasing a box on the target position afterRelease After releasing a box on the target position afterZone After leaving a completed zone onSheet When a shim paper needs to be inserted afterPallet After the pallet is complete The user defined commands can utilize the values of the following global variables ProductCount the number of boxes palletized o...

Page 25: ...able variable to indicate that the robot has been moved to the MoveTarget position and the program should skip the movement With this variable it is possible to implement custom movement from the pickup to the target position or back from the target position to the waiting position Set this variable to True in either afterGrab or afterRelease depending on the direction of the movement that has bee...

Page 26: ...shoulder joint is located seen from the opposite side of the conveyor For a right handed robot the shoulder joint is located to the right side of the base joint For a left handed robot the shoulder joint is located to the left of the base joint The examples in this document are made with a left handed configuration Figure 16 Check the joint positions before mounting vacuum hoses and cables 5 1 2 R...

Page 27: ...ation range in both directions Depending on the physical dimensions of your gripper you might have to configure the robot tool center point under Installation General TCP as described below Note The conveyor direction is calculated directly from the Y axis of the tool coordinate system at the pickup position as shown in figure 18 Version 2 9 1 Rocketfarm AS 2021 All rights reserved 27 ...

Page 28: ... in the direction where boxes arrive from i e towards box 2 Press the Y button and the gripper should move back to the end of the conveyor When the gripper is above the box on the pickup position press the RZ and RZ buttons the gripper should rotate around its own center point and not around the robot tool flange Rotating by 180 degrees the gripper should remain perfectly above the center of the b...

Page 29: ...Layout The palletizer cell consists of the robot the pallets and the pickup position The conveyor and the pallet positions must be calibrated by moving the robot with the gripper attached into various calibration points as shown in figure 19 Note Always use the width and length values as shown below Make sure that the width and length values are used consistently during the entire calibration Figu...

Page 30: ...variety of angles but should always be stationary on the same location when being picked up by the robot Multi picking Pally supports lifting and placing two or more products at the same time as long as the total payload and the placement on the pallet allows it When using multi picking the boxes must be aligned on the conveyor Either guides or pushers are recommended for this purpose Low guides a...

Page 31: ...fetime of the robot Two pickup positions When picking from two lines simultaneously it is recommended that the two lines come into the robot parallel to the y axis The robot has less free space to move in and lines coming in from the side may cause crashes when the pallets are nearing fully stacked figure 23 Version 2 9 1 Rocketfarm AS 2021 All rights reserved 31 ...

Page 32: ...Figure 23 This layout is recommended for dual conveyor solutions The layout will minimize unnecessary vertical movements for the robot Version 2 9 1 Rocketfarm AS 2021 All rights reserved 32 ...

Page 33: ...ickup Install the next sensor where the second box will be located figure 25 Note If palletizing many different products from the same line an adjustable mounting of sensor 2 is recommended so that it easily can be moved according to product size Priority sensors It is recommended to install a sensor close to where the line is full of products waiting to be palletized to inform the robot that the ...

Page 34: ...ble with any pallets as long as the selected robot has enough reach across the pallet Please configure the pallet dimensions in the Pally Pallet Builder https palletizer rocketfarm no home Pally can palletize on two separate pallets 5 3 2 Pickup from Conveyor For maximum reach and flexibility it is recommended to place the robot so that the pickup position will be approximately at the following co...

Page 35: ...ght from ground to the pickup position 700 mm Note It is possible to deviate from these values but it is not recommended to do so by more than 100 mm When referring to the length and width of a product the width is the face towards the end of the conveyor and length is the face parallel to the conveyor direction figure 28 Figure 26 Recommended height of the pickup location Version 2 9 1 Rocketfarm...

Page 36: ...Figure 27 Recommended placements of components relative to the robot base Figure 28 Box and gripper orientation relative to conveyor direction Version 2 9 1 Rocketfarm AS 2021 All rights reserved 36 ...

Page 37: ...width including any objects mounted on the conveyor E g sensors The minimum elevation needed to freely move the box above the conveyor Measure this from the highest point including any object which may be a hurdle Figure 29 Important dimensions to be measured 5 4 Gripper Pally has built in support for the UniGripper Co Light Regular and Schmalz FXCB but a custom gripper may be specified The weight...

Page 38: ...ate system is parallel to the conveyor transport direction 5 5 I O Connections All I O ports are configurable in Pally and may be used as needed Typical configurations such as a push button to confirm that a new empty pallet is ready to use and a light to indicate that the robot knows there is an empty pallet present are supported Note The program can be expanded to use more I O in the callback fe...

Page 39: ...before proceeding 6 1 Installation settings This chapter describes the various settings in the installation routine Note This is a one time procedure and it is important to follow the steps precisely 6 1 1 Overview The Overview tab shows the completion status of the required installation settings Verify that all items listed in this section are properly configured Figure 30 Overview of the install...

Page 40: ...to the root folder of a USB stick Insert the USB stick in the USB connector on the teach pendant and click the Load license from USB button The license request file and the license file are named using the following naming conventions where serialNumber is the serial number of the robot License request file no rocketfarm urcap palletmanager serialNumber license_request License file no rocketfarm u...

Page 41: ...unted Unigripper Co Light gripper only as weight and dimensions are predefined The grip and release functions are controlled by the Pally URCap via the digital IO channels configured here Note Only choose this option if your gripper is standard mounted i e without any offset plates and custom rotations In all other cases choose the Other vacuum gripper option Custom Vacuum Gripper Choose this opti...

Page 42: ...s mounted on the robot in the Type tab Figure 33 If Custom gripper is selected no IO channels can be set in the Pally installation node Control the gripper using callbacks see 6 3 Callbacks Version 2 9 1 Rocketfarm AS 2021 All rights reserved 42 ...

Page 43: ...operties edgeAlignment if true the box edges will be aligned to the gripper zone edges otherwise the gripper zone s will be centered above the box center coveragePercent defines how many percents of the vacuum zone bounding rectangle area must be covered in order to use a specific zone tcp the tool center point TCP of the gripper as x y z rx ry rz cog the center of gravity COG of the empty gripper...

Page 44: ...nsions width 628 length 252 height 202 weight 1 9 foamHeight 15 properties coveragePercent 51 edgeAlignment false tcp 0 0 110 0 0 90 cog 0 0 80 zones id 1 x 0 y 0 width 134 length 201 grip type standard channel 0 inverse false Version 2 9 1 Rocketfarm AS 2021 All rights reserved 44 ...

Page 45: ... channel 1 release type standard channel 5 id 3 x 163 y 0 width 67 length 201 grip type standard channel 2 release type standard channel 6 id 4 x 0 y 0 width 527 length 67 grip type standard channel 3 release type standard channel 7 Version 2 9 1 Rocketfarm AS 2021 All rights reserved 45 ...

Page 46: ...columns can be selected on this configuration page The following options are available No lifting column Select this option when no lifting column is in use Ewellix LiftKit Select this option when the robot is mounted on top of an Ewellix LiftKit lifting column Select Use dynamic positioning if your project requires recalculating the lifting column position for each pick and place movement Enter t...

Page 47: ...ng columns that are built with the first generation Vention MachineMotion controllers Select Use dynamic positioning if your project requires recalculating the lifting column position for each pick and place movement Enter the maximum stroke in millimeters and the controller name and drive number as they are configured in the Vention Robot Cell URCap Version 2 9 1 Rocketfarm AS 2021 All rights res...

Page 48: ...s URCap Note Make sure the URCap MachineLogic for Universal Robots v3 1 5 or newer is installed and configured This URCap is provided by Vention Note The encoder zero position can be set to any position in the MachineLogic URCap Make sure to select a zero position that is suitable for the entire calibration Set the minimum and maximum stroke parameters according to how much the lifting column can ...

Page 49: ...g column has reached one of its end positions Motion feedback Digital input that tells whether the lifting column is in motion Max duration Time limit in seconds allowed for the lifting column to move from one end position to another Figure 37 Lifting column with digital I O signals Note It is highly recommended to use a lifting column with feedback from end switches and current motion state Witho...

Page 50: ...t use digital_input 0 for pallet presence AND product presence sensor as this will result in unexpected behavior 6 1 5 1 Using MODBUS or General Purpose Boolean Registers In addition to the standard digital I O and configurable digital I O it is now possible to select and use the general purpose registers and external Modbus signals with Pally Modbus Registers In order to use MODBUS registers in P...

Page 51: ...t the general purpose IOs in the configuration of the Pally installation node 6 1 5 2 Input Outputs in Pally Start Palletizing Signal These input signals shall be connected to physical push buttons where the operator can confirm that the empty pallet is present and ready for palletizing After a pallet has been finished the program will not start palletizing the same pallet position again until the...

Page 52: ...n LED tower These output signals can be connected to light sources that indicate the status of the palletizer robot as follows Red Program stop emergency stop normal program stop Yellow Only one pallet is present the robot will stop when the current pallet is full Green Both pallets are present the robot will continue with the next when current pallet is full Do not use the Green output in project...

Page 53: ...tizing patterns In order to edit this field the daemon has to be stopped Therefore if this field is disabled then navigate to the System tab or click the Next button in the current tab and press the Stop daemon button Patterns in the patterns directory This table shows all the patterns that are uploaded to the patterns storage directory on the robot It is possible to delete patterns from the robot...

Page 54: ...e used to upload patterns from a plugged in USB stick to the patterns storage directory on the robot It is only possible to use this feature if the Automatic upload of patterns is disabled Figure 39 Pattern management 6 1 7 Advanced This configuration screen is reserved for advanced features and options Operation mode Select Dual product option to enable palletizing two different products from two...

Page 55: ...es after making changes on the General I O Setup screen to show the actual names of each IO channel Back up By pressing this button files from the following folders will be copied to the USB stick that was plugged into the robot most recently root urcaps From this folder the installed urcap files are copied to the USB home no rocketfarm urcap palletmanager From this folder Pally s license is copie...

Page 56: ...40 Advanced installation settings 6 2 Program settings Create the palletizer main program first Go to Program Robot Empty Program Structure URCaps Pally Version 2 9 1 Rocketfarm AS 2021 All rights reserved 56 ...

Page 57: ...ength of the gripper Note The lifting column has to be at its zero position during calibration Note It is necessary to redo the calibration of the pickup position if the gripper dimensions on the Installation page are updated 6 2 1 1 Calibration Box Before calibrating the pickup position s enter the dimensions of the box that will be used for calibration as shown in the figure below Version 2 9 1 ...

Page 58: ...e sure to use the calibration box that was specified in the Calibration Box tab The production line name that is set is shown to the operator when the Pally program is running it is used to distinguish between the two pickup positions production lines when Pally is running in dual product mode see section 7 3 2 Dual Product Mode The value for the production line name defaults to Line 1 for the pri...

Page 59: ...Figure 43 Naming the pickup position production line Figure 44 Calibrating the pickup position with a calibration box Version 2 9 1 Rocketfarm AS 2021 All rights reserved 59 ...

Page 60: ...n or can be mounted with an offset The correct calibration of the pickup position with an offset mounted gripper is shown below Figure 45 Calibration of the pickup position with an offset mounted gripper Enter the conveyor dimensions and select the fixed guide position as shown below Figure 46 Total width of the conveyor at the pickup position Version 2 9 1 Rocketfarm AS 2021 All rights reserved 6...

Page 61: ...veyor and up the line Figure 47 The fixed guide orientation is looking from the end of the conveyor and up the line In this example the fixed guide position is left Figure 48 Configuration of the fixed side guide Version 2 9 1 Rocketfarm AS 2021 All rights reserved 61 ...

Page 62: ...ct Mode for more Figure 49 Enabling two pickup positions As for the primary pickup position the secondary pickup position production line must also be given a name if enabled The value for the production line name defaults to Line 2 for the secondary pickup please rename it to a name that makes sense to the operators if dual product mode is enabled To calibrate this second pickup position repeat t...

Page 63: ...t and the floor inclination angle are calibrated by moving the robot above three corners of an empty pallet These corners are shown in figure 19 Note The lifting column has to be at its zero position during calibration Note It is necessary to calibrate the pallet positions again when the gripper dimensions on the Installation page are updated Version 2 9 1 Rocketfarm AS 2021 All rights reserved 63...

Page 64: ...Figure 51 Illustration of the pallet calibration points Figure 52 Pallet corners can only be calibrated when the corresponding pallet is enabled Version 2 9 1 Rocketfarm AS 2021 All rights reserved 64 ...

Page 65: ...ed to limit the robot movement when approaching the pallet position This is especially important when the boxes on the pallet are very close to each other or the box dimensions have large variations and quick movements would increase the occurrence of unexpected safety stops Smart acceleration Use this setting to control how much the robot can limit the Maximum Acceleration value when moving large...

Page 66: ...nd accelerations may shorten the robot s lifespan and introduce additional safety hazards Note To avoid serious injury always use low values if the robot handles products with sharp edges A risk analysis must always be performed based on the products the robot is handling Box Free Height The elevation required for moving the box above the side guides and sensors figure 55 Select fixed to lift each...

Page 67: ...culated by the program in run time when rotation between the pick position and the target position is required By selecting fixed the program is enforced to finish all box rotations earlier and approach the target position to the exact distance Note The fixed approach option may have a significant impact on the path planning Pallet Lip Enforces a vertical approach with the specified length on the ...

Page 68: ...idle position for the robot while it is waiting for an empty pallet or a product It is recommended to define this point further away from the pickup position leaving some space for the operator to reach the conveyor when manual intervention is needed Version 2 9 1 Rocketfarm AS 2021 All rights reserved 68 ...

Page 69: ...ers for the Pally URCap The view is further divided into Path planning Language and System pages The Path planning view is for tuning the path planning algorithms of the Pally URCap Note Modifying these parameters will fundamentally change the program behaviour Version 2 9 1 Rocketfarm AS 2021 All rights reserved 69 ...

Page 70: ...specific target position This parameter has special importance when the gripper is offset mounted In this case the gripper orientation may have a huge impact on reach and performance Figure 59 Evaluating different gripper orientations at the pickup positions The list of evaluated gripper orientations for each setting is shown below None only A default Version 2 9 1 Rocketfarm AS 2021 All rights re...

Page 71: ...he robot base see the green areas on figure 61 When entering the smart exit search values consider the following coordinate system X 0 Y 0 is identical to or straight above the box free position Positive Y will move the box along the conveyor direction regardless of the current conveyor and gripper orientation Positive X will move perpendicular to the conveyor towards the actual pallet Note The pa...

Page 72: ...gh above the other boxes the alternative path planning algorithm moves the box Lower values let the box move closer to the top of the other boxes on the pallet higher values keep the box closer to the box free height figure 62 Figure 62 Illustration of the High approach boost parameters Version 2 9 1 Rocketfarm AS 2021 All rights reserved 72 ...

Page 73: ...smart exit search range Y Right pallet smart exit search range X Right pallet smart exit search range Y High approach boost Select the entry that is most similar to your layout Read more about typical configurations Operator language Select the operator language for the Product Selection Continue Existing Pallet and optionally the Operator Panel Currently the following languages are available Vers...

Page 74: ...ot have any effect on the Installation and Program pages and runtime log messages will not be translated Figure 64 Pally operator language selection System Settings on the System page should not be modified until it is explicitly requested by the support team to do so Version 2 9 1 Rocketfarm AS 2021 All rights reserved 74 ...

Page 75: ...n the log Info errors warnings summary of the palletizing steps and additional details about each calculation and robot movement is written in the log Debug everything is written in the log The default value is Warning which means that only errors and warnings are reported Note Log level debug is only valid for the current session and will be limited to info when the program is reloaded or the rob...

Page 76: ...different steps of the palletizing sequence as listed below Figure 66 Each callback entry point is illustrated on a flow chart beforePallet Executed every time before a new pallet is started This node is typically used to report the status to a production system beforeZone Executed before entering a new zone Zones are mainly used with lifting columns onNextTask Executed before calculations for the...

Page 77: ...r afterRelease Executed when the robot has released the box Use this node e g to report the progress to a production supervisor system Commands that move the robot back from the target position should be inserted here when a custom path is in use afterZone Executed after leaving a completed Zones are mainly used with lifting columns onSheet Executed every time when a shim paper needs to be inserte...

Page 78: ...Figure 68 Example of custom message after a pallet is completed Figure 69 Shim paper functions can be organized into subprograms Version 2 9 1 Rocketfarm AS 2021 All rights reserved 78 ...

Page 79: ...pallets Usually no additional configuration is required Figure 70 Classic setup with optimal pickup position 6 4 2 One pickup position with products coming in from the side Setups similar to illustration in figure 71 introduces a few points to be taken into consideration Pickup position should not be in the pallet shadow i e behind a pallet seen from the robot Use limited smart exit search Version...

Page 80: ...enough to move the box freely above the next boxes as shown on figure 72 Figure 71 Pickup position sideways The box will be moved above the other boxes on the conveyor Version 2 9 1 Rocketfarm AS 2021 All rights reserved 80 ...

Page 81: ...ces a few points to be taken into consideration Choose box_free high enough to move the box freely above the next boxes Use relatively large values for smart exit min_x and negative min_y Recommended settings approximately smart exit search area X 500 1000 mm smart exit search area Y 900 700 mm negative box free 350 mm or more depending on the box height Version 2 9 1 Rocketfarm AS 2021 All rights...

Page 82: ...th for conveyor 2 measured as in figure 75 Fixed guide width for conveyor 1 measured as b in figure 75 Measure conveyor total width from the left side of the left conveyor to the right side of the right conveyor See total width for both conveyor 1 and 2 measured as c in figure 75 Note Measure fixed guide width from the guide edge to the outer end of the conveyor area which may be the other conveyo...

Page 83: ...Figure 74 Two parallel pickup positions Figure 75 Measure the conveyor dimensions as if they were one big conveyor Version 2 9 1 Rocketfarm AS 2021 All rights reserved 83 ...

Page 84: ...izing from one pickup position to the opposite pallet In such projects set the box_free parameter large enough to move the box above other boxes on the other conveyor if necessary figure 77 Figure 76 Moving the box above other boxes on the other conveyor Version 2 9 1 Rocketfarm AS 2021 All rights reserved 84 ...

Page 85: ...be taken into consideration The pickup position should not be in the pallet shadow i e behind a pallet seen from the robot Use limited smart exit search Choose box free high enough to move the box freely above the next boxes figure 72 Note The second box may be in the pallet shadow making double grip impossible Version 2 9 1 Rocketfarm AS 2021 All rights reserved 85 ...

Page 86: ...a few points to be taken into consideration Individually configure smart exit for left and right pallet The smart exit search area may be limited to one single point or a very small area to avoid collision with the wall Note Reserve enough distance between the wall and the pallet to perform box rotation Version 2 9 1 Rocketfarm AS 2021 All rights reserved 86 ...

Page 87: ...ror recovery and shutdown of the robot 7 1 Creating the main program Create the palletizer main program as described in Program settings The palletizer program should be saved on the disk as a normal UR program Note that there should only be one Pally node in the Robot Program 7 2 Starting the program Start the robot Click the play button in Polyscope and then select Run program A window from Pall...

Page 88: ... open Below the graphical user interfaces for the single and dual product modes are described step by step 7 3 1 Single Product Mode In this mode the robot can palletize 1 product type from 1 or 2 pickup positions The first window that appears once the program is run is the Pattern Selection window as shown below Start a new pallet Select product by name Press Start Program button Palletize until ...

Page 89: ...stop the program or simply continue palletizing the current pallet Another option is to reset the current pallet this effectively means that the palletizing will continue on an empty pallet once the Continue Palletizing button is pressed but it continues using the same pattern as before Note that either the left or right pallet has to be confirmed before the palletizing will continue after the pal...

Page 90: ...o different product types from two different pickup positions dual product mode must be enabled All these cases are possible to achieve using dual product mode to allow for variations in the daily production plan Examples of various dual product mode setups are described in 6 4 4 Two parallel pickup positions and 6 4 5 Two opposite pickup positions Note When using a lifting column in dual product ...

Page 91: ...en to the production line the Pally program node Pickup tab Primary tab see section 6 2 1 Pickup Press the Next button to select a pattern for the secondary pickup the window shown in the figure below will then open Note that the name of the production line is now set to the value that was configured for the secondary pickup position in the Pally program node see section 6 2 1 Pickup Version 2 9 1...

Page 92: ...he production lines is not going to be used for a run of Pally simply uncheck the Production line in use checkbox for that line By disabling a production line Pally will run in single pickup mode 1 product type from 1 pickup position Please note that at least one production line has to be set to in use for Pally to start Dual Pickup Mode To achieve the case where Pally palletizes 1 product type fr...

Page 93: ...if the same pattern is chosen for the two production lines but one or more of the patterns have a partial pallet setting as described in the next section then Pally will run in dual product mode and not dual pickup mode Continue Existing Pallet s If the program is stopped once Pally has palletized at least one box in any of the three cases i e single pickup mode dual pickup mode or dual product mo...

Page 94: ... shown Figure 85 Continue existing pallet window in dual product mode It is possible to change the pattern on each production line which subsequently changes the pattern on the pallet that is used by that production line by pressing the Change pattern on line button If this button is pressed then the pattern selection window for that production line is opened This window is shown in the figure bel...

Page 95: ...first pallet that is palletized The remaining pallets will be palletized according to the selected pattern Note This description of the Partial Pallet feature applies to both single and dual product mode as described in 7 3 1 Single Product Mode and 7 3 2 Dual Product Mode To alter the start conditions on a pallet or the stop conditions use the partial pallet feature Once a pattern is selected in ...

Page 96: ...er the Stop after total boxes label Make sure to input values in the range between 1 and the original amount of boxes in the selected pattern Any total box number higher than the original amount of boxes will not be valid Note that the new value for the total boxes will only apply to the first pallet that is palletized the remaining pallets will have the original amount of boxes in the selected pa...

Page 97: ...input validation on this field yet One must therefore make sure that the number inserted into the new start box field is less than or equal to the amount of boxes that are present in the specified start layer If the selected pattern contains shim paper it is important to note that these shim paper layers do not count as a layer Therefore to specify a new start layer for a pattern with shim paper s...

Page 98: ...w of the data structures used To start defining patterns use a web browser and navigate to https palletizer rocketfarm no where you can create your patterns in a graphical editing environment All patterns can be exported to a regular text file and further edited in any text editor Figure 89 the graphical pattern editing environment at https palletizer rocketfarm no 8 1 The pallet pattern definitio...

Page 99: ...r missing value label not defined the maximum number of boxes the robot can pick at once maxGrip 1 single pick 2 double pick 3 triple pick up to 8 pick or automatic calculation of the maximum number of boxes in multi grip maxGripAuto a unique name a description and a timestamp and some additional metadata for the graphical pattern editor It is important that the product dimensions are as accurate ...

Page 100: ...built by using the same layer type repeatedly column stack or alternating two or more different layouts flipped rotated etc in order to create interlocking between the layers for increased stability layerTypes name normal pattern x 588 5 y 217 r 90 270 x 211 5 y 217 r 90 270 g 0 f 1 altPattern x 588 5 y 217 r 90 270 approach inverse name rotated pattern Version 2 9 1 Rocketfarm AS 2021 All rights ...

Page 101: ...on the next layer The only exception is the use of zones see Zones 8 3 4 Enforced single multi grip By default the robot will try to palletize two or more adjacent boxes in one turn in order to maximize throughput The number of boxes that the robot can pick at once is limited by the maxGrip parameter in the pattern file as well as the installed product sensors on the production line and the size o...

Page 102: ... the following values are allowed 0 90 180 and 270 where 0 corresponds to the configured pickup position in the URCap other values are angles counterclockwise when seen from above 8 3 6 Left and right pallet layout Each layout can be defined separately for the left and right pallet position Even if the left and right pallets look identical the order of the boxes can be different The default layout...

Page 103: ...lly 2 3 mm The number of shim paper layers is not limited The shim paper layer type is marked with the class separator field and must not contain the pattern and altPattern structures 8 4 Layers The layers structure defines the actual layout of the final pallet Each layer is built according to one of the layer types as described above layers normal rotated shimPaper normal rotated Figure 93 layers...

Page 104: ...contain a position transformation hint the posData array which may be used by the Pally URCap to control a lifting column The posData value is optional and the program will not control the lifting column unless the value is explicitly defined zones z condition value 730 posData 0 0 0 z condition value 980 posData 0 0 466 x condition value 200 z condition value 1220 posData 0 0 466 x condition valu...

Page 105: ...s the following format x y z in the robot base coordinate system in millimeters The default position is 0 0 0 8 5 3 Location of the zone definitions For compatibility reasons it is possible to define the zones in 3 different locations which are loaded in the following order 1 the zones and altZones structures included in the pattern file recommended 2 a separate file called pattern zones json for ...

Page 106: ...ion variables are changed once at startup before entering the main loop of the palletizer program To change any configuration variable use the initial MoveJ program node under the Pally program node to enter script lines or script files that modify the variables The global keyword is not required in this case 9 3 Changing configuration at runtime It might be necessary to modify some configuration ...

Page 107: ...points Name Description Reference rf_p11 Right pallet lower right calibration point Program Pallet Right rf_p13 Right pallet upper left calibration point Program Pallet Right rf_p14 Right pallet lower left calibration point Program Pallet Right rf_p21 Left pallet lower left calibration point Program Pallet Left rf_p23 Left pallet upper right calibration point Program Pallet Left rf_p24 Left pallet...

Page 108: ...entical to rf_calib_pu_dim rf_P1_calib_h Height of the pallet that was used during calibration of the right pallet position Program Pallet Height rf_P2_calib_h Height of the pallet that was used during calibration of the left pallet position Identical to rf_P1_calib_h 9 4 3 Path planning Name Description Reference rf_above_pickup Distance from pickup to above pickup position Program Advanced Path ...

Page 109: ... Movement Waypoints Approach rf_high_appr_boost High approach boost Program Advanced Path planning High approach boost rf_collision_radius_min Collision radius in meters around the Z axis when moving above the top of the shoulder joint Default 0 15 rf_collision_radius_max Collision radius around the Z axis when moving below the top of the shoulder joint Default 0 35 rf_approach_auto Approach dista...

Page 110: ... sensors installed rf_grip_delay Delay after turning on the gripper at pickup in seconds Default 0 2 rf_grip_release_delay Delay after turning off the gripper at target Default 0 2 rf_foam_height Gripper foam suction cup squeezing length in meters Default 0 02 9 4 5 Lifting column Name Description Reference rf_lift_max_stroke Maximum stroke in meters Installation Lifting column Characteristics Max...

Page 111: ...henever possible Default True re use current lifting column position whenever possible 9 4 6 Other Special Name Description Reference rf_goto_wait Go through the default waiting position before picking the next box Default False rf_release_strategy Bitmask that selects one or more waypoints to be removed from the return path Bit 0 remove box free Bit 1 remove target position Bit 2 use vertical exi...

Page 112: ...erting idle instructions to avoid Runtime is too much behind and Lost communication with controller issues Default 20 on E series Default 100000 on CB series Has no effect on CB 3 0 rf_cpuidle_l Increment for the idle tick counter variant 1 Default 2 on E series Default 1 on CB series Has no effect on CB 3 0 rf_cpuidle_xl Increment for the idle tick counter variant 2 Default 4 on E series Default ...

Page 113: ...rence in radians between actual joint positions and target joint positions before turning on the gripper for picking the box Setting to 0 will disable joint deviation monitoring at this point Default 0 0001 in radians rf_final_blend_radius Blend radius between the last waypoint on the return path and the first waypoint towards the next pickup NOTE Blend between moveL and moveJ may often cause unpr...

Page 114: ...e use the following method pallet_dim palletmanager_daemon get_pallet_dimensions 0 The method has one input parameter that is reserved and must be 0 The result is an array with 3 elements width length and height in millimeters The following example converts each value to meters and stores them in 3 separate variables pallet_width pallet_dim 0 1000 pallet_length pallet_dim 1 1000 pallet_height pall...

Page 115: ...r of boxes completed number of boxes not completed Please note that boxes in the current task are not included in the completed and the uncompleted boxes Use the following example to get detailed status of the pallet pallet_state palletmanager_daemon get_pallet_state 0 nr_total pallet_state 0 total number of boxes nr_done pallet_state 1 completed nr_not_done pallet_state 2 not completed nr_current...

Page 116: ... conveyor dimension settings Check fixed guide position left right settings Adjust the smart exit search area parameters Increase the High Approach Boost value 7 Box collision to the mounting base Change box rotation if possible Consider using the inverse approach Adjust the rf_collision_radius_max value 8 Robot collision to the mounting base Try to pick multiple boxes at once Change the box rotat...

Page 117: ... instructions in the popup message Change the box order or box rotation Adjust the rf_lift_safe_down value Consider using a lifting column with higher stroke 16 Program stops with Acceleration has been reduced extremely Make sure the gripper dimensions are entered properly under Installation Pally Gripper Move the Smart Acceleration slider one step right 17 Communication with controller lost error...

Reviews: