background image


www.raloy.com


          1 (866) 395-5927 


Chapter 1  Getting Started 


1.1 

Important Safeguards 

Please read all of these instructions carefully before you use the device. Save this manual for future reference.


Legal Information 

First English printing, October 2002 

Information in this document has been carefully checked for accuracy; however, no guarantee is given to the 
correctness of the contents. The information in this document is subject to change without notice. We are not 
liable for any injury or loss that results from the use of this equipment. 

Safety Instructions 

  Unplug equipment before c

leaning. Don’t use liquid or spray detergent; use a moist cloth. 

  Keep equipment away from excessive humidity and heat. Preferably, keep it in an air-conditioned 

environment with temperatures not exceeding 40º Celsius (104º Fahrenheit). 

  When installing, place the equipment on a sturdy, level surface to prevent it from accidentally falling and 

causing damage to other equipment or injury to persons nearby.  

  When the drawer is in an open position, do not cover, block or in any way obstruct the gap between it and 

the power supply. Proper air convection is necessary to keep it from overheating. 


Arrange the equipment’s power cord in such a way that others won’t trip or fall over it. 


If you are using a power cord that didn’t ship with the equipment, ensure that it is rated for the voltage and 
current labeled on the equipment’s electrical ratings label. The voltage rating on the cord should be higher 
than the one listed on the equipment’s ratings label. 

  Observe all precautions and warnings attached to the equipment. 

  I

f you don’t intend on using the equipment for a long time, disconnect it from the power outlet to prevent 

being damaged by transient over-voltage. 

  Keep all liquids away from the equipment to minimize the risk of accidental spillage. Liquid spilled onto the 

power supply or on other hardware may cause damage, fire or electrical shock. 

  Only qualified service personnel should open the chassis. Opening it yourself could damage the 

equipment and invalidate its warranty. 

  If any part of the equipment becomes damaged or stops functioning, have it checked by qualified service 

personnel. 

CAUTION: Slide/rail mounted equipment is not to be used as a shelf or a work space. 

What the warranty does not cover 

  Any product, on which the serial number has been defaced, modified or removed. 

  Damage, deterioration or malfunction resulting from: 

o

  Accident, misuse, neglect, fire, water, lightning, or other acts of nature, unauthorized product 

modification, or failure to follow instructions supplied with the product. 

o

  Repair or attempted repair by anyone not authorized by us. 

o

  Any damage of the product due to shipment. 

o

  Removal or installation of the product. 

o

  Causes external to the product, such as electric power fluctuation or failure. 

o

  Use of supplies or parts not meeting our specifications. 

o

  Normal wear and tear. 

o

  Any other causes which does not relate to a product defect. 

  Removal, installation, and set-up service charges. 


Summary of Contents for RF117HD Series

Page 1: ...re in Picture PIP Picture by Picture PBP capability 104 key keyboard with either touchpad or trackball SUN Micro or MAC keyboard options available New enhanced aesthetics with molded front handle Shor...

Page 2: ...USB DVI D KVM via RCX 6 Cable 11 1 10 3 RF117HD Connection to USB VGA server via RCB 6 cable 12 1 10 4 RF117HD Connection to external USB VGA KVM via RCB 6 cable 12 1 10 5 RF117HD Connection to HDMI D...

Page 3: ...s electrical ratings label The voltage rating on the cord should be higher than the one listed on the equipment s ratings label Observe all precautions and warnings attached to the equipment If you d...

Page 4: ...d can radiate radio frequency energy and if not installed and used in accordance with the instructions may cause harmful interference to radio communications However there is no guarantee that interfe...

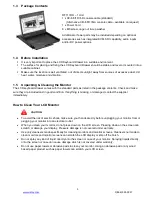
Page 5: ...kage contents Check and make sure they are included and in good condition If anything is missing or damaged contact the supplier immediately How to Clean Your LCD Monitor CAUTION To avoid the risk of...

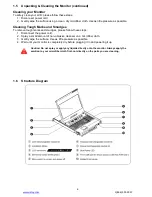
Page 6: ...ges To remove tough marks and smudges please follow these steps 1 Disconnect the power cord 2 Spray a small amount of non abrasive cleanser on a microfiber cloth 3 Gently wipe the surface Use as littl...

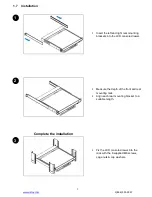
Page 7: ...mounting brackets into the LCD console drawer Measure the depth of the front and rear mounting rails Align each rear mounting bracket to a suitable length Complete the installation Fix the LCD console...

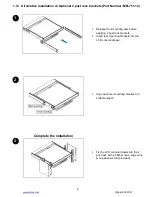
Page 8: ...2 Release front mounting ears before applying 2 post rack brackets Insert rear mounting brackets into the LCD console drawer Align each rear mounting bracket to a suitable length Complete the installa...

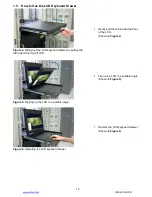
Page 9: ...is located on the outside of each slide Shown in Figure 1 Figure 2 Pull and hold the black arrow button on either side of the LCD keyboard drawer to unlock Shown in Figure 2 Figure 3 Push the LCD keyb...

Page 10: ...rawer by pulling the tab toward the front of LCD Gently pull the tab toward the front of the LCD Shown in Figure 4 Figure 5 Flipping up the LCD to a suitable angle Flip up the LCD to a suitable angle...

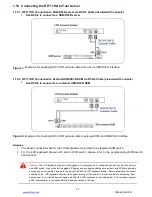
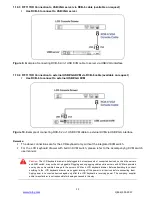
Page 11: ...the LCD keyboard only without the integrated KVM switch For the LCD keyboard drawer with built in KVM switch please refer to the accompanying KVM switch user manual Caution The LCD keyboard drawer is...

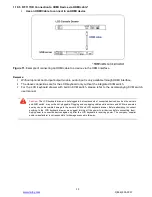
Page 12: ...ut the integrated KVM switch For the LCD keyboard drawer with built in KVM switch please refer to the accompanying KVM switch user manual Caution The LCD keyboard drawer is hot pluggable but component...

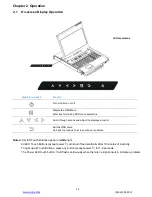
Page 13: ...h please refer to the accompanying KVM switch user manual Caution The LCD keyboard drawer is hot pluggable but components of connected devices such as the servers and KVM switch may not be hot pluggab...

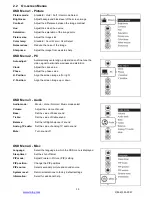
Page 14: ...ions and adjust the displayed control Exit the OSD menu Go back to previous on screen menu or submenu Notes All LED Touch Buttons appear in white light All LED Touch Buttons except power will shut off...

Page 15: ...and distortion Clock Adjust the clock value Phase Adjust the phase value H Position Align the screen image left or right V Position Align the screen image up or down OSD Menu 3 Audio Audio mode Movie...

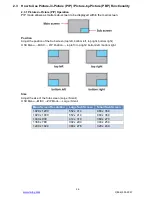
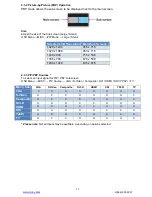
Page 16: ...position of the Sub screen top left bottom left top right bottom right OSD Menu MISC PIP Position top left top right bottom left bottom right Size Adjust the size of the Sub screen Large Small OSD Men...

Page 17: ...16 1440 x 900 715 x 536 1366 x 768 678 x 508 1280 x 1024 635 x 476 2 3 3 PIP PBP Sources To select an input signal for PIP PBP Sub screen OSD Menu MISC PIP Source VGA S Video Composite DVI HDMI SDI YP...

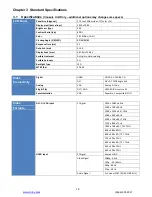
Page 18: ...face hardness 3H Backlight Type LED MTBF hrs 20 000 Video Connectivity Digital HDMI HDMI 1 1 CEA 861 D DVI DVI D TMDS single link Analog VGA Analog 0 7Vp p Plug Play DVI VGA VESA EDID structure 1 3 Sy...

Page 19: ...ON 34W or less Power saving mode 4W or less Power button OFF 1W or less Regulatory Safety Approval FCC CE Environmental Conditions Operating Temperature 0 to 50 C degree Humidity 20 90 non condensing...

Page 20: ...ravelling distance 3 0 3mm Switch life 10 million life cycle time Software support MS Windows 7 2008 2003 2000 XP ME 98 DOS Linux Mac Standard Keyboard Mouse Specifications Supported layouts G Style k...

Page 21: ...ted touchpad MAC keyboard with integrated Trackball MAC keyboard specific Keys F1 Decrease display brightness F9 Fast forward F2 Increase display brightness F10 Mute sound F3 Mission control Only work...

Page 22: ...SUN keys including Stop Cut Paste Compose Copy and Help 104 key notepad keyboard with full numerical pad and SUN function USB interface Num LED in Off mode Key pad behaves as a SUN Solar system admin...

Page 23: ...ent Combo KVM integration with either 8 16 32 ports Option with low cost PS 2 KVM Please ask your supplier for full KVM details 4 2 Audio Input Option 3 5mm audio jacks for audio in out and 2W 2W spea...

Page 24: ...x 1 0 8Vp p 75 ohm 3G SDI OUT BNC x 1 Active through equalized relocked Standard Compliance Video SMPTE 425M 274M 296M 125M ITU R BT 656 Audio SMPTE 299M 272M C Compatible Video Format 3G SDI 1080p 6...

Page 25: ...ange 9 18V 18 36V 36 75V Input current No load 50 mA 50 mA 50 mA Full load 4950 mA 2450 mA 1220 mA Output rating Output voltage 12 Volt 12 Volt 12 Volt Output current 4 16A 4 16A 4 16A Efficiency 84 8...

Page 26: ...9 x 1 73 590 x 768 x 140 mm 23 2 x 30 2 x 5 5 10 8 kg 23 8 lb 15 8 kg 34 8 lb 1 The weight is only for the single console models and will vary with accessories options such as integrated KVM SDI audi...

Page 27: ...o modify product specifications without prior notice and assumes no responsibility for any error which may appear in this publication All brand names logo and registered trademarks are properties of t...

Reviews: