background image

Hardening or cracking

Deformation or fatigue

If a wiper blade or wiper arm is damaged, replace the
affected wiper arm or blade with a new unit. Do not
attempt to repair a wiper arm or blade that is damaged.

Wiper Blade Removal/Installation

CAUTION!

Do not allow the wiper arm to spring back against the
glass without the wiper blade in place or the glass
may be damaged.

1. Lift the wiper arm to raise the wiper blade off of the

glass, until the wiper arm is in the full up position.

2. To disengage the wiper blade from the wiper arm,

flip up the locking tab.

3. Tilt the lower end of the wiper blade away from the

arm and with one finger, push the release tab
toward the wiper arm.

4. Slide the wiper blade down towards the base of the

wiper arm.

5. With the wiper blade disengaged, remove the wiper

blade from the wiper arm by holding the wiper arm
with one hand and separating the wiper blade from
the wiper arm with the other hand (move the wiper
blade down toward the base of the wiper arm and
away from the J hook in the end of the wiper arm).

6. Gently lower the wiper arm onto the glass.

Installing The Front Wipers

1. Lift the wiper arm off of the glass, until the wiper

arm is in the full up position.

2. Position the wiper blade under the hook on the tip

of the wiper arm with the wiper locking tab open.

3. Insert the receiver bracket on the wiper assembly

into the hook on the tip of the arm through the
opening in the wiper blade under the locking tab.

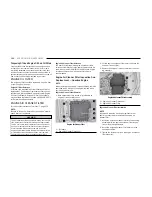
Windshield Wiper Arm And Blade

1 — Wiper
2 — Locking Tab
3 — Wiper Arm

Wiper Locking Assembly

1 — Wiper
2 — Locking Tab

Wiper Disengaging

1 — Locking Tab
2 — Wiper
3 — Release Tab

Removing Wiper From Wiper Arm

1 — Wiper
2 — Locking Tab
3 — Wiper Arm J Hook

296

SERVICING AND MAINTENANCE

Summary of Contents for CHASSIS CAB 2024

Page 1: ...ur through your vehicle s heritage knowing what steps to take following an accident or scheduling your next appointment we know you will find the app an important extension of your Ram vehicle Simply...

Page 2: ...use extreme caution when using any device or feature that may take their attention off the road Use of any electrical devices such as cellular telephones computers portable radios vehicle navigation...

Page 3: ...HICLE 15 2 3 GETTING TO KNOW YOUR INSTRUMENT PANEL 67 3 4 STARTING AND OPERATING 97 4 5 MULTIMEDIA 165 5 6 SAFETY 223 6 7 IN CASE OF EMERGENCY 265 7 8 SERVICING AND MAINTENANCE 278 8 9 TECHNICAL SPECI...

Page 4: ...o Memory 27 Memory Position Recall 28 SEATS 28 Manual Adjustment Front Seats If Equipped 28 Manual Adjustment Rear Seat If Equipped 29 Power Adjustment Front Seats If Equipped 29 Heated Seats If Equip...

Page 5: ...ine 72 MIDLINE INSTRUMENT CLUSTER DIESEL 73 Diesel Instrument Cluster 74 HIGHLINE INSTRUMENT CLUSTER DIESEL 75 Diesel Instrument Cluster 76 PREMIUM INSTRUMENT CLUSTER DIESEL 77 Premium Instrument Clus...

Page 6: ...EAR PARK ASSIST IF EQUIPPED 133 ParkSense Sensors 133 ParkSense Warning Display 133 ParkSense Display 133 Enabling And Disabling ParkSense 136 Service The ParkSense Park Assist System 136 Cleaning The...

Page 7: ...ehicle Assistance FAQs If Equipped 212 Connected Services Remote Vehicle Start FAQs 212 Connected Services Remote Horn Lights FAQs 213 Connected Services Account FAQs If Equipped 213 Data Collection P...

Page 8: ...rive Belt Inspection 291 Draining Fuel Water Separator Filter 292 Engine Mounted Fuel Filter Replacement 293 Underbody Mounted Fuel Filter Replacement 293 Priming If The Engine Has Run Out Of Fuel 294...

Page 9: ...ASSIS FLUIDS AND LUBRICANTS 340 CUSTOMER ASSISTANCE SUGGESTIONS FOR OBTAINING SERVICE FOR YOUR VEHICLE 342 Prepare For The Appointment 342 Prepare A List 342 Be Reasonable With Requests 342 IF YOU NEE...

Page 10: ...ce and engineering specialists to acquaint you with the operation and maintenance of your vehicle It is supplemented by customer oriented documents Within this information you will find a description...

Page 11: ...eo monitors DVD Blu Ray heaters stoves refrigerators etc For warranty cover age and service on these items contact the applicable manufacturer Operating instructions for the special equipment installe...

Page 12: ...emperature Warning Light page 89 Hood Open Warning Light page 89 Oil Pressure Warning Light page 89 Red Warning Lights Oil Temperature Warning Light page 90 Seat Belt Reminder Warning Light page 90 Tr...

Page 13: ...ght MIL page 90 Electronic Stability Control ESC Active Warning Light page 91 Electronic Stability Control ESC OFF Warning Light page 91 Yellow Warning Lights LaneSense Warning Light page 91 Low Washe...

Page 14: ...or Light page 93 Cold Ambient Derate Mode Indicator Light page 93 Diesel Exhaust Brake Indicator Light page 93 Yellow Indicator Lights Forward Collision Warning FCW Off Indicator Light page 93 Low Die...

Page 15: ...n Fuel Indicator Light page 94 Green Indicator Lights Adaptive Cruise Control ACC Set With Target Indicator Light page 94 Adaptive Cruise Control ACC Set With No Target Detected Indicator Light page 9...

Page 16: ...icator Lights page 94 White Indicator Lights Adaptive Cruise Control ACC Ready Indicator Light page 94 Cruise Control Ready Indicator Light page 94 White Indicator Lights LaneSense Indicator Light pag...

Page 17: ...s to follow page 346 To Lock Unlock The Doors If the vehicle is equipped with remote power door locks push and release the unlock button on the key fob once to unlock the driver s door Push the unlock...

Page 18: ...Key Fob The replacement battery model is one CR2032 battery NOTE Customers are recommended to use a battery obtained from Mopar Aftermarket coin battery dimensions may not meet the original OEM coin...

Page 19: ...formed at an autho rized dealer This procedure consists of programming a blank key fob to the vehicle electronics A blank key fob is one that has never been programmed NOTE When having the Sentry Key...

Page 20: ...ignition switch The push button ignition can be placed in the following modes OFF The engine is stopped Some electrical devices e g power locks alarm etc are still available ACC Engine is not started...

Page 21: ...Operation of the Remote Start system windows door locks or other controls could cause serious injury or death HOW TO USE REMOTE START Push and release the Remote Start button on the key fob twice with...

Page 22: ...remain off to allow for optimal front row performance Automatic Temperature Control ATC If Equipped The climate controls will automatically adjust to the optimal temperature and mode settings dependi...

Page 23: ...art or run an engine in a closed garage or confined area Exhaust gas contains carbon mon oxide which is odorless and colorless Carbon mon oxide is poisonous and can cause serious injury or death when...

Page 24: ...using the door lock knob To lock each door push the door lock knob on each door trim panel downward To unlock the front doors pull the inside door handle to the first detent To unlock the rear doors...

Page 25: ...doors may unlock when water is sprayed on the Passive Entry door handles if the key fob is located outside of the vehicle within 5 ft 1 5 m of the handle If the vehicle is unlocked by Passive Entry a...

Page 26: ...le without the vehicle unlocking The Passive Entry system depends on a key fob that is not fully discharged of its coin battery capacity When the key fob battery is low the instrument clus ter will di...

Page 27: ...s warning may result in serious injury or death HEATED STEERING WHEEL IF EQUIPPED The steering wheel contains a heating ele ment that helps warm your hands in cold weather The heated steering wheel ha...

Page 28: ...et to Hey Uconnect and can be repro grammed through the Uconnect Settings GET STARTED All you need to control your Uconnect system with your voice are the buttons on your steering wheel Helpful hints...

Page 29: ...sed to activate the memory save function The 1 and 2 buttons which are used to recall either of two saved memory profiles PROGRAMMING THE MEMORY FEATURE To create a new memory profile perform the foll...

Page 30: ...stment Both front seats are adjustable forward or rearward The manual seat adjustment handle is located under the seat cushion at the front edge of each seat While sitting in the seat pull up on the h...

Page 31: ...curely locked into position If the seatback is not securely locked into position the seat will not provide the proper stability for child seats and or passengers An improperly latched seat could cause...

Page 32: ...er s seat will move about 2 4 inches 6 cm rearward if the driver s seat posi tion is greater than or equal to 2 7 inches 6 77 cm forward of the rear stop The seat will return to its previously set pos...

Page 33: ...e minutes The engine must be running for the heated seats to operate VENTILATED SEATS IF EQUIPPED Front Ventilated Seats Located in the seat cushion are small fans that draw the air from the passenger...

Page 34: ...th a front bench seat the center head restraint is not adjustable or removable WARNING All occupants including the driver should not oper ate a vehicle or sit in a vehicle s seat until the head restra...

Page 35: ...occupants Follow the reinstallation instructions prior to operating the vehicle or occupying a seat DRIVER ADJUSTABLE PEDALS IF EQUIPPED The adjustable pedals system is designed to allow a greater ra...

Page 36: ...rror automatically adjusts for headlight glare from vehicles behind you NOTE The Automatic Dimming feature is disabled when the vehicle is in REVERSE to improve rear view viewing The Automatic Dimming...

Page 37: ...ns cannot be changed view can still be changed NOTE The Digital Rearview Mirror is not as effective during nighttime driving in low light applications due to low ambient light levels In the event that...

Page 38: ...sor Slide On Rod feature allows for additional flexibility in positioning the sun visor to block out the sun 1 Fold down the sun visor 2 Unclip the visor from the corner clip 3 Pivot the sun visor tow...

Page 39: ...osition To return the control to the large mirror push the Power Telescoping Mirror Switch a second time Manual Telescoping Mirrors To extend the Manual Telescoping Mirrors pull the mir ror outward to...

Page 40: ...lare when the inside mirror adjusts POWER MIRRORS IF EQUIPPED The controls for the power mirrors are located on the driver s door trim panel The power mirror controls consist of mirror select but tons...

Page 41: ...on on the door panel followed by closing the door After exiting the vehicle close the doors then push the lock button on the key fob After exiting the vehicle close the doors then touch the lock icon...

Page 42: ...inate in all ignition positions The rear guidance lights will turn off when the vehicle transmission is placed in DRIVE The rear guidance lights will also illuminate when the cargo light switch is pre...

Page 43: ...g It is recommended that you erase all the channels of your HomeLink before you use it for the first time ERASING ALL THE HOMELINK CHANNELS To erase the channels follow this procedure 1 Place the igni...

Page 44: ...light stays on constantly pro gramming is complete 2 Push the programmed HomeLink button to con firm that the garage door opener motor operates If the garage door opener motor does not operate repeat...

Page 45: ...T erase the channels If you unplugged the garage door opener device for programming plug it back in at this time Reprogramming A Single HomeLink Button Canadian Gate Operator To reprogram a channel th...

Page 46: ...NOTE For vehicles sold in Canada rotate the headlight switch clockwise from the parking lights and instrument panel lights position to the first detent to turn on headlights parking lights and instrum...

Page 47: ...lights by lightly pulling the multifunction lever toward you This will cause the high beam headlights to turn on and remain on until the lever is released AUTOMATIC HEADLIGHTS IF EQUIPPED This system...

Page 48: ...is feature can be programmed through the Uconnect system page 165 The headlight delay feature is automatically acti vated if the headlight switch is left in the AUTO posi tion when the ignition is pla...

Page 49: ...ts are manually activated by the headlight switch NOTE Battery saver mode is canceled if the ignition is ON If the headlights remain on while the ignition is placed in the OFF position the exterior li...

Page 50: ...adlights on rotating the instrument panel dimmer control upward will increase the brightness of the instrument panel lights Rotating the ambient dimmer control will adjust the interior and ambient lig...

Page 51: ...nob is released It will then resume the intermittent inter val previously selected If the washer knob is pushed while in the off position the wipers will turn on and cycle approxi mately three times a...

Page 52: ...system Rain Sensing wipers are not operational when the vehicle is in the Remote Start mode Once the operator is in the vehicle and has placed the ignition switch in the RUN position Rain Sensing wip...

Page 53: ...n the faceplate to change the cur rent airflow setting to Defrost mode The Front Defrost indicator illuminates when Front Defrost is on Air comes from the windshield and side window demist outlets Whe...

Page 54: ...tribu tion mode The airflow distribution mode can be adjusted so air comes from the instrument panel out lets floor outlets defrost outlets and demist outlets Touchscreen Press one of the MODE buttons...

Page 55: ...operation Recirculation is disabled automatically if this mode is selected Attempting to use Recirculation while in this mode causes the LED in the control button to link and then turn off Front Defro...

Page 56: ...ir out of the panel outlets and warmer air from the floor outlets Floor Mode Air comes from the floor outlets A slight amount of air is directed through the defrost and side window demister outlets Mi...

Page 57: ...may cause window fogging Vacation Storage For information on maintaining the Climate Control sys tem when the vehicle is being stored for an extended period of time see page 329 Window Fogging Vehicle...

Page 58: ...ated in both the driver and passenger rear door trim panels Center Console Storage If Equipped The center storage compartment is located between the driver and passenger seats The storage compart ment...

Page 59: ...ole is equipped with two front storage bins located in front of the center storage com partment These storage bins may be equipped with tandem doors Push the front bin to access the cup holders or pus...

Page 60: ...pped Located in the back of both the driver and passenger front seats are pockets that can be used for storage Storage Bin Regular Cab If Equipped The storage bin is located behind the front seats and...

Page 61: ...he load floor in the up position When stopping fast or in an accident the load floor could move to the down position causing serious injury 4 Reverse the procedure to put the load floor back in the se...

Page 62: ...ample if a device is plugged into the Type A USB port and another device is plugged into the Type C USB port a message will appear and allow you to select which device to use Third and fourth USB port...

Page 63: ...es that the ignition must be in the ON RUN or ACC positions for the outlet to provide power The battery symbol indicates that the outlet is connected to the battery and can provide power at all times...

Page 64: ...e Wireless Charging Pad if equipped This inverter can power cellular phones electronics and other low power devices requiring power up to 400 Watts Certain video game consoles exceed this power limit...

Page 65: ...he text Wireless Charger and accompanying phone and charging icon graphics The charger is available for the left side only Alternatively if you have a phone holder in your vehicle it has a rubber surf...

Page 66: ...fob in close proximity of the charging pad blocks the fob from being detected by the vehicle and prevents the vehicle from starting WINDOWS POWER WINDOWS IF EQUIPPED The window controls on the driver...

Page 67: ...the driver s door trim panel allows you to disable the window controls on the rear passenger doors To disable the window controls push and release the window lockout button the indi cator light on the...

Page 68: ...LOSE THE HOOD In one continuous motion pull down on the front edge of the hood with moderate force until the angle is below the crossover point where the gas props are no longer resisting and let the...

Page 69: ...GETTING TO KNOW YOUR INSTRUMENT PANEL MIDLINE INSTRUMENT CLUSTER GASOLINE 67 3...

Page 70: ...e indicates that the engine cooling sys tem is operating satisfactorily The gauge pointer will likely indicate a higher temperature when driving in hot weather up mountain grades or when towing a trai...

Page 71: ...HIGHLINE INSTRUMENT CLUSTER GASOLINE GETTING TO KNOW YOUR INSTRUMENT PANEL 69 3...

Page 72: ...ng system is dangerous You or oth ers could be badly burned by steam or boiling cool ant It is recommended to call an authorized dealer for service if your vehicle overheats If you decide to look unde...

Page 73: ...T CLUSTER GASOLINE Holding the OK button on the Instrument Cluster Display controls located on the steering wheel will allow you to change your display from Digital to Analog GETTING TO KNOW YOUR INST...

Page 74: ...e Cap paragraph page 297 CAUTION Driving with a hot engine cooling system could dam age your vehicle If the temperature gauge reads H pull over and stop the vehicle Idle the vehicle with the air condi...

Page 75: ...MIDLINE INSTRUMENT CLUSTER DIESEL GETTING TO KNOW YOUR INSTRUMENT PANEL 73 3...

Page 76: ...ous high or low reading under normal driving conditions may indicate a lubrication system malfunction Immediate service should be obtained from an authorized dealer 5 Speedometer Indicates vehicle sp...

Page 77: ...HIGHLINE INSTRUMENT CLUSTER DIESEL GETTING TO KNOW YOUR INSTRUMENT PANEL 75 3...

Page 78: ...To put it another way there s additional storage capacity in the tank above the Full mark that s not represented in the gauge You may not see any movement in the reading even after driving up to 200 m...

Page 79: ...NT CLUSTER DIESEL Holding the OK button on the Instrument Cluster Display controls located on the steering wheel will allow you to change your display from Analog to Digital GETTING TO KNOW YOUR INSTR...

Page 80: ...he fuel door is located 4 Tachometer Indicates the engine speed in revolutions per minute RPM x 1000 5 Instrument Cluster Display The instrument cluster display features a driver interactive display p...

Page 81: ...nd Naviga tion tile with no Ethernet navigates to Speedometer submenu Press up or down to select different screen within selected category If Menu button is pressed while in this view cluster will ret...

Page 82: ...QR code to access your digital experience Your vehicle is equipped with an engine oil change indicator system The Oil Change Required message will display in the instrument cluster display after a sin...

Page 83: ...Push the ACC on off button located on the steering wheel until one of the following displays in the instru ment cluster display Adaptive Cruise Control Off When ACC is deactivated the display will re...

Page 84: ...c will be grayed out A message indicat ing the necessary speed for the feature to become available will also display Fuel Economy If Equipped Push and release the up or down arrow button until the Fue...

Page 85: ...he number of stored warning messages Push and release the right or left arrow button to cycle through stored messages Settings If Equipped Personal Settings allows the driver to set and recall fea tur...

Page 86: ...uel Gauge Hide Range Show Range Favorite Menus Trip Info Navigation Off Road Trailer Tow If Equipped show hide Audio show hide Defaults Restores All Settings To Default Settings Restore Cancel Commerc...

Page 87: ...s required to remove the trapped PM If this occurs the Exhaust Filter XX Full Safely Drive at Highway Speeds to Remedy message will be displayed in the instrument cluster display If this message is di...

Page 88: ...i tially displayed on pickup applications and approxi mately 7 gallons 26 Liters are required on chassis cab applications Speed Limited to 5 MPH in XXX mi Refill DEF This message will continuously dis...

Page 89: ...periodically during driving The message will be accompanied by a single chime We recommend you drive to the near est authorized dealer and have your vehicle ser viced as soon as possible BATTERY SAVER...

Page 90: ...tem check menu may appear different based upon equipment options and current vehicle status Some telltales are optional and may not appear RED WARNING LIGHTS Air Bag Warning Light This warning light...

Page 91: ...PARK position The light should turn off If the light remains on with the vehicle running your vehicle will usually be drivable however see an authorized dealer for service as soon as possible NOTE Thi...

Page 92: ...ission damage or transmission failure Vehicle Security Warning Light If Equipped This light will flash at a fast rate for approxi mately 15 seconds when the vehicle security system is arming and then...

Page 93: ...ight remains on after several ignition cycles and the vehicle has been driven several miles kilome ters at speeds greater than 30 mph 48 km h see an authorized dealer as soon as possible to have the p...

Page 94: ...rd or tire inflation pressure label If your vehicle has tires of a different size than the size indicated on the vehicle placard or tire inflation pres sure label you should determine the proper tire...

Page 95: ...tor Light If Equipped This light alerts the driver that the 4WD power transfer case is in the NEUTRAL mode and the front and rear driveshafts are disen gaged from the powertrain 4WD Lock Indicator Lig...

Page 96: ...This indicator light will illuminate when the front fog lights are on LaneSense Indicator Light If Equipped The LaneSense indicator light illuminates solid green when both lane markings have been det...

Page 97: ...ission control system It could also affect fuel economy and driveability The vehicle must be serviced before any emissions tests can be performed If the MIL is flashing while the vehicle is running se...

Page 98: ...not proceed to the I M station The MIL will not flash at all and will remain fully illuminated until you place the ignition in the off position or start the engine This means that your vehicle s OBD I...

Page 99: ...hicle in NEUTRAL is not possible unless the Manual Park Release has been activated For the Manual Park Release operation information page 274 AUTOPARK ROTARY SHIFTER AND 8 SPEED TRANSMISSION ONLY Auto...

Page 100: ...g chime will continue until you shift the vehicle into PARK or the driver s door is closed ALWAYS DO A VISUAL CHECK that your vehicle is in PARK by looking for the P in the instrument cluster display...

Page 101: ...f the engine fails to start within 10 seconds wait 10 to 15 seconds to allow the starter to cool then repeat the Extended Park Starting procedure 4 If the engine fails to start after eight attempts al...

Page 102: ...n Go in the ACC or ON RUN position A child could operate power windows other controls or move the vehicle AUTOMATIC TRANSMISSION Start the engine with the transmission in the NEUTRAL or PARK position...

Page 103: ...he Normal Starting procedure except 1 Pushing the engine start button with the driver s foot on the brake will move the ignition from OFF or ACC to RUN and will illuminate the Wait To Start Indicator...

Page 104: ...tion switch to the OFF position and wait at least two minutes for the starter to cool before repeating start procedure 5 Check that the Oil Pressure Warning Light has turned off 6 Release the parking...

Page 105: ...or mance will result if intake air heater is not recycled 2 Heat generated by the intake air heater dissipates rapidly in a cold engine If more than two minutes pass between the time the Wait To Start...

Page 106: ...NOTE Use of Climatized ULSD or Number 1 ULSD Fuel results in a noticeable decrease in fuel economy Climatized ULSD Fuel is a blend of Number 2 ULSD and Number 1 ULSD Fuels which reduces the tem perat...

Page 107: ...he crankcase diluting the oil and causing rapid wear to the engine If the engine is allowed to idle or the truck is driven on low engine speed drive cycles for more than two hours the system will auto...

Page 108: ...od ule This process will create a clicking sound and at times will make noise even with the vehicle shut off This is normal as the DEF dosing module is purging DEF If at any time the check engine ligh...

Page 109: ...nkcase diluting the lubricating oil and causing rapid wear to the engine COOLING SYSTEM TIPS To reduce potential for engine and transmission over heating in high ambient temperature conditions take th...

Page 110: ...r use Non Detergent Oil or Straight Mineral Oil in the engine or damage may result NOTE A new engine may consume some oil during its first few thousand miles kilometers of operation This should be con...

Page 111: ...ob in or near the vehicle or in a location accessible to children and do not leave a vehicle equipped with Keyless Enter n Go in the ACC or ON RUN position A child could operate power windows other co...

Page 112: ...will change from Yellow to Green when Automatic Smart Exhaust Brake is enabled Pushing the exhaust brake button again will toggle the exhaust brake mode to off AUTOMATIC TRANSMISSION You must press an...

Page 113: ...PARK the ignition must be in the ON RUN position engine running or not and the brake pedal must be pressed The BTSI will timeout if brake pedal is pressed for three minutes or longer continuously whi...

Page 114: ...PARK position P and is not blinking With the brake pedal released verify that the gear selector will not move out of PARK REVERSE R This range is for moving the vehicle backward Shift into REVERSE on...

Page 115: ...l operation NOTE Even if the transmission can be reset we recommend that you visit an authorized dealer at your earliest pos sible convenience An authorized dealer has diagnostic equipment to assess t...

Page 116: ...ERSE when the accelerator pedal is released and the vehicle is stopped Be sure to keep your foot on the brake pedal when shifting between these gears The transmission gear selector has only PARK REVER...

Page 117: ...der heavy loading condi tions in hilly terrain traveling into strong head winds or while towing a heavy trailer select TOW HAUL mode or use the Electronic Range Select ERS shift control to select a lo...

Page 118: ...set the transmission gear limit to FOURTH gear the transmission will not shift above FOURTH gear but will shift through the lower gears normally You can switch between DRIVE and ERS mode at any vehic...

Page 119: ...the torque converter clutch is not engaged it may seem as if the transmission is not shifting properly when cold this is normal Using the Electronic Range Select ERS shift control when the transmissio...

Page 120: ...e N Neutral position disengages both the front and rear drive shaft from the powertrain and will allow the vehicle to roll even if the transmission is in PARK The parking brake should always be applie...

Page 121: ...e type and circumference on each wheel Any difference in tire size can cause damage to the drivetrain Because four wheel drive provides improved traction there is a tendency to exceed safe turning and...

Page 122: ...h Range 2WD Four Wheel Drive High Range 4WD HIGH Four Wheel Drive Low Range 4WD LOW N Neutral For additional information on the appropriate use of each transfer case position see the following informa...

Page 123: ...ge 121 The SERV 4WD Warning Light monitors the electroni cally shifted four wheel drive system If this light remains on after engine start up or illuminates during driving it means that the four wheel...

Page 124: ...tion indica tor light is on until all requirements have been met The ignition switch must be in the ON RUN position for a shift to take place and for the position indica tor lights to be operable If t...

Page 125: ...s normal and is not detrimental to the vehicle or occupants With the vehicle rolling at 2 to 3 mph 3 to 5 km h shift the transmission into NEUTRAL While the vehicle is coasting at 2 to 3 mph 3 to 5 km...

Page 126: ...substantial increase in steer ing effort especially at very low vehicle speeds and during parking maneuvers NOTE Increased noise levels at the end of the steering wheel travel are considered normal an...

Page 127: ...em or cause it to go faster than you want You could lose control and have an accident Always ensure the sys tem is off when you are not using it To Set A Desired Speed Turn the Cruise Control on When...

Page 128: ...nce provided by Cruise Control while traveling on highways and major roadways However it is not a safety system and not designed to prevent collisions The Cruise Control function performs differently...

Page 129: ...depends on ACC system status Push the Adaptive Cruise Control ACC on off button until one of the following appears in the instrument cluster display Adaptive Cruise Control Off When ACC is deactivated...

Page 130: ...tion the proximity warning does not activate and no alarm will sound even if you are too close to the vehicle ahead since neither the presence of the vehicle ahead nor the vehicle to vehicle distance...

Page 131: ...ontinue to adjust in 5 mph increments until the button is released The new set speed is reflected in the instrument cluster display Metric Speed km h Pushing the SET or SET button once will result in...

Page 132: ...s a warning for the driver to take action and does not mean that the Forward Collision Warning system is applying the brakes autonomously Overtake Aid When driving with ACC engaged and following a veh...

Page 133: ...com mended Doing so may block the sensor and inhibit ACC FCW operation CLEAN FRONT WINDSHIELD WARNING The ACC FCW Limited Functionality Clean Front Wind shield warning will display and a chime will so...

Page 134: ...vehicle ahead detected Once the vehicle is out of the curve the system will resume your original set speed This is a part of normal ACC system functionality NOTE On tight turns ACC performance may be...

Page 135: ...e rear ParkSense sensors are shipped loose Please refer to the Ram Body Builder s Guide for more information The four ParkSense sensors are to be located in the rear fascia bumper and monitor the area...

Page 136: ...e Flashing Arc 2 No Tone Flashing Arc 7 Fast Tone Flashing Arc 3 Fast Tone Flashing Arc 8 Slow Tone Solid Arc 4 Continuous Tone Flashing Arc 9 Slow Tone Solid Arc 5 Continuous Tone Flashing Arc 10 Sin...

Page 137: ...47 39 inches 120 100 cm 39 25 inches 100 65 cm 25 12 inches 65 30 cm Less than 12 inches 30 cm Audible Alert Chime None Single 1 2 Second Tone Slow Slow Fast Fast Continuous Arcs Left None None None N...

Page 138: ...the display overlay Wipe Sensors If the system needs service the display overlay will read Service Under this condition ParkSense will not operate If Front Rear ParkSense Unavailable Wipe Sensors appe...

Page 139: ...ne boundaries When both lane markings are detected and the driver drifts out of the lane no turn signal has been applied OR the driver departs the lane on the opposite side of the applied turn signal...

Page 140: ...se system operates with similar behavior for a right lane departure when only the right lane marking has been detected Left Lane Departure Both Lane Lines Detected When the LaneSense system is on and...

Page 141: ...nes and may not provide alerts when changing lanes under all driving conditions Even if your vehicle is equipped with the BSA system always check your vehicle s mirrors glance over your shoulder and u...

Page 142: ...of the vehicle and its projected back up path based on the steering wheel position The active guidelines will show separate zones that will help indicate the distance to the rear of the vehicle These...

Page 143: ...e and side mir rors in addition to a fourth Rear Back Up Camera NOTE For the 3500 4500 and 5500 Chassis Cab vehicles the Rear Back Up Camera is shipped loose and not installed Please refer to the Ram...

Page 144: ...View will be disabled when this is selected Back Up Camera View Pressing the Back Up Camera button will provide a full screen rear view with Zoom View NOTE If the Rear View Camera view was selected t...

Page 145: ...button The touchscreen X button on the display is pressed Vehicle is shifted into PARK Ignition is placed in the OFF position Vehicle speed is over 8 mph 13 km h for 10 seconds NOTE If the Surround V...

Page 146: ...ra image If Trailer Reverse Guidance is selected through manu ally activated Surround View Back Up Camera or Cargo Camera the following deactivation conditions apply The touchscreen X button on the di...

Page 147: ...ettings can be accessed The Trailer Surround View Camera settings can be accessed through Uconnect Settings by pressing the Trailer but ton in the Trailer Settings or the Camera Settings The system re...

Page 148: ...ected through the More Cameras menu an option to return to the More Cameras menu will display If the Trailer Surround Camera was manually activated through the Controls menu of the Uconnect system exi...

Page 149: ...activated by first pressing the Backup Camera or Cargo Camera if equipped button on the touchscreen followed by the AUX button located in the upper left corner of the rearview display On vehicles with...

Page 150: ...Indicator Light MIL to illuminate due to fuel vapors escaping from the system A poorly fitting fuel filler cap may cause the MIL to turn on To avoid fuel spillage and overfilling do not top off the f...

Page 151: ...sor For system messages and warnings page 78 NOTE Your vehicle is equipped with a DEF injection sys tem You may occasionally hear an audible clicking noise This is normal operation The DEF pump will r...

Page 152: ...content of the bottle into the DEF tank After the indication appears on the instrument clus ter display page 78 fill the DEF tank with no more than 6 gal 22 L CAUTION To avoid DEF spillage and possib...

Page 153: ...ctual tire size on your vehicle Replacement tires must be equal to the load capacity of this tire size RIM SIZE This is the rim size that is appropriate for the tire size listed INFLATION PRESSURE Thi...

Page 154: ...ximum front or rear GAWR A dangerous driving condition can result if either rating is exceeded You could lose con trol of the vehicle and have a collision Tongue Weight TW The TW is the downward force...

Page 155: ...is height H1 3 Attach the trailer to the vehicle without the weight distribution bars connected 4 Measure the height from the top of the front wheel opening on the fender to the ground this is height...

Page 156: ...oupling arm connects to the hitch mounted over the rear axle in the truck bed TRAILER HITCH TYPE AND MAXIMUM TRAILER WEIGHT The following chart provides the industry standard for the maximum trailer w...

Page 157: ...mote proper break in of your new vehicle drive train components the following guidelines are recommended CAUTION Do not tow a trailer at all during the first 500 miles 805 km the new vehicle is driven...

Page 158: ...personal injury An electronically actuated trailer brake controller is required when towing a trailer with electronically actuated brakes When towing a trailer equipped with a hydraulic surge actuated...

Page 159: ...0 25 mph 30 40 km h 1 Make sure the trailer brakes are in good working condition functioning normally and properly adjusted See a trailer dealer if necessary 2 Hook up the trailer and make the electri...

Page 160: ...r use with trailers with air or EOH trailer brake systems To determine the type of brakes on your trailer and the availability of controllers check with your trailer manufacturer or dealer Removal of...

Page 161: ...urn signal is activated from stalk Hazard switch is activated Any button on the key fob is pushed Ignition button is pushed High Beam stalk position is changed Sequence is canceled in the instrument c...

Page 162: ...r excessive wear The cutting edge should be to inches 6 cm to 1 2 cm above ground in snow plowing position Check that snowplow lighting is connected and func tioning properly SNOWPLOW PREP PACKAGE MOD...

Page 163: ...speeds operate in 4WD HIGH Vehicles with automatic transmissions should use 4WD LOW when plowing deep or heavy snow for extended periods of time to avoid transmission overheating Do not shift the tran...

Page 164: ...n and or transfer case damage Tow with all four wheels either ON the ground or OFF the ground using a vehicle trailer Tow only in the forward direction Towing this vehicle backwards can cause severe d...

Page 165: ...nition must be in the ON RUN position for a shift to take place and for the position indicator lights to be operable If the ignition is not in the ON RUN position the shift will not take place and no...

Page 166: ...more flowing and or rising water can carry your vehicle away swiftly Failure to follow this warning may result in injuries that are serious or fatal to you your passengers and others around you Shallo...

Page 167: ...d if installed in your vehicle it may increase the possi bility for vehicle systems to be breached As always if you experience unusual vehicle behavior contact an authorized dealer immediately NOTE To...

Page 168: ...y one touchscreen area may be selected at a time Depending on the vehicle s options feature settings may vary When making a selection press the button on the touchscreen to enter the desired menu Once...

Page 169: ...etting will allow you to change the display theme Units The available settings are Speed mph or km h Distance mi or km Fuel Consumption mpg US mpg UK L 100 km or km L Pressure psi kPa or bar Temperatu...

Page 170: ...or km h Distance mi or km Fuel Consumption mpg US mpg UK L 100 km or km L Pressure psi kPa or bar Temperature C or F Power HP US Gal HP UK or kW and Torque lb ft or Nm units of measurement independen...

Page 171: ...This setting will allow you to favorite app drawer pop ups with On and Off options App Drawer Unfavoritings Pop ups This setting will allow you to unfavorite app drawer pop ups with On and Off option...

Page 172: ...Pedestrian Emergency Braking This setting will turn the Pedestrian Emergency Braking system on or off LaneSense Warning This setting will change the distance at which the steering wheel will provide...

Page 173: ...the front camera when an obstacle is detected Clock When the Clock button is pressed on the touchscreen the system displays the different options related to the vehicle s internal clock NOTE Dependin...

Page 174: ...s in the Instrument Cluster Display Voice When the Voice button is pressed on the touchscreen the system displays the options related to the vehicle s Voice Recognition feature NOTE Depending on the v...

Page 175: ...ding on the vehicle s options feature settings may vary Setting Name Description Trailer Select Select from Trailer 1 Trailer 2 Trailer 3 and Trailer 4 These trailer designa tions can be used to save...

Page 176: ...mera when shifting out of REVERSE ParkView Backup Camera Active Guidelines This setting will turn the ParkView Backup Camera Active Guidelines on or off ParkView Backup Camera Fixed Guidelines This se...

Page 177: ...lights can be turned on or off This feature is only allowed by law in the country of the vehicle purchase Depending on the vehicle s options feature settings may vary Setting Name Description Headligh...

Page 178: ...fob on or off Sound Horn With Lock This setting will sound the horn when the Lock button is pushed on the key fob The Off setting will not sound the horn when the Lock button is pushed The 1st Press...

Page 179: ...Exit Seats This setting will automatically move the driver seat rearward when the engine is shut off The available settings are On and Off Key Off Options Engine Off Options When the Key Off Options E...

Page 180: ...d to the vehicle s sound system These settings can change the audio location within the vehicle adjust the bass or treble levels and auto play settings from an audio device or smartphone NOTE Dependin...

Page 181: ...of any connected phone on or off Navigation Pop Ups This setting turns receiving storing predictive Navigation Pop Ups on or off SiriusXM Setup When the SiriusXM Setup button is pressed on the touchs...

Page 182: ...Software Downloads over Wi Fi This setting will allow software updates to happen over Wi Fi Selectable options for the setting are On and Off System Information When the System Information button is...

Page 183: ...n can also be pressed to cancel the screen Restore Settings to Default This setting will return all the previously changed settings to their factory defaults Clear Personal Data This setting will disp...

Page 184: ...oses only and may not reflect exact software for your vehicle Uconnect 3 With 5 inch Display 1 RADIO Button 6 COMPASS Button 2 MEDIA Button 7 SETTINGS Button 3 PHONE Button 8 MORE Button 4 VOLUME On O...

Page 185: ...dio station Push the SCREEN OFF button on the faceplate to turn the screen on or off Push the MUTE button on the faceplate to turn the audio of the radio system off Push it again to turn the audio bac...

Page 186: ...safe and secure location where you can pull over and park safely to do so Stop use immediately if a problem occurs Failure to do so may cause injury or damage to the product See an authorized dealer...

Page 187: ...o Operation Pushing the top of the switch will seek up for the next available station and pushing the bottom of the switch will seek down for the next available station The button located in the cente...

Page 188: ...s and hold and then release the Seek Up or Seek Down button to advance the radio through the available stations or channels at a faster rate The radio stops at the next available station or channel wh...

Page 189: ...es not receive a signal in underground parking garages or tunnels No Subscription Radios equipped with a Satellite receiver require a sub scription to the SiriusXM Service When the radio does not have...

Page 190: ...t The radio begins playing the con tent at the point at which the press is released Forward Each press of the Forward button on the touchscreen forwards the content in steps of five seconds Forwarding...

Page 191: ...airing any of the items in the Favorites list You can scroll the Favorites list by pressing the Up and Down arrows located at the right side of the screen Scrolling can also be done by operating the T...

Page 192: ...Press the or button or press and drag the level bar to increase or decrease each of the equalizer bands The level value which spans between plus or minus nine is displayed at the top of each of the b...

Page 193: ...taining music to the Uconnect system Before proceeding the Bluetooth device must be paired to the Uconnect Phone to communicate with the Uconnect system On the Uconnect 3 With 5 inch Display push the...

Page 194: ...he touch screen to toggle the repeat functionality The Repeat button on the touchscreen is highlighted when active The Radio will continue to play the current track repeatedly as long as the repeat is...

Page 195: ...S drive safely with your hands on the steering wheel You have full responsibility and assume all risks related to the use of the Uconnect features and applications in this vehicle Only use Uconnect wh...

Page 196: ...mand button on the steering wheel HELP COMMAND If you need assistance at any prompt or if you want to know your options at any prompt say Help following the beep To activate the Uconnect Phone from id...

Page 197: ...tem at a time If No is selected sim ply select Uconnect from the mobile phone audio device Bluetooth screen and the Uconnect system will reconnect to the Bluetooth device NOTE For phones which are not...

Page 198: ...nload and update of a phonebook if supported begins as soon as the Bluetooth wire less phone connection is made to the Uconnect Phone for example after you start the vehicle A maximum of 5 000 contact...

Page 199: ...KEY PAD NUMBER ENTRY 1 Press the Phone button 2 Press the Dial Keypad button on the touchscreen 3 The Touch Tone screen will be displayed 4 Use the numbered buttons on the touchscreens to enter the n...

Page 200: ...auto reply message up to 160 characters NOTE Only the first 25 characters can be seen on the touchscreen while typing a custom message While in Do Not Disturb Conference Call can be selected so you c...

Page 201: ...Medium Vehicle Speed Low Road Noise Smooth Road Surface Fully Closed Windows Dry Weather Conditions WARNING ALWAYS drive safely with your hands on the wheel You have full responsibility and assume al...

Page 202: ...Phone refer to your iPhone User Manual Did You Know Voice Text Reply is not compatible with iPhone but if your vehicle is equipped with Siri Eyes Free you can use your voice to send a text message Sir...

Page 203: ...Guardian are available everywhere at all times particularly in remote or enclosed areas Other factors outside the control of SiriusXM Guard ian that may limit or prevent service delivery are hills st...

Page 204: ...Press Continue Activation from the confirma tion email It may take a short time before remote services will be available but you will be able to log into the Vehicle Branded App and the Owner s Site O...

Page 205: ...located on the rearview mirror or overhead console designed to enhance your driving experience if you should ever need assistance or support Description SOS Call offers a convenient way to get in con...

Page 206: ...nnection compatible with your device Vehicle must be powered in the ON RUN or ACC Accessory position with a properly functioning elec trical system WARNING Never place anything on or near the vehicle...

Page 207: ...e Start Press this button to start your vehicle Horn Lights Press this button to sound the horn and acti vate your lights Unlock Press this button to unlock your vehicle Cancel Vehicle Start Press thi...

Page 208: ...the vehicle is in motion the ignition key is on or during an emergency call NOTE All other remote services should be performed via your Owner s Site or through the Vehicle Branded App on your compati...

Page 209: ...console designed to enhance your driving experience if you should ever need assistance or support How It Works Simply push the ASSIST button in the vehicle and you will be presented with your ASSIST...

Page 210: ...t one time Any Wi Fi enabled device such as a laptop or any other portable enabled media can connect over your private in vehicle network A high speed secured connection lets anyone on your private ne...

Page 211: ...network connection compatible with your device Vehicle must be registered with SiriusXM Guardian and have an active subscription that includes the applicable feature NOTE Not all features of SiriusXM...

Page 212: ...k my vehicle name with your Voice Code Alexa ask vehicle brand to send 1000 Chrysler Drive Auburn Hills Michigan to my vehicle name Alexa ask vehicle brand what is the fuel level of my vehicle name An...

Page 213: ...button to cancel the call To cancel the call either push the SOS Call button again or press the Cancel button on the in vehicle touchscreen 2 What type of information is sent when I use the SOS Call...

Page 214: ...ICES STOLEN VEHICLE ASSISTANCE FAQS IF EQUIPPED 1 Can someone locate my vehicle To enhance your privacy and the privacy of others using your vehicle a stolen vehicle police report is required for you...

Page 215: ...my SiriusXM Guardian account There are three ways that you can register your SiriusXM Guardian Account Push the ASSIST button A call will be placed to an agent who can assist in registering your new...

Page 216: ...for refunds related to billing plans of other lengths and other circumstances 15 Can I cancel a subscription before it expires Yes If you have an annual subscription your subscrip tion will be cancele...

Page 217: ...tisfactorily improve from repositioning the mobile phone it is recom mended that the volume be turned down or off during mobile phone operation when not using the Uconnect system REGULATORY AND SAFETY...

Page 218: ...en select the OFF ROAD button on the main screen Off Road Pages can also be accessed through the app drawer OFF ROAD PAGES STATUS BAR The Off Road Pages Status Bar is located along the bottom of Offro...

Page 219: ...rmation is displayed 1 Status of Transfer Case 2 Status of the Rear Axles 3 Steering angle in degrees Status Bar 2WD 4WD 1 Transfer Case Status 2 Latitude Longitude 3 Altitude 4 Hill Descent Control S...

Page 220: ...isplays the vehicle s current pitch angle up and down and roll angle side to side in degrees The Pitch Roll gauges provide a visualiza tion of the current vehicle angle NOTE Pitch Roll values may show...

Page 221: ...on system and the current ride height of the vehicle The Suspension page will also indicate when the vehicle s height changes If vehicle is equipped with air suspension the Wheel Articulation image wi...

Page 222: ...F EQUIPPED If your vehicle is equipped with Trailer Tow Pages you will be able to view and edit different trailer settings for each of your unique trailers To access Trailer Tow Pages press on the Veh...

Page 223: ...maximize each gauge which will show you the Gauge Detail View page that will show specific gauge information and a status graph of the gauge over time To get back to the Trailer Info page select the s...

Page 224: ...ke Trailer Uconnect Settings will automatically turn on your trailer s lights once the trailer is attached to the vehicle For more information page 165 NOTE After two minutes if Cancel Light Check is...

Page 225: ...nnot prevent the natural laws of physics from acting on the vehicle nor can it increase braking or steering efficiency beyond that afforded by the condition of the vehicle brakes and tires or the trac...

Page 226: ...collisions including those resulting from excessive speed in turns driving on very slippery surfaces or hydroplaning The capabilities of a BAS equipped vehicle must never be exploited in a reck less...

Page 227: ...in a reckless or dangerous manner which could jeopardize the user s safety or the safety of others Vehicle modifications or failure to properly main tain your vehicle may change the handling charac te...

Page 228: ...in the ESC system If this light remains on after several ignition cycles and the vehicle has been driven several miles kilometers at speeds greater than 30 mph 48 km h see an authorized dealer as soo...

Page 229: ...ter than 40 mph 64 km h HDC exits immediately HDC detects excessive brake temperature Feedback To The Driver The instrument cluster has an HDC icon and the HDC switch has an LED icon which offers feed...

Page 230: ...exiting your vehicle Also be certain to place the transmission in PARK Failure to follow these warnings can result in a col lision or serious personal injury Ready Alert Braking RAB RAB may reduce the...

Page 231: ...the collision by braking but has not applied sufficient brake force the system will compensate and provide additional brake force as required If an FCW with Mitigation event begins at a speed below 32...

Page 232: ...ible collision warnings on objects closer to the vehicle This results in later warnings and provides less reaction time than the Far and Medium settings which allows for a more dynamic driving experie...

Page 233: ...ing System TPMS will warn the driver of a low tire pressure based on the vehicle recommended cold placard pressure NOTE The TPMS Warning Light will illuminate in the instru ment cluster and a chime wi...

Page 234: ...sure always reinstall the valve stem cap This will pre vent moisture and dirt from entering the valve stem which could damage the TPMS sensor NOTE The TPMS is not intended to replace normal tire care...

Page 235: ...to any of the following Signal interference due to electronic devices or driv ing next to facilities emitting the same radio fre quencies as the TPMS sensors Installing aftermarket window tinting tha...

Page 236: ...river through the instrument cluster when either a low tire pressure condition falls below 25 of the driver s set pressure or if a system malfunction occurs The instrument cluster will display the act...

Page 237: ...ressure System Service Required message for a minimum of five seconds Once the system fault is corrected the Trailer Tire Pres sure System Service Required message will no longer be displayed The vehi...

Page 238: ...back in the ON RUN position page 165 The customer may also store the pressure values chosen for each axle in the radio as a preset pressure The cus tomer will be allowed to store up to two sets of pr...

Page 239: ...d dealer IMPORTANT SAFETY PRECAUTIONS Please pay close attention to the information in this section It tells you how to use your restraint system properly to keep you and your passengers as safe as po...

Page 240: ...The driver should instruct all occupants to buckle their seat belts Change Of Status If the driver or outboard front seat passenger if equipped with outboard front passenger seat BeltAlert unbuckles...

Page 241: ...the buckle nearest you A seat belt that is too loose will not protect you properly In a sudden stop you could move too far forward increasing the possibility of injury Wear your seat belt snugly A sea...

Page 242: ...begins immedi ately above the latch plate 3 Slide the latch plate upward over the folded web bing The folded webbing must enter the slot at the top of the latch plate 4 Continue to slide the latch pla...

Page 243: ...the seat belt over the seat 3 Route the shoulder belt to the inside of the right head restraint 4 When the seat belt is long enough to fit insert the mini latch plate into the mini buckle until you h...

Page 244: ...a different occupant it must be removed WARNING ONLY use a Seat Belt Extender if it is physically required in order to properly fit the original seat belt system DO NOT USE the Seat Belt Extender if...

Page 245: ...tivate the ALR If the ALR is activated you will hear a clicking sound as the seat belt retracts Allow the webbing to retract completely in this case and then carefully pull out only the amount of webb...

Page 246: ...Switch Supplemental Side Air Bags If Equipped Front and Side Impact Sensors If Equipped Seat Belt Pretensioners If Equipped Air Bag Warning Light The Occupant Restraint Controller ORC monitors the rea...

Page 247: ...child in a rear facing child restraint Never install a rear facing child restraint in the front seat of a vehicle Only use a rear facing child restraint in the rear seat If the vehicle does not have a...

Page 248: ...o not mount any accessories to the knee impact bolsters such as alarm lights stereos citizen band radios etc Supplemental Side Air Bags Supplemental Seat Mounted Side Air Bags SABs If Equipped Your ve...

Page 249: ...e based on the severity and type of collision The side impact sensors aid the ORC in determining the appropriate response to impact events The system is calibrated to deploy the Side Air Bags on the i...

Page 250: ...sted below Occupant Restraint Controller ORC Air Bag Warning Light Steering Wheel and Column Instrument Panel Knee Impact Bolsters Driver and Front Passenger Air Bags Seat Belt Buckle Switch Supplemen...

Page 251: ...ribed below If you have any doubt contact an authorized dealer Enhanced Accident Response System Reset Procedure In order to reset the Enhanced Accident Response Sys tem functions after an event the i...

Page 252: ...CHILD RESTRAINTS Everyone in your vehicle needs to be buckled up at all times including babies and children Every state in the United States and every Canadian province requires that small children r...

Page 253: ...eight limit of the infant carrier Convertible child seats can be used either rear facing or forward facing in the vehicle Convertible child seats often have a higher weight limit in the rear facing di...

Page 254: ...ir back is against the seatback should use the seat belt in a rear seat Use this simple 5 step test to decide whether the child can use the vehicle s seat belt alone 1 Can the child sit all the way ba...

Page 255: ...ipped child seats without using the vehicle s seat belts Some seating positions may have a top tether anchorage but no lower anchor ages In these seating positions the seat belt must be used with the...

Page 256: ...from the outboard seating positions N A Regular Crew Split Rear Bench No Crew Full Rear Bench Regular Cab Front Full Bench Rear Seat Use the seat belt and tether anchor to install a child seat in the...

Page 257: ...mpatible child restraint systems will be equipped with a rigid bar or a flexible strap on each side Each will have a hook or connector to attach to the lower anchorage and a way to tighten the connec...

Page 258: ...sh to move it to its rear most position to make room for the child seat You may also move the front seat forward to allow more room for the child seat 3 Attach the lower hooks or connectors of the chi...

Page 259: ...seat belts in the passenger seating positions are equipped with either a Switchable Automatic Locking Retractor ALR or a cinching latch plate or both Both types of seat belts are designed to keep the...

Page 260: ...Follow the child restraint manufacturer s directions exactly when installing an infant or child restraint 1 For Crew Cab Models Place the child seat in the center of the seating posi tion If the seco...

Page 261: ...ion has a top tether anchorage con nect the tether strap to the anchorage and tighten the tether strap See page 259 for directions to attach a tether anchor 6 Test that the child restraint is installe...

Page 262: ...rap loops located between the rear glass and the back of the rear seat There is a tether strap loop located behind each seat ing position Follow the steps below to attach the tether strap of the child...

Page 263: ...over the seat back under the head restraint through the tether strap loop behind the seat and over to the tether strap loop behind either the right or left outboard seat 3 Pass the tether strap hook...

Page 264: ...jury or death It is extremely dangerous to ride in a cargo area inside or outside of a vehicle In a collision people riding in these areas are more likely to be seriously injured or killed Do not allo...

Page 265: ...SERIOUS INJURY or DEATH ALWAYS securely attach your floor mat using the floor mat fasteners DO NOT install your floor mat upside down or turn your floor mat over Lightly pull to confirm mat is secured...

Page 266: ...ulation mode If it is necessary to sit in a parked vehicle with the engine running adjust your heating or cooling con trols to force outside air into the vehicle Set the blower at high speed The best...

Page 267: ...stem and it should not be used when the vehicle is in motion Use it only when your vehicle is disabled or signaling a safety hazard warning for other motorists When you must leave the vehicle to seek...

Page 268: ...Device Screen Termination of the SOS Call will turn off the green LED light on the overhead console 2 The LED light located within the ASSIST and SOS but tons on the overhead console will turn green...

Page 269: ...console light located within the ASSIST and SOS buttons will continuously illuminate red The Device Screen will display the following mes sage Vehicle Device Requires Service Please con tact an autho...

Page 270: ...e that is on a jack If you need to get under a raised vehicle take it to a service center where it can be raised on a lift Never start or run the engine while the vehicle is on a jack The jack is desi...

Page 271: ...em facing the ground The jack should be used on level firm ground wher ever possible It is recommended that the wheels of the vehicle be chocked and that no person should be remain in a vehicle that i...

Page 272: ...the ground when tightening to ensure wheel centering and maximum wheel clamping Dual wheel models require a special heavy duty lug nut tightening adapter included with the vehicle to cor rectly tight...

Page 273: ...ly in the cap notch before attempting to pull off Replace the wheel covers using a rubber mallet to ease the installation Align the wheel cover vent holes to the wheel vent holes Tap on the wheel cove...

Page 274: ...an inadver tent electrical contact You could be seriously injured Batteries contain sulfuric acid that can burn your skin or eyes and generate hydrogen gas which is flammable and explosive Keep open f...

Page 275: ...viced by an authorized dealer Potential signs of vehicle overheating Temperature gauge is at HOT H Strong smell of coolant White smoke coming from engine or exhaust Coolant bottle coolant has bubbles...

Page 276: ...will allow your vehicle to roll away if it is not secured by the parking brake or by proper con nection to a tow vehicle Activating the Manual Park Release on an unsecured vehicle could lead to seri o...

Page 277: ...e achieved at wheel speeds of 5 mph 8 km h or less Whenever the transmission remains in NEU TRAL N for more than two seconds you must press the brake pedal to engage DRIVE or REVERSE Push the ESC OFF...

Page 278: ...vehicles under tow must be observed If you must use the accessories wipers defrosters etc while being towed the ignition must be in the ON RUN mode not the ACC mode If the key fob is unavailable or t...

Page 279: ...o the transmission or transfer case will occur if a front or rear wheel lift is used when towing Continued CAUTION Towing this vehicle in violation of the approved requirements can cause severe transm...

Page 280: ...ls For Diesel Engines configured with optional B20 capa bility are operated with greater than 5 levels of bio diesel the oil change interval must not exceed 12 500 miles 20 000 km or 400 hours whichev...

Page 281: ...0 130 000 140 000 150 000 Or Years 2 3 4 5 6 7 8 9 10 11 12 13 14 15 Or Kilometers 32 000 48 000 64 000 80 000 96 000 112 000 128 000 144 000 160 000 176 000 192 000 208 000 224 000 240 000 Change eng...

Page 282: ...the automatic transmission fluid AS66RCTransmission Only X X X Inspect the transfer case fluid change for any of the following police taxi fleet or frequent trailer towing X X Change the transfer case...

Page 283: ...months or 500 Hours or sooner if prompted by the oil change indicator system whichever comes first X X X X X X X X X X Additional Inspections Check the Diesel Exhaust Fluid DEF tank refill if necessa...

Page 284: ...e if necessary X X X X X X X X X X Inspect the brake linings X X X X X X Inspect and adjust parking brake X X X X X X Inspect drive belt replace as necessary X X X X X X Inspect wheel bearings X X X X...

Page 285: ...C transmission only X X Change automatic transmission fluid and filter s X Replace Crankcase Ventilation Filter CCV X X Flush and replace power steering fluid X Flush and replace engine coolant X WARN...

Page 286: ...oolant Pressure Cap 6 Engine Air Cleaner Filter 2 Engine Oil Fill 7 Power Steering Reservoir Cap 3 Engine Oil Dipstick 8 Power Distribution Center Fuses 4 Brake Fluid Reservoir Cap 9 Washer Fluid Rese...

Page 287: ...Cap 8 Battery 3 Engine Coolant Pressure Reservoir 9 Power Distribution Center Fuses 4 Engine Oil Fill 10 Engine Air Cleaner Filter 5 Engine Oil Dipstick 11 Power Steering Reservoir Cap 6 Automatic Tr...

Page 288: ...gnite and burn you Care must be exercised when filling or working around the washer solution After the engine has warmed up operate the defroster for a few minutes to reduce the possibility of smearin...

Page 289: ...is unused for an extended period of time incorrect oil extended oil changes or extended idling If the engine continues to tick or if the Malfunction Indicator Light MIL comes on see the nearest autho...

Page 290: ...e with the air induction system air cleaner hoses etc removed Failure to do so can result in serious personal injury Engine Air Cleaner Filter Selection The quality of replacement engine air cleaner f...

Page 291: ...performance your air conditioner should be checked and serviced by an authorized dealer at the start of each warm season This service should include cleaning of the condenser fins and a performance te...

Page 292: ...ing the blower can contact hands and may propel dirt and debris into your eyes resulting in personal injury The cabin air filter is located in the fresh air inlet behind the glove compartment Perform...

Page 293: ...G Do not attempt to inspect an accessory drive belt with vehicle running When working near the radiator cooling fan dis connect the fan motor lead The fan is temperature controlled and can start at an...

Page 294: ...uld stop the engine and drain the water from both of the filters CAUTION If the Water In Fuel Indicator Light remains on DO NOT START the engine before you drain water from the fuel filters to avoid e...

Page 295: ...nstall the filter dry and allow the in tank lift pump to prime the fuel system 1 Ensure engine is turned off 2 Place drain pan under the fuel filter drain hose 3 Open the water drain valve a quarter t...

Page 296: ...Add a substantial amount of fuel to the tank approximately 2 to 5 gal 8 L to 19 L 2 Three priming cycles must be completed Turn igni tion to the RUN position and wait approximately 30 seconds This wi...

Page 297: ...stems which help diesel vehicles meet stringent emission regulations DEF is a liquid reducing agent that reacts with engine exhaust in the presence of a catalyst to convert smog forming nitrogen oxide...

Page 298: ...lade disengaged remove the wiper blade from the wiper arm by holding the wiper arm with one hand and separating the wiper blade from the wiper arm with the other hand move the wiper blade down toward...

Page 299: ...loss of perfor mance have your vehicle serviced promptly Con tinued operation of your vehicle with a severe malfunction could cause the converter to overheat resulting in possible damage to the conve...

Page 300: ...oolant conforming to MS 90032 by an authorized dealer as soon as possible Do not use water alone or alcohol based engine coolant products Do not use additional rust inhibi tors or anti rust products a...

Page 301: ...k emergency assistance immediately Checking Coolant Level 6 4L Engine The level of the coolant in the pressurized coolant bottle should be between the MIN and MAX range on the bottle when the engine i...

Page 302: ...ed drop in fluid level may be caused by a leak and a system check should be conducted For further information page 340 WARNING Use only manufacturer s recommended brake fluid page 340 Using the wrong...

Page 303: ...ssion to fully engage in each position ending with the transmis sion in PARK 6 Remove the dipstick wipe it clean and reinsert it until seated 7 Remove the dipstick again and note the fluid level on bo...

Page 304: ...ity and or torque converter shudder and for 6 speed transmissions will require more frequent fluid and filter changes page 340 REAR AXLE AND 4X4 FRONT DRIVING AXLE FLUID LEVEL For normal service perio...

Page 305: ...d parts Devices such as hangers clamps and U bolts should be tight and in good condition Damaged components burned or blown out mufflers burned or rusted out exhaust pipes should be replaced according...

Page 306: ...s control caused noise emissions to exceed Federal standards are covered by this warranty for the life of the vehicle Maintenance Log and Service Chart Diesel Engines Noise Systems Maintenance Chart a...

Page 307: ...protect electrical systems against excessive current When a device does not work you must check the fuse element inside the blade fuse for a break melt Also please be aware that using power outlets fo...

Page 308: ...Cavity Cartridge Fuse Micro Fuse Description If Equipped F01 Spare F02 60 Amp Yellow ABS Pump Mtr Power Distribution Center Location 306 SERVICING AND MAINTENANCE...

Page 309: ...Green CBC 2 Ext Lights F11 40 Amp Green Brake SYS MOD ECU Valves F12 40 Amp Green CBC 3 Pwr Locks F13 40 Amp Green HVAC Blwr Mtr F14 40 Amp Green CBC 4 Ext Light F15 30 Amp Pink Power Side Step F16 3...

Page 310: ...0 Amp Pink Sunroof F36 30 Amp Pink Rear Defroster EBL F37 30 Amp Pink Diesel Frame Fuel HTR F38 30 Amp Pink ITBM F39 Spare F40 10 Amp Red Vented Seats F41 10 Amp Red Act Grille Shutter Dam F42 20 Amp...

Page 311: ...F61 10 Amp Red NH3 Sensor PM Sensor F62 10 Amp Red A C Clutch F63 20 Amp Yellow Ignition Coils CAPS F64 25 Amp Clear Fuel Injectors PCM F65 10 Amp Red RVDMP MOD BLE F66 10 Amp Red Sunroof USB RR RR M...

Page 312: ...Blue ASBM HVAC ICS R Heated Seats SW F85 10 Amp Red ORC Airbag F86 10 Amp Red ORC Airbag F87 10 Amp Red Air Susp ITBM SCCM TLR TPM F88 15 Amp Blue IP Cluster F89 Spare F90 20 Amp Yellow Power Outlet B...

Page 313: ...o be replaced this section includes bulb description and replacement part numbers NOTE See an authorized dealer for LED bulb replacement Interior Bulbs Bulb Name Bulb Number Overhead Console Lamps TS...

Page 314: ...AMP HIGH BEAM HEADLAMP FRONT PARK AND TURN IF EQUIPPED Low Beam See the following steps to replace 1 Open the hood 2 Disconnect and isolate the negative battery cable 3 Reach into the front wheel hous...

Page 315: ...ther oily surfaces Shortened bulb life will result Always use the correct bulb size and type for replacement An incorrect bulb size or type may overheat and cause damage to the lamp the bulb socket or...

Page 316: ...steps to replace 1 Remove the two screws holding the housing lens to the body as shown 2 Separate the connector holding the housing and wiring harness to the body 3 Turn the desired bulb socket a qua...

Page 317: ...P is absent from this tire size designation Example 215 65R15 96H LT Light Truck Metric tire sizing is based on US design standards The size designation for LT Metric tires is the same as for P Metric...

Page 318: ...ociated with the maximum load a tire can carry H Speed Symbol A symbol indicating the range of speeds at which a tire can carry a load corresponding to its load index under certain operating condition...

Page 319: ...he year 2001 Prior to July 2000 tire manufacturers were only required to have one number to represent the year in which the tire was manufactured Example 031 could represent the 3rd week of 1981 or 19...

Page 320: ...on your vehicle You will not exceed the tire s load carrying capacity if you adhere to the loading conditions tire size and cold tire inflation pressures specified on the Tire And Load ing Information...

Page 321: ...p 4 6 If your vehicle will be towing a trailer load from your trailer will be transferred to your vehicle Consult this manual to determine how this reduces the available cargo and lug gage load capaci...

Page 322: ...r tires is dangerous Overloading can cause tire failure affect vehicle handling and increase your stopping distance Use tires of the recommended load capacity for your vehicle Never overload them 320...

Page 323: ...lation contributes to a comfortable ride Overinflation produces a jarring and uncomfortable ride Tire Inflation Pressures The proper cold tire inflation pressure is listed on the driver s side B pilla...

Page 324: ...esigned to be reused Run Flat Tires If Equipped Run Flat tires allow you the capability to drive 50 miles 80 km at 50 mph 80 km h after a rapid loss of inflation pressure This rapid loss of inflation...

Page 325: ...or your tire will be found on the original equipment tire sidewall For more information relating to the Load Index and Speed Symbol of a tire page 315 It is recommended to replace the two front tires...

Page 326: ...above 75 mph 120 km h refer to original equipment or an authorized tire dealer for recommended safe operating speeds loading and cold tire inflation pressures While studded tires improve performance...

Page 327: ...is worn to the tread wear indicators the temporary use full size spare tire needs to be replaced Since it is not the same as your original equipment tire replace or repair the original equipment tire...

Page 328: ...icle and apply the brakes to remove the water droplets from the brake components This activity will remove the red rust on the brake rotors and prevent vehicle vibration when braking Dark Vapor Chrome...

Page 329: ...km Autosock devices do not require retightening Do not exceed 30 mph 48 km h Drive cautiously and avoid severe turns and large bumps especially with a loaded vehicle Do not drive for a prolonged peri...

Page 330: ...to account slower speeds and stops If the tires are rotated incorrectly the Auto localiza tion of the TPIS sensors will fail to locate correctly resulting in incorrect locations for the pressure val u...

Page 331: ...y to dissipate heat when tested under controlled condi tions on a specified indoor laboratory test wheel Sustained high temperature can cause the material of the tire to degenerate and reduce tire lif...

Page 332: ...wool or other aggressive material to clean the lenses PRESERVING THE BODYWORK Washing Wash your vehicle regularly Always wash your vehicle in the shade using Mopar Car Wash or a mild car wash soap an...

Page 333: ...hecking for cuts frays or loose parts Damaged parts must be replaced imme diately Do not disassemble or modify the seat belt system If your vehicle is involved in a collision or if you have questions...

Page 334: ...ther upholstery as damage to the upholstery may result GLASS SURFACES All glass surfaces should be cleaned on a regular basis with Mopar Glass Cleaner or any commercial household type glass cleaner Ne...

Page 335: ...g or hissing noises from the hydro boost system during hard braking conditions NOTE Under cold temperatures pedal effort will be higher than normal until the power steering fluid reaches oper ating te...

Page 336: ...cking sound see a dealer immediately Use of gasoline with a lower than recommended octane num ber can cause engine failure and may void or not be cov ered by the New Vehicle Limited Warranty Poor qual...

Page 337: ...blems that result from running CNG or LP are not the responsibility of the manufac turer and may void or not be covered under the New Vehicle Limited Warranty METHYLCYCLOPENTADIENYL MANGANESE TRICARBO...

Page 338: ...fuel tank with gasoline on your diesel vehicle Do not start the vehicle If you restart your vehicle you risk damaging the engine and fuel system Please call an authorized dealer for service A maximum...

Page 339: ...lution Must Adhere To Required Oil Change Interval Fuel dilution of lubricating oil has been observed with the use of biodiesel fuel Fuel in oil must not exceed 5 To ensure this limit is met your oil...

Page 340: ...ND LUBRICANTS 6 4L GASOLINE ENGINE Component Fluid Lubricant or Genuine Part Engine Coolant We recommend using Mopar Antifreeze Coolant 10 Year 150 000 Mile 240 000 km Formula OAT Organic Additive Tec...

Page 341: ...using Mopar CCV Filter Fuel Selection Use good quality diesel fuel from a reputable supplier in your vehicle Federal law requires that you must fuel this vehicle with Ultra Low Sulfur Highway Diesel...

Page 342: ...olant antifreeze Use of propylene glycol based engine coolant antifreeze is not recommended CHASSIS FLUIDS AND LUBRICANTS 6 4L GASOLINE ENGINE Component Fluid Lubricant or Genuine Part Automatic Trans...

Page 343: ...Case We recommend using Mopar BW44 44 Transfer Case Fluid Front and Rear Axle Fluid We recommend using SAE 75W 85 HD Ram GL 5 Synthetic Axle Lubricant in Front and Rear Axles Limited slip additive is...

Page 344: ...r or owner of the authorized dealer They want to know if you need assistance If an authorized dealer is unable to resolve the concern you may contact FCA US LLC s Customer Assistance center Any commun...

Page 345: ...do not have to worry about being stranded We will dispatch a service provider to provide you with a battery jump anytime day or night Lockout Service Whether the keys are locked in your vehicle or fr...

Page 346: ...o the State of California to cause cancer and birth defects or other reproductive harm In addition certain fluids contained in vehicles and certain products of compo nent wear contain or emit chemical...

Page 347: ...y to find and fix problems on computer controlled vehicle systems and features They show exactly how to find and correct problems using step by step trouble shooting and drivability procedures proven...

Page 348: ...t applicables aux appareils radio exempts de licence L exploitation est autoris e aux deux conditions suivantes 1 l appareil ne doit pas produire de brouillage et 2 l utilisateur de l appareil doit ac...

Page 349: ...337 Disposal 299 Anti Lock Brake System ABS 223 Anti Lock Warning Light 90 Assist Hill Start 227 Audio Settings 190 Audio Systems Radio 165 Auto Down Power Windows 64 Automatic Door Locks 24 Automati...

Page 350: ...ant Antifreeze 298 Coolant Level 298 299 Cooling Capacity 337 Disposal Of Used Coolant 299 Drain Flush And Refill 298 Inspection 299 Points To Remember 299 Pressure Cap 299 Radiator Cap 299 Selection...

Page 351: ...s 46 94 264 Flash To Pass 45 Flat Tire Stowage 270 Fluid Capacities 337 Fluid Leaks 264 Fluid Level Checks Brake 300 Power Steering 124 Fog Lights 46 314 Fold Flat Load Floor 58 Fold Flat Seats 28 29...

Page 352: ...98 100 Passive Entry 23 Keys 15 L Lane Change And Turn Signals 46 Lane Change Assist 46 LaneSense 137 Latches 264 Hood 66 Lead Free Gasoline 334 Leaks Fluid 264 Life Of Tires 323 Light Bulbs 264 311 L...

Page 353: ...nt Restraints 237 Octane Rating Gasoline Fuel 334 Oil Engine 287 338 Capacity 337 Dipstick 286 Disposal 288 Filter 288 338 Filter Disposal 288 Identification Logo 287 Materials Added To 287 Pressure W...

Page 354: ...9 Replacement Bulbs 311 Replacement Tires 323 Reporting Safety Defects 344 Restraints Child 250 Restraints Head 31 Roadside Assistance 207 212 Rotation Tires 327 S Safety 184 Safety Checks Inside Vehi...

Page 355: ...our Vehicle 329 Sunglasses Storage 58 Sway Control Trailer 228 Synthetic Engine Oil 287 T Telescoping Steering Column 25 Temperature Control Automatic ATC 54 Tilt Down 29 Up 29 Tilt Steering Column 25...

Page 356: ...fer Call To And From Mobile Phone 199 Voice Command 199 Uconnect Settings 165 Customer Programmable Features 23 Passive Entry Programming 23 Uconnect System 182 Uniform Tire Quality Grades 328 Univers...

Page 357: ......

Page 358: ......

Page 359: ...use extreme caution when using any device or feature that may take their attention off the road Use of any electrical devices such as cellular telephones computers portable radios vehicle navigation...
Page 360: ...ur through your vehicle s heritage knowing what steps to take following an accident or scheduling your next appointment we know you will find the app an important extension of your Ram vehicle Simply...

Reviews: