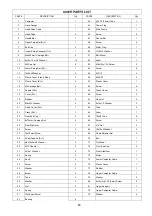
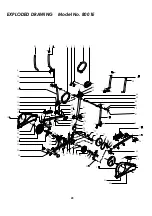
background image

8001E PARTS LIST 

PART# DESCRIPTION 

Qty 

PART# 

DESCRIPTION 

Qty 

1 Computer 

43 10*16*22mml 

Tube 

Hand Sponge 

44 

Power Plug 

Hand Pulse Cable 

45 

Main Frame 

1   

4 Hand 

Pulse 


46 Screw 

Handle Bar 

1   

47 

Sensor Set 

1   

Upper Swing Bar(R+L) 

1   

48 

Screw 

End Cap 

49 

Motor Plug 

1   

Upper Swing Sponges(R+L) 

1   

50 

17x22x3 Washer 

M8x35 mml Carriage Bolt 

51 

Belt Wheel 

10 

8x19x1.5 mmT Washer          

14 

52 

Arbor 

1  

11 

M8 Cap Nut 

53 

M8x15Lx1.25 Screw 

12 

Lower Swing Bar (R+L) 

1   

54 

Screw 

13 10x26x8 

Washer 

55  M5*15 

14 

Plastic Cover (Front+ Rear) 

2   

56 

M4.5*25 

15 

Plastic Cover (R+L) 

2   

57 

Plastic Cover 

16 

M6 Carriage Bolt 

58 

Screw 

17 

Pedals (R+L) 

1   

59 

Crank Cover 

18 Cover 

(R+L) 


60  Screw 

19 Rubber 

61  Cap 

Nut 

20 

M8x25L Washer 

62 

8x16x1.5 Washer 

21 

Chain Cover (R+L) 

1   

63 

Tube 

22 Crank 

(R+L) 


64  Arbor 

23 

Rear End Cap 

65 

19x38 Tube 

24 

8x70mml Carriage Bolt 

66 

Screw 

25 

Rear Stabilizer 

67 

3/8” Nut 

26 Screw 

68  10x19x3 

Washer 

27 

10x78mml Screw 

69 

Chain Adjuster Set 

2   

28 

Pedal Support (R+L) 

1   

70 

Belt 

29 

8x19x2mmT Washer 

71 

Fly Wheel 

30 

M10 Cap Nut 

72 

Front End Cap 

31 

6x14x1 Washer 

73 

Front Stabilizer 

32 Spring 

74  Motor 

33 Knob 

75  Lower 

Computer 

Cable 

34 Screw 

76  Plastic 

Cover 

35 Washer 

77  Rubber 

36 Screw 

78  Upper 

Computer 

Cable 

37 Tube 

79  Washer 

38 

Washer 

80 

8x15mmlx1.25 (5mm) Screw 

39 Nut 

81  Upper 

Support 


40 Spring 

78  Upper 

Computer 

Cable 

41 10x38mml 

Screw 

79  Washer 

42 Bearing 


19

Summary of Contents for HG-8001E

Page 1: ...HG 8001E ELLIPTICAL TRAINER USER S MANUAL ...

Page 2: ... and precautions 5 Keep children and pets away from the equipment The equipment is designed for adult use only The equipment is not suitable for therapeutic use 6 Before using the machine please check the nuts and bolts are securely tightened 7 Always use the equipment as mentioned If any defective components while assembling or checking the equipment has been found or you hear any unusual noises ...

Page 3: ...ustomer Service Department To help us assist you please note the product model number and serial number before calling The model number of the ELLIPTICAL TRAINER is HG 8001E The serial number can be found on a decal attached to the ELLIPTICAL TRAINER Before reading further please familiarize yourself with the parts that are labeled in the drawing below LEFT SIDE RIGHT SIDE 3 Computer Hand Pulse Up...

Page 4: ... 12 DVKHU 7 ASSEMBLY Assembly requires two people Set the parts in a cleared area and remove all packing materials Do not dispose of the packing materials until assembly is completed Identify your hardware Unpacking your ELLIPTICAL TRAINER where will be using it Being careful Not to damage Place your ELLIPCAL TRAINER on a level flat surface It is recommended that you place a protective covering on...

Page 5: ...5 with 2 carriage bolts 24 from the underside of stabilizers And secure them with 2 washers 10 and cap nuts 11 to main frame 45 STEP 2 I Connect the upper computer cable 78 with the lower computer cable 75 securely II Put upper support 81 into main frame 45 and secure it with washers 10 79 and screws 80 III Attach rubber 77 and plastic cover 76 in to main frame 45 5 67 3 45 fitnessfaq info ...

Page 6: ...the same for the left pedal bar 28L VI Attach the end of right swing bar 6R 12R to the front of pedal bar 28R with screw 27 and then secure with washer 29 and cap nut 30 tightly VII Do the same for the left swing bar 6L 12L STEP 4 I Attach right pedal 17R onto the right pedal bar with carriage bolt 16 And secure them with washers 31 springs 32 and knobs 33 tightly Do the same for the left pedal 17...

Page 7: ...1 on upper support 81 secure with 2 screws 66 and 2 washers 29 tightly III Connect hand pulse cable 3 to back of computer 1 Also connect the upper computer cable 78 with computer 1 IV Put the computer 1 into the plate of upper support 81 and fix it with screws 26 The machine is ready for use METER OPEREATION 7 67 3 78 ...

Page 8: ... to confirm the value you would like to set up During the start mode press this button to choose the time speed RPM calorie distance watt or pulse to display on the bigger digital number In the body fat measurement program press this button to read the next result after body exercise UP or DOWN Press UP or DOWN button to select the program form Manual Rolling Valley Fat Burn Ramp Mountain Interval...

Page 9: ...nd WATT Then Press UP or DOWN to adjust the values After pressing START STOP key to exercise please also apply the heart rate detector appropriately During the exercise the level of loading is not adjustable In this program computer will adjust the level of loading according to the value of WATT setup For example the level of loading may increase while the speed is too slow Also the level of loadi...

Page 10: ...TART STOP key to calculate again Then the calculation values of FAT BMR BMI BODY TYPE and a designed profile will show up shortly Press START STOP key to exercise The profile shown in the display is specially designed for your body type Fitness Test Press the Pulse Recovery Button The fitness note is for personal orientation and compares the pulse rate before and after training You will notice tha...

Page 11: ...e M male or F female Finish the user data input Program select and setting value C 1 Manual Program Press UP or DOWN button to select the Manual program Press the Enter Button to confirm the manual program The Time display will flash and then press UP or DOWN to set up the desired time to do the exercise Press ENTER button to confirm your setting value The distance display will flash and then pres...

Page 12: ...splay will flash and then press UP or DOWN button to set up the desired time to do the exercise Press ENTER button to confirm your setting value The distance display will flash and then press UP or DOWN button to set up the desired distance value Press ENTER button to confirm your setting value The Calories display will flash and then press UP or DOWN button to set up the desired calories to be co...

Page 13: ...ch the target the monitor will produce beep sound and then stop III If you set up more than one target and you would like to reach next target press start to exercise again C 5 HEART RATE CONTROL PROGRAM 60 H R C 75 H R C and 85 H R C Press the UP or DOWN button to select one of the heart rate control program Press the Enter Button to confirm your choice The Time display will flash and then press ...

Page 14: ...The AGE display will flash and then press UP or DOWN button to set up your sex Press ENTER button to confirm your setting value The gender display will flash and then press UP or DOWN button to set up your gender Press ENTER button to confirm your setting value Press START STOP button to begin body fat measurement After finished your measurement press the ENTER button to check your test results To...

Page 15: ...ed according to the FAT calculated Type 1 is from 5 to 14 Type 2 is from 15 to 24 Type 3 is from 25 to 29 Type 4 is from 30 to 39 Type 5 is from 40 to 50 D BMR Basal Metabolic Rate metabolism is the energy measured in calories expended by the body at rest to maintain normal bodily function E BMI BMI means Body Mass Index which is used for body shape adjustment F FAT WEIGHT The total body fat in ou...

Page 16: ...e in the first couple of weeks With increasing improvement of fitness the pulse rate should be slowly increased to 85 of your maximum pulse rate FAT BURING The body starts to burn fat at approx 60 of the maximum pulse rate To reach an optimum at burning rate it is advisable to keep the pulse rate between 60 70 of the maximum pulse rate The optimum training amount consists of three workouts per wee...

Page 17: ...t reach your limit Start to exercise in a tempo that you feel comfortable with After continuous training you can extend your training or adjust the item to a higher level Important Start your exercise slowly and increase intensity of exercises gradually You have a lot of time as you do your exercise at home You have to do some warming up without item before training Start and end your training wit...

Page 18: ... of knees and back 2 Hamstring Stretch Sit with one leg extended Bring the sole of the opposite foot toward you and rest it against the inner thigh of your extended leg Reach toward your toes as far as possible Hold for 15 counts then relax Repeat 3 times for each leg Stretches Hamstrings lower back and groin 3 Calf Achilles Stretch With one leg in front of the other reach forward and place your h...

Page 19: ...4 17 Pedals R L 1 59 Crank Cover 2 18 Cover R L 1 60 Screw 2 19 Rubber 2 61 Cap Nut 2 20 M8x25L Washer 2 62 8x16x1 5 Washer 2 21 Chain Cover R L 1 63 Tube 2 22 Crank R L 1 64 Arbor 1 23 Rear End Cap 2 65 19x38 Tube 6 24 8x70mml Carriage Bolt 4 66 Screw 2 25 Rear Stabilizer 1 67 3 8 Nut 2 26 Screw 4 68 10x19x3 Washer 2 27 10x78mml Screw 2 69 Chain Adjuster Set 2 28 Pedal Support R L 1 70 Belt 1 29 ...

Page 20: ...EXPLODED DRAWING Model No 8001E 20 727 3 2 5 ...

Reviews: