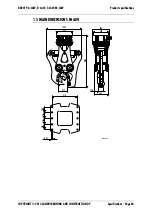
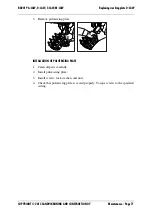
background image

Maintenance - Page 75

COPYRIGHT © 2013 SANDVIK MINING AND CONSTRUCTION OY

Troubleshooting

RD2019 A-JAW, D-JAW, S-JAW, M-JAW

OIL LEAKAGE WITHIN CYLINDER

The attachment must be serviced in an authorized Rammer service shop.

CYLINDER ROD IS BENT

The attachment must be serviced in an authorized Rammer service shop.

10.4 EXCESSIVE MOVING

WORN PINS AND BUSHINGS

The attachment must be serviced in an authorized Rammer service shop.

10.5 OIL LEAKAGE

OIL LEAKAGE AT HOSE END

Check the hose end and tighten.

OIL LEAKAGE AT SWIVEL JOINT

The attachment must be serviced in an authorized Rammer service shop.

CYLINDER SEALS ARE DAMAGED

The attachment must be serviced in an authorized Rammer service shop.

10.6 HIGH SPEED VALVE PROBLEMS

OIL LEAKAGE BELOW SPOOL AND BODY

Check the sealing of the spool.

OIL LEAKAGE IN THE CARTRIDGES

Check the sealing of the cartridges.

CLOSING TIME TOO LONG

RSHC-cartridge is not functioning.

Too much backpressure. Too small oil lines.

Cartridges are disadjusted.
MACHINE DOES NOT CUT OR CRUSH

CSAD-cartridge is not functioning.

Cartridges are disadjusted.
OIL OVERHEATS

Too much backpressure. Too small oil lines.

Cartridges are disadjusted.
Summary of Contents for A-Jaw

Page 1: ...Original instructions 2 13 OPERATOR S MANUAL OMRD2019ADSMENG 213 CUTTER CRUSHER RAMMER RD2019 A JAW D JAW S JAW M JAW ...

Page 2: ...58 Wear limits adjustments and torques for cutting blades 58 Removal of cutting blades 59 Installation of cutting blades 60 4 Turning and changing cutting blades M JAW 61 Wear limits adjustments and torques for cutting blades 61 Removal of cutting blades 62 Installation of cutting blades 63 5 Hardfacing crusher jaw and teeth 64 Welding tools 64 Hardfacing crusher jaw and teeth 64 6 Replacing crush...

Page 3: ...Operation Page 3 COPYRIGHT 2013 SANDVIK MINING AND CONSTRUCTION OY RD2019 A JAW D JAW S JAW M JAW OPERATION ...

Page 4: ...s Read this manual from front to back before installing operating or maintaining the attachment for the first time In this manual the units of measurement are metric For example weights are given in kilograms kg In some cases the other unit follows in parenthesis For example 28 litres 7 4 US gal The specifications and designs presented in this manual are subject to change without prior notice SYMB...

Page 5: ...s manual and in the description of operations where hazards exist These warnings are identified by the warning symbol To use the attachment correctly you must also be a competent operator of the carrier machine Do not use or install it if you can not use the carrier machine The attachment is a powerful tool Used without proper care it can cause damage Do not rush when you are learning to use the p...

Page 6: ...s are handled without it Make sure that you get a copy of it after the installation inspection and that it is correctly filled out INSTALLATION INSPECTION An installation inspection must be carried out after the product has been installed on the carrier In the installation inspection certain specifications operating pressure oil flow etc are checked so that they are within given limits See Product...

Page 7: ...quipment body The model and serial number are also located on the CE marking Check that the model corresponds to the one given on the cover of this manual It is important to make correct reference to the serial number of the attachment when making repairs or ordering spare parts Identification of the serial number is the only proper means of maintaining and identifying parts for a specific product...

Page 8: ...hen lifting components which weigh 23 kg 50 lb or more to avoid back injury Make sure all chains hooks slings etc are in good condition and are in the correct capacity Be sure hooks are positioned correctly Lifting eyes are not to be side loaded during a lifting operation PROVIDED LIFTING POINTS The lifting eyes located on the Product housing are to be used solely to lift or handle the Product its...

Page 9: ...uct If you use mechanical tools for tightening make sure not to overstrain the shank Before lifting make sure that the rope and or hook is stretched When two lifting eye screws are used the lifting capacity depends on the angle of the lifting chains The angle should not be less than 45 as shown in the illustration When the lifting eye screws are tightened both rings should be aligned The loading c...

Page 10: ...ting devices must safely carry the working weight of the product See Product specifications on page 78 Place chains or slings as shown by the illustration to lift the product Note The lifting eyes must always be removed from the crusher and replaced with blanking screws before starting to operate the crusher R010270 M010063 ...

Page 11: ...not lift people and never ride the hoisted load Keep people clear from lift area Avoid side pull of the load Make sure you take up the slack slowly Start and stop carefully Lift load a few centimeters and verify it before proceeding Make sure the load is well balanced Check for any loose items Never leave the suspended load unattended Maintain load control at all times Never lift the load over the...

Page 12: ...llow these guidelines Dispose of packaging materials properly Wood and plastic can be burned or recycled Deliver the steel belts to metal recycling center Protect environment from oil spills In case of hydraulic oil leaks the equipment should be serviced immediately Follow the product s greasing instructions and avoid excessive greasing Be careful when handling storing and transporting oils Dispos...

Page 13: ...atisfy yourself that it is safe for you and others You should also ensure that the product will not be damaged or made unsafe by the method of operation or maintenance procedures you choose Safety is not just a matter of responding to the warnings All the time you are working with your attachment you must pay attention to what hazards there might be and how to avoid them Do not work with the produ...

Page 14: ...an be injured if you do not wear proper clothing Loose clothing can get caught in the machinery Wear protective clothing to suit the job Examples are a safety helmet safety shoes safety glasses well fitting overalls ear protectors and industrial gloves Keep cuffs fastened Do not wear a necktie or scarf Keep long hair restrained PRACTICE You and others can be killed or injured if you do unfamiliar ...

Page 15: ... WORK SITE Work sites can be hazardous Inspect the site before working on it Check for potholes weak ground hidden rocks etc Check for utilities electric cables gas and water pipes etc Mark the positions of cables and pipes Poor visibility can cause accidents and damage Make sure that visibility and lightning of the working area are adequate Work sites can be noisy Wear ear protection to prevent p...

Page 16: ...protect yourself from airborne pollutants always keep excavator doors and windows closed during operation Excavators with pressurized cabins should be utilized in grapple operation Proper maintenance of fresh air filters of the excavator is essential Where pressurized cabins are not available proper respirators must be utilized Stop working when bystanders are in the area of airborne pollutants an...

Page 17: ...up to 40 m 130 ft and could cause death or serious injury Stop operation when a person enters hazard zone Wear approved personal protective equipment Protect yourself and your surroundings from flying debris Do not operate the product or carrier with people around it The European standard EN 474 1 on safety of earth moving machinery requires that adequate operator s protection such as bullet proof...

Page 18: ... around it EQUIPMENT LIMITS Operating the product beyond its design limits can cause damage It can also be dangerous See Product specifications on page 78 Do not try to upgrade the product s performance by unapproved modifications HYDRAULIC FLUID Fine jets of hydraulic fluid at high pressure can penetrate the skin Do not use your fingers to check for hydraulic fluid leaks Do not put your face clos...

Page 19: ...om the hydraulic hoses There might be pressurized oil trapped inside the product even if it is disconnected from the carrier Be aware of possible unexpected jaw movements while greasing or removing and installing cutting blades LIFTING EQUIPMENT You can be injured if you use faulty lifting equipment Make sure that lifting equipment is in good condition Make sure that the lifting tackle complies wi...

Page 20: ... must ALWAYS follow the instructions of the safety messages and symbols of the product safety labels and the instructions set forth in the manuals to avoid death or severe injury Keep the safety labels clean and visible at all times Check the condition of safety labels daily Safety labels and instructions which have disappeared been damaged painted over come loose or do not meet the legibility req...

Page 21: ...ury Read and follow the instructions in the operator s manual WARNING 169410_ENG 3 DUST HAZARD Breathing dust will cause death or severe injury Always wear approved respirator DANGER 169410_ENG 1 FLYING OBJECTS HAZARD Fragments fly up to 40 m 130 ft and could cause death or severe injury Stop operation when a person enters hazard zone Wear approved personal protective equipment WARNING 169410_ENG ...

Page 22: ...to the circle of the mounting bracket and the water is sprayed through the nozzles onto the object to be broken The principle behind the water spray system is to decrease the amount of dust caused by the breaking operation The water jet reduces the amount of dust effectively The use of this system is especially recommended for demolition applications In closed spaces like tunnels and buildings the...

Page 23: ...nly on flat surface to prevent them from moving and falling over Note The jaws must be secured to the assembling stand to prevent them from moving and falling off 1 Place the assembling stands as shown in the illustration Item Purpose Tightening screws A 8 pcs Fasten the jaw to the assembling stand for storage or transportation Tightening screws B 16 pcs Fasten the assembling stand supports M01006...

Page 24: ...chanics are allowed to change the jaws Do not try to change the jaws without knowledge Warning Keep other people away when changing the jaws Warning The cutter crusher and jaws must be secured from falling down in either direction when handling it Note When changing steel jaws the lighter jaw must always be installed first and removed last In other words there should not be a situation when only t...

Page 25: ...utter crusher up The cylinder weight will force the upper jaw against the stopper maximum opening Note Use lifting straps to prevent the cutter crusher from rotating Do not rely on the hydraulics Note Be very careful when lifting the cutter crusher Do not tilt the cutter crusher when lifting 3 Lower the cutter crusher on the second assembling stand and install the lower jaw 4 Make sure that the to...

Page 26: ...utter crusher around and remove the lower jaw 6 Lower the cutter crusher on the third assembling stand and install the lower jaw 7 Make sure that the toothing of the jaws is aligned correctly 8 Adjust the cutting blades according to the information in operation and maintenance manual M010071 B A A B M010072 B A A B M010073 B A A B ...

Page 27: ... hoses and fittings For crusher installation secondary relief valves in bucket cylinder circuit and in carrier auxiliary circuit are needed If the carrier does not have suitable kit to run attachments one must be built This may require more complex installation including new piping and additional valves such as flow control valve or pressure relief valve Suitable kits can be ordered from the manuf...

Page 28: ... of the crushing mouth The cutting blades can be reversed CRUSHER JAWS TEETH AND CUTTING BLADES Crusher jaws Crusher jaws are made of wear resisting special steel The jaws are operated by the hydraulic cylinder of the crusher and they open and close simultaneously Crushing teeth Crushing is performed using the crushing teeth of the jaws The long lasting convex shaped teeth are made of special stee...

Page 29: ...round it The cutter crusher must not be used under water Warning Cutting of steel cables or hardened steel wires with cutter crusher may be difficult due to the flexibility of the material The steel cable or hardened wire can be deflected or bent within the jaw area and may cause serious damage to the cutter crusher Consult with your local dealer for more information 1 Prepare the carrier for norm...

Page 30: ...rusher and boom into the crushing position Quick and careless boom movements could result in damage to the cutter crusher 4 Open crusher jaws position the object between the jaws and close the jaws to crush When the crusher jaws are closed a slewing function will work enabling crushing in right angle The best crushing result is obtained by using the tooth area of the crusher jaws Avoid crushing co...

Page 31: ... only 6 Concrete blocks can easily be demolished by first crushing in one point so that the structure breaks and then crushing in another point to multiple fractures Finish demolition by crushing and cutting between the two points Note When demolishing prestressed concrete blocks be careful not to damage the crusher on extra hard steel ribbons inside the concrete M010076 ...

Page 32: ...ration 8 To cut position the object between the cutting blades and close the jaws When the crusher jaws close a slewing function will work enabling cutting in right angle 9 When cutting horizontal steel frames concentrate the shearing action at the proper working angle Cut through in one point at the other end of the frame Cut partially through in another point Then bend the framework down using t...

Page 33: ... shown in the illustration Note If the cutting object does not fit into the crusher mouth first press it between the jaws to flatten it and then perform final cutting with cutting blades 11 Place steel frames deep between cutting blades Feed force is critical for proper working result 12 Make sure the metal object is fully between the cutting blades M010075 M010077 ...

Page 34: ...per and lower cutting blade is less than 30 degrees the object will not slip 15 The cutter crusher is intended for cutting and crushing do not use the cutter crusher as a lever or to strike hit or ram objects Do not use the side of the cutter crusher to move concrete or objects 16 Do not use cutter crusher for lifting Lifting eyes on the cutter crusher are for storage and maintenance purposes only...

Page 35: ...oom or hydraulic lines 19 Do not operate crusher jaws with the carrier s boom stick or bucket cylinders at the end of their stroke either fully extended or retracted Damage to the carrier may result 20 When the crusher jaws are closed the cylinder rod is exposed The operator must take care not to hit the rod with concrete or iron bars Damage to the cylinder rod may cause rod seal breakage and oil ...

Page 36: ...bris from the housing 22 Do not operate excavator hydraulic cylinders when the crusher jaws are closed Bending the object up and down when the cutter crusher jaws are pressed on it may cause excessive wearing of cutter crusher teeth and cutting blades 23 The bearings must be well greased during operation Regular inspections during operation are recommended If no grease is visible bearings require ...

Page 37: ...use severe injuries 1 Position attachment horizontally on the floor 2 Stop the carrier engine Operate boom and attachment controls to release pressure trapped inside hoses 3 Close attachment shut off valve If quick couplers are used disconnection automatically closes attachment lines If the line includes ball valves please make sure that they are closed 4 Disconnect hoses Protect environment from ...

Page 38: ...m the hoses by carefully operating the crusher cylinder Open and close empty jaws several times 6 4 MOVEMENT The transportation and parking positions are shown below When moving the carrier ensure that the crusher is not too close to the carrier 6 5 SPECIAL CONDITIONS OF USE The equipment may require modifications special operating techniques increased maintenance or special wear items if it is us...

Page 39: ...ust and the machine is ready to be used whenever necessary 1 The storage area must be dry 2 To avoid damaging the cylinder rod operate the cylinder to the shortest position by leaving the crusher jaws open 3 Insert blocks under the crusher to keep it off the ground If the machine is stored outside cover it to prevent rusting 4 Apply grease to all crusher parts Protect mounting bracket pin holes cu...

Page 40: ...COPYRIGHT 2013 SANDVIK MINING AND CONSTRUCTION OY Page 40 Operation Operation RD2019 A JAW D JAW S JAW M JAW ...

Page 41: ...Lubrication Page 41 COPYRIGHT 2013 SANDVIK MINING AND CONSTRUCTION OY RD2019 A JAW D JAW S JAW M JAW LUBRICATION ...

Page 42: ...priately The greasing points of the crusher have been marked with the following sticker Item Recommended greases Greasing interval Crusher pins and bushings ESSO Beacon EP2 every 8 hours SHELL Retinax EP2 FUCHS Lubritech Lagermeister EP 2 MOBIL Mobilux EP 2 Slew bearing ESSO Beacon EP2 every 150 hours SHELL Retinax EP2 FUCHS Lubritech Lagermeister EP 2 MOBIL Mobilux EP 2 Slew gear ESSO Dynagear ev...

Page 43: ...mount of grease to working conditions Insufficient greasing or improper grease may cause abnormal wear of parts SLEW GEAR 1 Always grease before operation and after every 8 hours of operation 2 Adapt greasing interval and amount of grease to working conditions 3 Apply grease from grease gun to grease nipples It is important to rotate the slewing ring during lubrication Complete the lubrication aft...

Page 44: ...hours of operation 2 Adapt greasing interval and amount of grease to working conditions 3 Apply grease from grease gun to grease nipples It is important to rotate the slewing ring during lubrication Complete the lubrication after rotation Insufficient greasing or improper grease may cause abnormal wear of parts Note Use only grease specified for slew bearing ...

Page 45: ...monitored If the temperature of the hydraulic oil exceeds 80 C 176 F an auxiliary oil cooler is needed The oil viscosity must be between 1000 20 cSt while the attachment is being used When the product is used continuously the temperature of the hydraulic oil normalizes at a certain level depending on conditions and on the carrier The temperature in the tank must not exceed the maximum allowed The ...

Page 46: ...c oil in continuous use is in the ideal area on the chart and the hydraulic system is used to best advantage Problems due to incorrect hydraulic oil viscosity in the equipment Oil too thick Difficult start up Stiff operation Danger of cavitation Sticky valves Filter bypass opens impurities in the oil are not removed Oil too thin Efficiency losses internal leaks Damage to gaskets and seals leaks Ac...

Page 47: ... acceptable level during the crusher operation This is for two reasons 1 Seals wipers membranes and other parts manufactured from the corresponding materials can normally stand temperatures up to 80 C 176 F 2 The higher the temperature is the less viscous the oil gets thus losing its capability to lubricate A standard carrier with a proper crusher circuit meets the requirements of the necessary co...

Page 48: ... microns 0 025 mm The oil filter material must be man made fibre cloth or very fine gauge metallic mesh to withstand pressure fluctuations The oil filter must have a nominal flow capacity of at least twice the attachment s maximum flow In general oil companies guarantee new oils to have a particle count of 40 microns maximum Filter the oil when filling the tank The damage caused by hydraulic oil i...

Page 49: ... A JAW D JAW S JAW M JAW Note Component damage is only a symptom The trouble itself will not be cured by removing the symptom After any component damage due to impurities in the oil the entire hydraulic system has to be cleaned Dismantle clean and reassemble the crusher and change the hydraulic oil ...

Page 50: ...COPYRIGHT 2013 SANDVIK MINING AND CONSTRUCTION OY Page 50 Lubrication Carrier hydraulic oil RD2019 A JAW D JAW S JAW M JAW ...

Page 51: ...Maintenance Page 51 COPYRIGHT 2013 SANDVIK MINING AND CONSTRUCTION OY RD2019 A JAW D JAW S JAW M JAW MAINTENANCE ...

Page 52: ...tion If you must leave the jaws open remember to block the jaws to prevent them from closing Prior to maintenance or inspection operate all the control levers to their fully extended stroke This will release pressure within the hydraulic piping and prevent unexpected movement of the jaw and loss of oil through the hydraulic lines 1 2 INSPECTION AND MAINTENANCE BY THE OPERATOR Note The times given ...

Page 53: ...he attachment is installed INITIAL 50 H INSPECTION It is recommended to have the first inspection done by your local dealer after 50 to 100 operating hours Contact your local dealer for more information about the initial 50 hour inspection EVERY 600 HOURS OR ONCE A YEAR This service is recommended to be done by your local dealer after 600 operating hours or once a year whichever comes first Neglec...

Page 54: ...r the correct service intervals The cutter crusher must not be used under water 1 5 OTHER MAINTENANCE PROCEDURES WASHING THE ATTACHMENT When working with attachment and removing it from the carrier dirt mud rock powder etc can become attached to it Wash the outside of the product with a steam washer before sending it to the workshop Dirt can cause difficulties in disassembly and assembly otherwise...

Page 55: ...JAW RD2019 A JAW D JAW S JAW M JAW 2 TURNING AND CHANGING CUTTING BLADES A JAW D JAW WEAR LIMITS ADJUSTMENTS AND TORQUES FOR CUTTING BLADES Item Wear limit Cutting blade edge R 3 mm 0 12 in Item Adjustment Cutting blade clearance C 0 2 0 7 mm 0 01 0 03 in Item Tightening torque Cutting blade screws 85 Nm 63 lbf ft ...

Page 56: ...ed movement of the jaw and loss of oil through the hydraulic lines Warning Support the crusher jaw to prevent it from closing unexpectedly during maintenance Used cutting blades can be recycled Contact your dealer for more information about local regulations of recycling 1 Position the attachment on level ground 2 Support the crusher jaw 3 Make sure the carrier s transmission is in neutral and the...

Page 57: ...e This will cause breakage of the cutting blade INSTALLATION OF CUTTING BLADES 1 Reverse the cutting blade so that unused edge can be used or install a new cutting blade 2 Set cutting blade on the base 3 Fit cutting blade into cutter base with screws lock washers and nuts 4 Use a plastic hammer to seat cutting blade into its place with proper contact 5 Close crusher jaws and measure the clearance ...

Page 58: ...AW RD2019 A JAW D JAW S JAW M JAW 3 TURNING AND CHANGING CUTTING BLADES S JAW WEAR LIMITS ADJUSTMENTS AND TORQUES FOR CUTTING BLADES Item Wear limit Cutting blade edge R 3 mm 0 12 in Item Adjustment Cutting blade clearance C 0 2 0 7 mm 0 01 0 03 in Item Tightening torque Cutting blade screws 360 Nm 266 lbf ft ...

Page 59: ... movement of the jaw and loss of oil through the hydraulic lines Warning Support the crusher jaw to prevent it from closing unexpectedly during maintenance Used cutting blades can be recycled Contact your dealer for more information about local regulations of recycling 1 Position the attachment on level ground 2 Support the crusher jaw 3 Make sure the carrier s transmission is in neutral and the p...

Page 60: ...s will cause breakage of the cutting blade INSTALLATION OF CUTTING BLADES 1 Reverse the cutting blade so that unused edge can be used or install a new cutting blade 2 Set cutting blade on the base 3 Fit cutting blade into cutter base with screws and lock washers 4 Use a plastic hammer to seat cutting blade into its place with proper contact 5 Close crusher jaws and measure the clearance between cu...

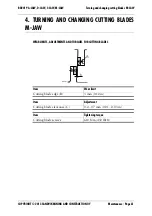
Page 61: ...AW RD2019 A JAW D JAW S JAW M JAW 4 TURNING AND CHANGING CUTTING BLADES M JAW WEAR LIMITS ADJUSTMENTS AND TORQUES FOR CUTTING BLADES Item Wear limit Cutting blade edge R 3 mm 0 12 in Item Adjustment Cutting blade clearance C 0 2 0 7 mm 0 01 0 03 in Item Tightening torque Cutting blade screws 610 Nm 450 lbf ft ...

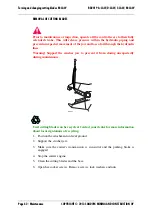
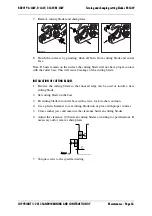
Page 62: ...vement of the jaw and loss of oil through the hydraulic lines Warning Support the crusher jaw to prevent it from closing unexpectedly during maintenance Used cutting blades can be recycled Contact your dealer for more information about local regulations of recycling 1 Position the attachment on level ground 2 Support the crusher jaw 3 Make sure the carrier s transmission is in neutral and the park...

Page 63: ...will cause breakage of the cutting blade INSTALLATION OF CUTTING BLADES 1 Reverse the cutting blade so that unused edge can be used or install a new cutting blade 2 Set cutting blade on the base 3 Fit cutting blade into cutter base with screws lock washers and nuts 4 Use a plastic hammer to seat cutting blade into its place with proper contact 5 Close crusher jaws and measure the clearance between...

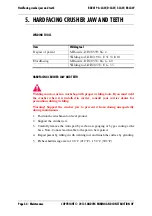
Page 64: ...ding Warning Support the crusher jaw to prevent it from closing unexpectedly during maintenance 1 Position the attachment on level ground 2 Support the crusher jaw 3 Carefully remove the worn part by carbon arc gouging or by gas cutting at the base Note Connect earth cable to the part to be repaired 4 Repair parent by filling it with welding rod and finish the surface by grinding 5 Preheat hardfac...

Page 65: ...e 65 COPYRIGHT 2013 SANDVIK MINING AND CONSTRUCTION OY Hardfacing crusher jaw and teeth RD2019 A JAW D JAW S JAW M JAW 6 Perform hardfacing The hardfacing area of the crusher is shown in the illustration below M030029 ...

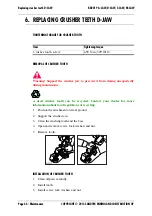
Page 66: ...nexpectedly during maintenance A used crusher tooth can be recycled Contact your dealer for more information about local regulations of recycling 1 Position the attachment on level ground 2 Support the crusher jaws 3 Clean the crushing tooth and the base 4 Open and remove screw lock washers and nut 5 Remove tooth INSTALLATION OF CRUSHER TOOTH 1 Clean all parts carefully 2 Install tooth 3 Install s...

Page 67: ...nance Page 67 COPYRIGHT 2013 SANDVIK MINING AND CONSTRUCTION OY Replacing crusher teeth D JAW RD2019 A JAW D JAW S JAW M JAW 4 Check that tooth is seated properly Torque screw and nut to the specified setting ...

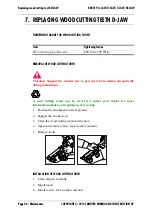
Page 68: ...unexpectedly during maintenance A used cutting tooth can be recycled Contact your dealer for more information about local regulations of recycling 1 Position the attachment on level ground 2 Support the crusher jaws 3 Clean the wood cutting tooth and the base 4 Open and remove screws lock washers and nuts 5 Remove tooth INSTALLATION OF WOOD CUTTING TOOTH 1 Clean all parts carefully 2 Install tooth...

Page 69: ...enance Page 69 COPYRIGHT 2013 SANDVIK MINING AND CONSTRUCTION OY Replacing wood cutting teeth D JAW RD2019 A JAW D JAW S JAW M JAW 4 Check that tooth is seated properly Torque screws to the specified setting ...

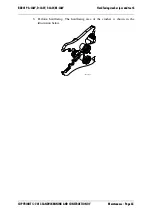
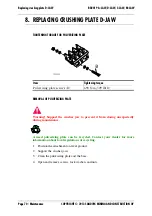
Page 70: ...Warning Support the crusher jaw to prevent it from closing unexpectedly during maintenance A used pulverizing plate can be recycled Contact your dealer for more information about local regulations of recycling 1 Position the attachment on level ground 2 Support the crusher jaws 3 Clean the pulverizing plate and the base 4 Open and remove screws lock washers and nuts Item Tightening torque Pulveriz...

Page 71: ...g plate D JAW RD2019 A JAW D JAW S JAW M JAW 5 Remove pulverizing plate INSTALLATION OF PULVERIZING PLATE 1 Clean all parts carefully 2 Install pulverizing plate 3 Install screws lock washers and nuts 4 Check that pulverizing plate is seated properly Torque screws to the specified setting ...

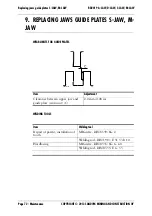
Page 72: ...CING JAWS GUIDE PLATES S JAW M JAW WEAR LIMITS FOR GUIDE PLATES WELDING TOOLS Item Adjustment Clearance between upper jaw and guide plate worn out C 2 0 mm 0 08 in Item Welding tool Repair of parent installation of tooth MIG wire DIN 8559 SG 2 Welding rod DIN 1913 E 51 53 B 10 Hardfacing MIG wire DIN 8555 SG 6 60 Welding rod DIN 8555 E 6 55 M030032 ...

Page 73: ...jaws 3 Check the clearance between crusher jaw and guide plates Change guide plates if clearance is more than specified 4 Cut off the worn part by carbon arc gouging or by gas cutting at the base Note Connect earth cable to the part to be repaired 5 Repair parent by filling it with welding rod and finish the surface by grinding 6 Make edge preparation on the body side INSTALLATION OF GUIDE PLATES ...

Page 74: ...anging cutting blades S JAW on page 58 CUTTING BLADE DOES NOT FIT PROPERLY ONTO THE CUTTER BASE Refit and tighten with bolts See Turning and changing cutting blades A JAW D JAW on page 55 See Turning and changing cutting blades S JAW on page 58 INCORRECT CLEARANCE BETWEEN THE BLADES AND BASE Check the clearance and adjust See Turning and changing cutting blades A JAW D JAW on page 55 See Turning a...

Page 75: ...ose end and tighten OIL LEAKAGE AT SWIVEL JOINT The attachment must be serviced in an authorized Rammer service shop CYLINDER SEALS ARE DAMAGED The attachment must be serviced in an authorized Rammer service shop 10 6 HIGH SPEED VALVE PROBLEMS OIL LEAKAGE BELOW SPOOL AND BODY Check the sealing of the spool OIL LEAKAGE IN THE CARTRIDGES Check the sealing of the cartridges CLOSING TIME TOO LONG RSHC...

Page 76: ...STANCE FURTHER ASSISTANCE If further assistance is required please prepare to answer the following questions before calling your dealer Model and serial number Working hours and service history Carrier model Installation Oil flow operating pressure and return line pressure if known Application Has the product operated normally before ...

Page 77: ...Specifications Page 77 COPYRIGHT 2013 SANDVIK MINING AND CONSTRUCTION OY RD2019 A JAW D JAW S JAW M JAW SPECIFICATIONS ...

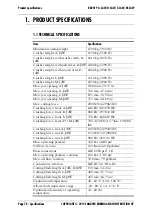
Page 78: ... force 2800 kN 629465 lbf Crushing force front A JAW 640 kN 143878 lbf Crushing force front D JAW 880 kN 197832 lbf Crushing force front S JAW 750 kN 168607 lbf Crushing force front F1 M JAW 700 850 kN 157366 191088 lbf Crushing force rear A JAW 1020 kN 229305 lbf Crushing force rear D JAW 1350 kN 303492 lbf Crushing force rear S JAW 980 kN 220313 lbf Max operating pressure 320 bar 4640 psi Oil fl...

Page 79: ...VIK MINING AND CONSTRUCTION OY Product specifications RD2019 A JAW D JAW S JAW M JAW Allowed oil viscosity range 20 1000 cSt Carrier weighta 16 25 t 35300 55100 lb a Check carrier s lifting capacity from carrier manufacturer Item Specification ...

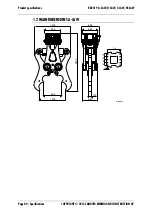
Page 80: ...013 SANDVIK MINING AND CONSTRUCTION OY Page 80 Specifications Product specifications RD2019 A JAW D JAW S JAW M JAW 1 2 MAIN DIMENSIONS A JAW 2240 600 1375 696 580 694 1000 100 560 510 105 120 120 105 ø27 M040038 ...

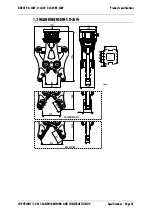
Page 81: ...K MINING AND CONSTRUCTION OY Product specifications RD2019 A JAW D JAW S JAW M JAW 1 3 MAIN DIMENSIONS D JAW 1996 600 1391 696 580 474 702 174 560 510 105 120 120 105 ø27 M040029 174 2076 843 2041 723 PULVERIZING PLATE WOOD CUTTER 320 4 3 5 4 8 0 ...

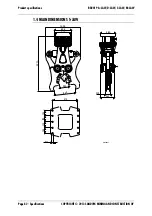
Page 82: ...ANDVIK MINING AND CONSTRUCTION OY Page 82 Specifications Product specifications RD2019 A JAW D JAW S JAW M JAW 1 4 MAIN DIMENSIONS S JAW 2210 580 1394 696 600 220 565 510 385 853 2 0 0 2 0 0 M040042 120 105 105 120 Ø27 ...

Page 83: ...ge 83 COPYRIGHT 2013 SANDVIK MINING AND CONSTRUCTION OY Product specifications RD2019 A JAW D JAW S JAW M JAW 1 5 MAIN DIMENSIONS M JAW 2089 600 1399 696 580 220 565 373 22 5 2 0 0 510 M040037 120 105 105 120 Ø27 F2 F1 ...

Page 84: ...ording to ISO 9001 is applied to design and manufacture of the product Is in conformity with all the relevant provisions of the Outdoor Equipment Noise Directive 2000 14 EC The procedure applied for conformity assessment is Internal control of production Annex V Technical file N N Director R D E is authorized to compile the technical file and confirms the product design to conform with the essenti...

Page 85: ...Page 85 COPYRIGHT 2013 SANDVIK MINING AND CONSTRUCTION OY ...

Page 86: ...COPYRIGHT 2013 SANDVIK MINING AND CONSTRUCTION OY Page 86 ...

Page 87: ...Page 87 COPYRIGHT 2013 SANDVIK MINING AND CONSTRUCTION OY ...

Page 88: ...vik Mining and Construction Oy Breakers Lahti Taivalkatu 8 P O Box 165 FI 15101 Lahti Finland Phone Int 358 205 44 151 Telefax Int 358 205 44 150 www rammer com 12 16 14091 27 124 336 12 16 14091 27 176 210 ...

Reviews:

Related manuals for A-Jaw