background image

40

G1/2"

G1/2"

G1/2"

190

M5

145

70

20-50

G1/2"

70

50-80

40

75

40

B

A

120

B

A

40

G1/2"

G1/2"

M5

145

70

70

20-50

G1/2"

220

50-80
G1/2"

40

75
40

B

A

172

B

A

40

40

G1/2"

G1/2"

G1/2"

190

M5

145

70

70

20-50

G1/2"

50-80

75
40

B

A

120

B

A

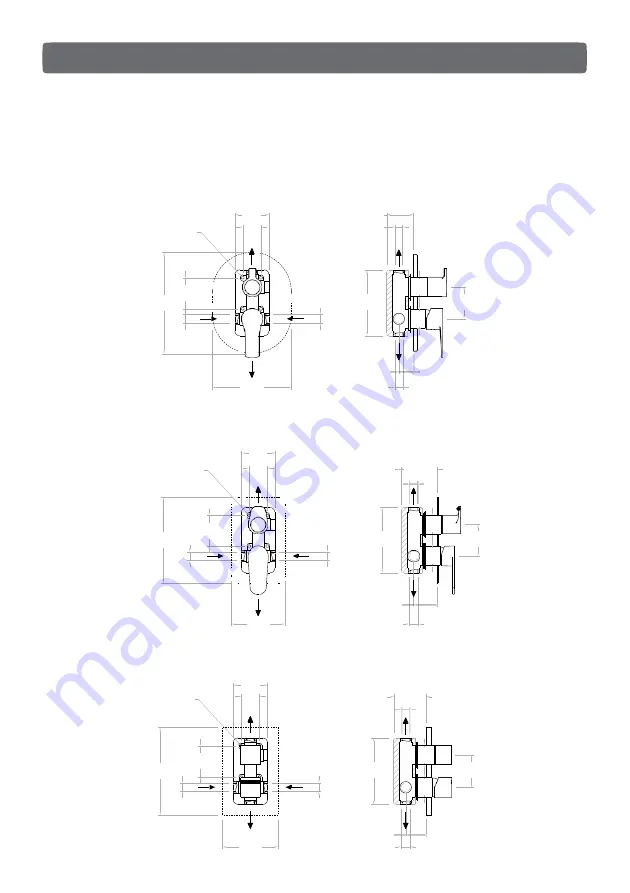
М Е Т А Л Л И Ч Е С К А Я  П Л А С Т И Н А  

/ 3 M E T A L P L A T E

К руг л ая   п л астина 

/

R o u n d plate

П л астина  с  зак руг л е нны м и к рая м и 

/ R o u n d e d edge plate

П ря м о уг о л ь ная  п л астина

/  S q u a r e  plate

КОМБИНАЦИИ 

/COMBINATIONS

н а п р а в л е н н ы е  

/  2 W A Y S

3

Summary of Contents for 181502

Page 1: ...181502 551502 691502 601502 361503 751503 361502 751502 931502 931503 331503 331502 661502 641502 941502 471503 491503 471502 491502 941502K 1 ...

Page 2: ...ity Эргономичные Ergonomics Устойчивые к повреждениям Durability Акустическая защита Acoustic protection Соответствует санитарным стандартам Health requirements BLAUTHERM 941502K ALEXIA ÂTICA RS Q DRAKO YPSILON YPSILONPLUS BLAUTHERM 361502 751502 931502 331502 661502 641502 941502 CARTAGO 601502 КОМБИНАЦИИ COMBINATIONS 2 н а п р а в л е н н ы е 2 W A Y S 2 ...

Page 3: ...1 2 40 75 40 B A 172 B A 40 40 G1 2 G1 2 G1 2 190 M5 145 70 70 20 50 G1 2 50 80 75 40 B A 120 B A 3 МЕТА ЛЛИЧЕСКА Я П ЛА СТИНА 3 M E T A L PLATE Круглая пластина R ound plate Пластина с закругленными краями R ounded edgeplate Прямоугольная пластина Square plate КОМБИНАЦИИ COMBINATIONS 2 н а п р а в л е н н ы е 2 W A Y S 3 ...

Page 4: ...ILON 661503 КОМБИНАЦИИ COMBINATIONS 3 н а п р а в л е н н ы е 3 W A Y S Система экономии воды Watersaving system Высокая чувствительность Sensitivity Эргономичные Ergonomics Устойчивые к повреждениям Durability Акустическая защита Acoustic protection Соответствует санитарным стандартам Health requirements 4 ...

Page 5: ...0 75 40 B A 120 B A B G1 2 2 М Е ТА ЛЛИЧ Е СКА Я П ЛА СТИНА 2 M E T A L PLATE Прямоугольная пластина Square plate 40 40 G1 2 G1 2 M5 145 70 70 20 50 50 80 G1 2 G1 2 190 75 40 B A 120 B A B G1 2 КОМБИНАЦИИ COMBINATIONS 3 н а п р а в л е н н ы е 3 W A Y S 5 ...

Page 6: ...я повреждений Если инструкции по установке и подключению не соблюдены гарантия на изделие аннулируется EN Beforeinstallingyournewtap itisessentialtocleantheinstallationtoeliminateany impuritiesleftin thesystem thatcoulddamage it We recommendinstallingfiltersinthesupplypipes All theparts must be removed from their packaging and inspected before installing in case any of them havebeendamagedduringtr...

Page 7: ...st following these technicalguidelines Recommended workingtemperature Maximum working temperature Minimum pressure Maximum pressure Recommended service pressure 55 C 65 C 1bar 5bar 3bar RU Для достижения максимальной производительности и долговечности использования мы предлагаем следовать этим техническим рекомендациям Рекомендуемая рабочая температура 55 C Максимальная рабочая температура 65 C Ми...

Page 8: ...ION У станов к а на п ов е рхность к ирп ич ной сте ны Surfaceinstallation in a brick wall Встраив ае м ая установ к а на к ирп ич ную ил и бе тонную сте ну Embedded installation in a brick wall У станов к а на обл е гч е нную к онструк цию Installation in a light w eight w all 8 ...

Page 9: ... которая указывает расстояние на котором закрывающая пластина должна быть установлена Рис 3 Учитывайте толщину плитки EN Position the body of the concealed set and mark where the connections are to be installed EN Make the necessary channels and the space for the housing if the set is to be embedded in a brickwall Pay attention to the mark that indicates the distance at which the covering plate mu...

Page 10: ... been installed connect the concealed body ensuring that the water supply is still disconnected The body will be supported by theconnections RU После установки корпуса заполните каналы не снимая защитную пленку EN After installing the body fill in the channels leaving the Porex covering the body as protection Рис 3 Рис 4 3 направленные 3 w a y s 3 направленные 3 w a y s МОНТАЖ MOUNTING 10 ...

Page 11: ...ты RU Обрезать защитную пленку вплотную к облицовке и запечатать периметр если это необходимо у вас также есть возможность удалить внешнюю часть защитной пленки полностью EN Cut the Porex flush to the cladding and seal the perimeter if necessary Another option is to completely removetheexteriorpart ofthePorex EN Position the plate chosen according to the model and secure it with adhesive tape Рис ...

Page 12: ...n assemble the handle and the corresponding wheel To install the wheel correctly position it and turn clockwise until it will go no further Remove the wheel and put it back at an angle of 45º Then secure it with the screw PKIS0014 02 Рис 8 3 направленные 3 ways 2 направленные 2 ways МОНТАЖ MOUNTING ООО НОФЕР РУС официальный дистрибьютор Ramon Soler в России Москва ул Шумкина 26А стр4 7 495 602 05 ...

Reviews: