background image

6

GB

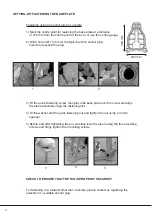
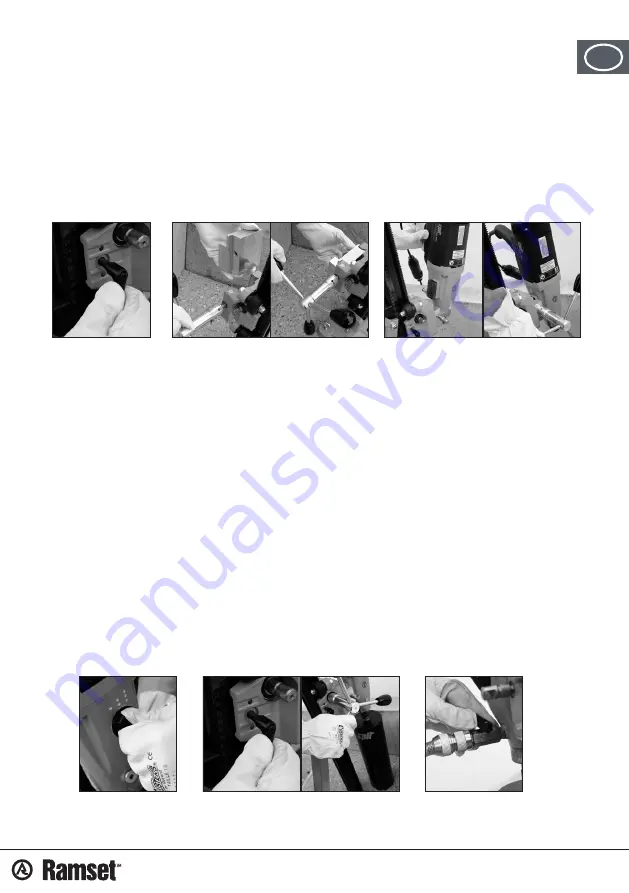
SETTING UP: ATTACHING THE DRILL MOTOR


1) Move the carriage to the upper stop and secure it in place using the knob.


2) Slide the carriage block into the carriage and lock it in place by using the capstan


    wheel to tighten the locking screw.


3) Place the dovetail connection of the motor in the quick release coupling and fix the 


    motor with the capstan wheel.


4) Select the correct machine speed.


5) While holding the capstan wheel in position, loosen the brake handle.


    Bring the crown of the drill bit in contact with the surface of the material to be drilled, 


    then back it off by a few millimetres.


6) Open the water tap and adjust the water flow.


7) Switch the motor on. Consult the operation and maintenance manual for the SD 160 


    or SD 200E with regard to selecting the speed and other precautions.


    Start drilling. Drill slowly and cautiously for several millimetres after penetrating the 


    surface, and then maintain a constant force on the capstan wheel for the remainder  


    of the bore.


ALWAYS SECURE THE CARRIAGE USING THE BRAKE HANDLE BEFORE  


RELEASING THE CAPSTAN WHEEL!!

1

3

2

5

4

6

Summary of Contents for TRIX 160

Page 1: ...Operator s manual and maintenance instructions TRIX 160...

Page 2: ...2...

Page 3: ...Column 12 Sliding clamp 3 Upper stop 13 Fixing bolts 4 Depth adjustment scale 14 Rear brace 5 Angle adjustment scale 15 Levelling screws 6 Carriage break handle 16 Vacuum base plate 7 Capstan wheel 1...

Page 4: ...sole responsibility that this article conforms to the European standards for column type drilling machines Paul van Beek Ruben Bernaert General Manager Product Manager Intended use The TRIX 160 drill...

Page 5: ...clamping handles and other items used for clamping and locking must be securely tightened or fitted after each adjustment The capstan wheel can be fitted on the right a or left b side of the carriage...

Page 6: ...ening screw then place the base plate over the screw and align the stand assembly using the fastening slot 4 Fit the washer and the quick fastening nut and tighten the nut using a 32 mm spanner 5 Befo...

Page 7: ...uum pump and a Spit vacuum kit with manometer and seal 1 Consult the manual of the vacuum pump regarding the use and maintenance 2 Put the plate in the foreseen place on the back of the vacuum plate a...

Page 8: ...s close to the column as possible 2 Secure the telescopic brace clamp by using the lever handle to apply sufficient force to firmly secure the rig After fitting the brace clamp carefully level the rig...

Page 9: ...ion loosen the brake handle Bring the crown of the drill bit in contact with the surface of the material to be drilled then back it off by a few millimetres 6 Open the water tap and adjust the water f...

Page 10: ...k and the four rollers Never oil or grease these three components For the best results the rollers to move the carriage must travel perfectly along the column Adjust the rollers as follows Using two f...

Page 11: ...8 GB NOTES...

Page 12: ...Phone 09 444 2354 Auckland 35 Station Rd Penrose P O Box 12 327 Auckland 1330 Phone 09 579 3072 Henderson 123 Central Park Drive P O Box 83 135 Auckland 1330 Phone 09 838 9865 East Tamaki Unit 1 333 E...

Reviews: