background image

Tool Handling Safety

1.  Always be sure tool is operating 

properly before attempting to use  
it. Follow the “Daily Function Test” 
shown to the right and described  
on page 9.

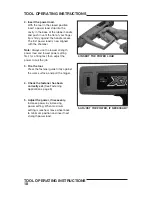
2.   Always load tool using a strip load  

selected directly from a box indicating  
the power load type and number. 
Never attempt to use loose strip 
loads that could be mis-identified.

3.  Never carry loose loads in pockets  

with pins or other hard objects.

4.  Never load a tool unless you intend 

to immediately make a fastening. 

Loading a tool and leaving it unattended 
in the work area can result in the tool 
being accidentally discharged by others.

5.   Never place your hand or any other 

body part over the fastener loading 
end of the tool. 

Serious hand injury 

could result from being struck by either 
a fastener or the tool piston should the 
tool be accidentally fired.

6.   Always store the tool unloaded and 

keep the tool and the loads securely 
locked in a tool box. Keep keys away 
from children and unlicensed persons.

7.   Always keep the tool pointed away 

from yourself and others.

8.   Never carry a loaded tool around  

the work area.

9.   Never allow anyone not trained  

to use the tool.

10.  Never engage in horseplay with  

the tool.

11.  Using the tool in poorly ventilated 

areas, cleaning tool or handling 
loads may result in exposure to  
lead or other substances known  
to cause birth defects, and other 
physical harm. Have adequate  
ventilation at all times and wash 
thoroughly after exposure.

      DANGER  

SAFETY INSTRUCTIONS

SAFETY INSTRUCTIONS

      DANGER 

5

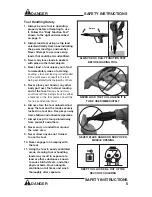
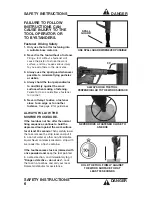
NEVER LOAD THE TOOL UNLESS IT IS 

TO BE USED IMMEDIATELY

NEVER PLACE HANDS OR BODY OVER 

MUZZLE OPENING

KEEP TOOL LOCKED & OUT OF THE 

REACH OF CHILDREN

ALWAYS DO A DAILY FUNCTION TEST 

BEFORE LOADING TOOL

1

2

Empty

Summary of Contents for XT540

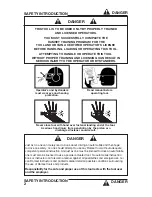
Page 1: ...R S SAFETY OPERATING INSTRUCTION MANUAL DANGER THIS TOOL FOR USE BY LICENSED OPERATORS ONLY READ AND OBEY ALL SAFETY AND OPERATING INSTRUCTIONS BEFORE OPERATING TOOL SEMI AUTOMATIC LOW VELOCITY PISTON TYPE FASTENING TOOL ...

Page 2: ...afe and proper use of this tool rests with the tool user and the employer SAFETY INTRODUCTION DANGER SAFETY INTRODUCTION DANGER 2 Operator s and bystanders must wear eye and hearing protection Never close tool with hand over fastener loading end of the tool A serious hand injury from penetration by the piston or a discharged fastener could result Read manual before operating tool DANGER THIS TOOL ...

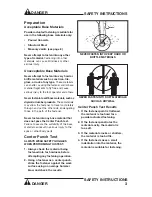
Page 3: ...ver fasten into any base material that does not pass the Center Punch test Failure to assure the suitability of the base material can result in serious injury to the eyes or other body parts Center Punch Test ALWAYS WEAR SAFETY GOGGLES WHEN PERFORMING THIS TEST 1 Always check the material being fastened into for hardness before attempting any fastening operation 2 Using a fastener as a center punc...

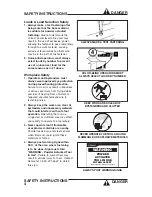
Page 4: ...e 2 Always keep the work area clear of bystanders and unnecessary materials that could interfere with safe tool operation Operating the tool in a congested or cluttered area may affect your ability to operate the tool safely 3 Never operate tool if flammable or explosive materials are nearby Powder loads burn and create sparks when fired and could ignite these materials or fumes 4 Always post warn...

Page 5: ...y either a fastener or the tool piston should the tool be accidentally fired 6 Always store the tool unloaded and keep the tool and the loads securely locked in a tool box Keep keys away from children and unlicensed persons 7 Always keep the tool pointed away from yourself and others 8 Never carry a loaded tool around the work area 9 Never allow anyone not trained to use the tool 10 Never engage i...

Page 6: ... 8 for guidelines ALWAYS FOLLOW THE MISFIRE PROCEDURE If the tool does not fire after the normal firing sequence continue to hold the depressed tool against the work surface for at least 30 seconds Then carefully lower the tool remove the strip load and put it in a can of water or other non flammable liquid Never carelessly discard a strip with live loads into a trash container If the tool becomes...

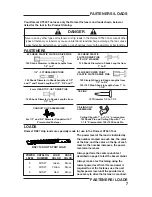
Page 7: ... more power is required to set the fastener use the next higher power level until the powder level necessary to drive the fastener is reached RS27 10 SHOT STRIP LOAD POWER CATALOG LOAD CASE LEVEL NUMBER COLOR COLOR 3 3RS27 Green Brass 4 4RS27 Yellow Brass 5 5RS27 Red Brass 300 HEAD PLASTIC FLUTED DRIVE PINS 145 Shank Diameter in Shank Lengths from 1 2 to 3 300 HEAD PLASTIC FLUTED DRIVE PINS WITH 7...

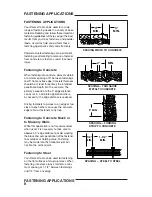
Page 8: ... is reduced Driving fasteners too close to an edge or too close to each other can cause the concrete edge to fail or fasteners to fly free Fastening to Concrete Block or to Masonry Walls While this application is not recommended when used it is necessary to take care to observe a 3 edge distance to avoid cracking the block and over penetration of the fastener to avoid loss of holding value Fasteni...

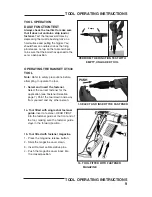
Page 9: ... Select the correct fastener for the application see Fastener Selection page 7 Point the tool down and away from yourself and any other person 1a Tool fitted with single shot fastener guide Insert a fastener HEAD FIRST into the fastener guide at the front end of the tool making sure the fastener guide stays in the forward position 1b Tool fitted with fastener magazine 1 Press the magazine release ...

Page 10: ... setting first for a firing test then adjust the power to suit the job 3 Fire the tool Press the fastener guide firmly against the work surface and pull the trigger 4 Check the fastener has been correctly set See Fastening Applications page 8 5 Adjust the power if necessary Increase power by increasing power setting When maximum setting is reached move wheel back to minimum position and insert nex...

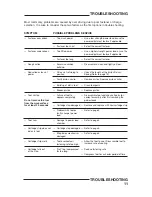
Page 11: ...dge strip damaged Problem with tool or faulty charge power load Damage to power load chamber Cartridge strip damaged Strip index mechanism damaged Tool overheated fastening rate too high Hot tool compressed for too long Use a low strength power load or use the power adjustment feature if applicable Select the correct fastener Use a higher strength power load or use the power adjustment feature if ...

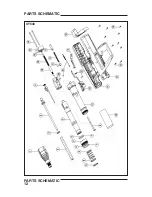
Page 12: ...PARTS SCHEMATIC PARTS SCHEMATIC 12 XT540 ...

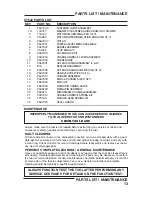
Page 13: ...e cleaning should be done by a qualified repair person IMPROPERLY MAINTAINED TOOLS CAN CAUSE SERIOUS INJURIES TO TOOL OPERATOR AND BYSTANDERS CLEAN TOOL DAILY ALWAYS FUNCTION TEST THE TOOL AFTER PERFORMING ANY SERVICE SEE PAGE 9 FOR DETAILS ON THE FUNCTION TEST MAINTENANCE XT540 PARTS LIST KEY PART NO DESCRIPTION 1 PA37040 FASTENER GUIDE ASSEMBLY 1A 100227 MAGNETIC FASTENER GUIDE ASSM NOT SHOWN 2 ...

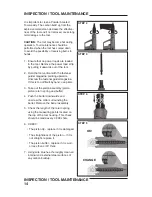
Page 14: ...ts located on the top of the tool housing This check should be made every 3 000 shots 6 CHECK The piston tip replace if it is damaged The straightness of the piston if it is not straight replace it The piston buffer replace if it is worn or less than 3 16 thick 7 Using wire brushes thoroughly clean all internal and external steel surfaces of any carbon buildup It is important to clean a Powder Acu...

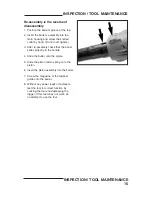
Page 15: ... tighten 3 After re assembly check that the barrel slides properly in the handle 4 Slide the buffer onto the piston 5 Slide the piston return spring onto the piston 6 Insert the piston assembly into the barrel 7 Screw the magazine or the fastener guide onto the barrel 8 Without any power loads or fasteners test the tool for correct function by cocking the tool and depressing the trigger If this te...

Page 16: ...e liability hereunder will be to replace any part or accessory which proves to be defective within the specific time period Any replacement part or accessory provided in accordance with this warranty will carry a warranty for the balance of the period of warranty applicable to the part it replaces This warranty does not apply to part replacement required due to normal wear This warranty is void as...

Reviews: