background image

13


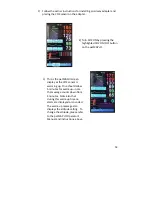
Note


2

:


During


the


CO2


warm

up


period,


the


II’s


programmed


altitude


is


displayed


and


should


be


confirmed


by


the


user


to


be


acceptably


close


to


their


actual


altitude


(or


elevation).


The


II


unit


is


set


by


default


at


time


of


manufacture


to


assume


a


user


altitude


of


1000


feet


(304


meters)


which


will


give


CO2


accuracy


within


+/

‐ 

3


mmHg


for


user


altitudes


anywhere


from


sea


level


to


approximately


2000


feet


(610


meters).


For


best


accuracy


of


CO2


measurement,


the


user’s


current


altitude


should


be


set


using


the


Set


Altitude/Time/Date


option


#6


on


the


setup


menu


(see


the


II


Operator’s


Manual


for


instructions


to


get


into


the


set

up


menu


or


refer


to


the


instructions


above).


This


#6


setup


option


will


allow


the


user


to


set


the


elevation


to


the


nearest


100


feet


(30


meters)


which


will


eliminate


the


potential


small


offsets


mentioned


above


if


the


user


is


substantially


different


from


1000


feet


(304


meters)


altitude


programmed


in


as


the


default


altitude


at


time


of


manufacture.


After


changing


the


altitude,


the


unit


will


retain


the


new


altitude


until


it


is


changed


by


the


user


again.


Summary of Contents for petMAP+ II

Page 1: ...1 Now your petMAP II can measure ETCO2...

Page 2: ...2...

Page 3: ...equipment petMAP II is to be operated by qualified personnel only Before use familiarize yourself with the device and read the manuals including all warnings and cautions The user should check that th...

Page 4: ...5 Intended Uses 5 Configurations Accessories 6 Symbols Warnings Cautions 7 EMC Declaration 10 Device Overview and Operating Instructions Controls Connections 11 Operating Instructions User Selections...

Page 5: ...2 End Tidal CO2 InspCO2 Inspired CO2 RtCO2 Realtime CO2 and RRCO2 Respiration Rate from the CO2 waveform The CO2 sensor resides on the airway and has a nine foot cable that plugs into the connector la...

Page 6: ...ptional accessories available for the petMAP II CO2 Module Product Code Description Standard Accessories included with the Module 9027 CO2 Module CO2 mainstream sensor with Connector Cable 9 2 airway...

Page 7: ...plained changes in CO2 capnograph readings with the clinical circumstances and environment and an arterial blood gas measurement comparison Use of an Electrosurgical Unit ESU can potentially result in...

Page 8: ...drain into the sensor Do not store the CO2 Module at temperatures less than 14 degrees F or greater than 131 degrees F Do not operate the sensor at temperatures less than 50 degrees F or greater than...

Page 9: ...device since the petMAP device contains magnetically active materials and could result in injury if used or placed too close to an MRI device even if the MRI is not operating since the MRI magnet is...

Page 10: ...10 EMC DECLARATION The CO2 Module REF 9027 has been tested together with the petMAP II as a system Please refer to the petMAP II Manual R400257 for detailed EMC compliance information...

Page 11: ...the cable to the petMAP II Listen for the soft click that indicates full insertion 3 Insert an airway adapter into the breathing circuit Examples 1 Locate the connector labeled CO2 on the side of the...

Page 12: ...g and holding your finger on bottom left quadrant of the touch screen while powering ON the petMAP II with the power button Release the touch screen at the count of 10 to enter the CO2 sensor zeroing...

Page 13: ...of CO2 measurement the user s current altitude should be set using the Set Altitude Time Date option 6 on the setup menu see the petMAP II Operator s Manual for instructions to get into the set up me...

Page 14: ...AP II 3 This is the petMAP II screen display as the CO2 sensor is warming up One should allow 5 minutes for warm up note the message counts down from 5 minutes Note also that during this warm up time...

Page 15: ...are also displayed 5 Pg_3 is an alternate display format showing a short trend of the BP and other values in addition to the ETCO2 RR and a shorter capnograph NOTE Alternate displays are achieved by...

Page 16: ...there is a delay before sounding the CO2 alarms of approximately 20 seconds to allow the user to detect and correct CO2 conditions without the disturbance of the alarm actually sounding and also to p...

Page 17: ...ency and or by a problem malfunction with the ventilation system including the setup the valves the CO2 absorber or other components Refer to CO2 monitoring educational material for all causes and cur...

Page 18: ...ry inside and out before use The windows must be clear and without moisture or contamination of any kind Shaking the airway adapter will help to remove water from the inside of the adapter Note For th...

Page 19: ...een detected and eliminated 1 Is the CO2 sensor properly connected to the CO2 connector on the petMAP II Try disconnecting it and then reconnecting it making sure that it is in the CO2 connector not t...

Page 20: ...l use with prompt notification within the warranty period Damage resulting from inappropriate use or physical abuse is not covered by the warranty THERE ARE NO WARRANTIES WHICH EXTEND BEYOND THOSE EXP...

Page 21: ...tialization Time Capnograph and CO2 numerics displayed in less than 20 seconds reaching full specifications after 5 minutes of warm up Alarms are not active during the warm up period RR Accuracy 2 1BP...

Page 22: ...Document Revision Date Comments R400290 A 09 26 16 Manual Released ECO 160901 R400290 B 08 03 17 Modified sterilization instructions for airway adapters ECO 170703 R400290 C 01 09 18 Added self cance...

Page 23: ...23...

Page 24: ...Cypress St Ste 110 Tampa FL 33607 For Customer Service contact CardioCommand Inc Phone 800 231 6370 813 289 5555 Fax 813 289 5454 Website www petmap com E mail support cardiocommand com petMAP II is...

Reviews: