background image


3

N. 

The  required  installation  time  for  this  system  is 

approximately  8  hours.    Check  off  the  box  ( 


)  at  the 

beginning of each  step  when you  finish it.   Then  when  you 
stop during the installation, it will be easier to find where you 
need to continue from. 
 

O. 

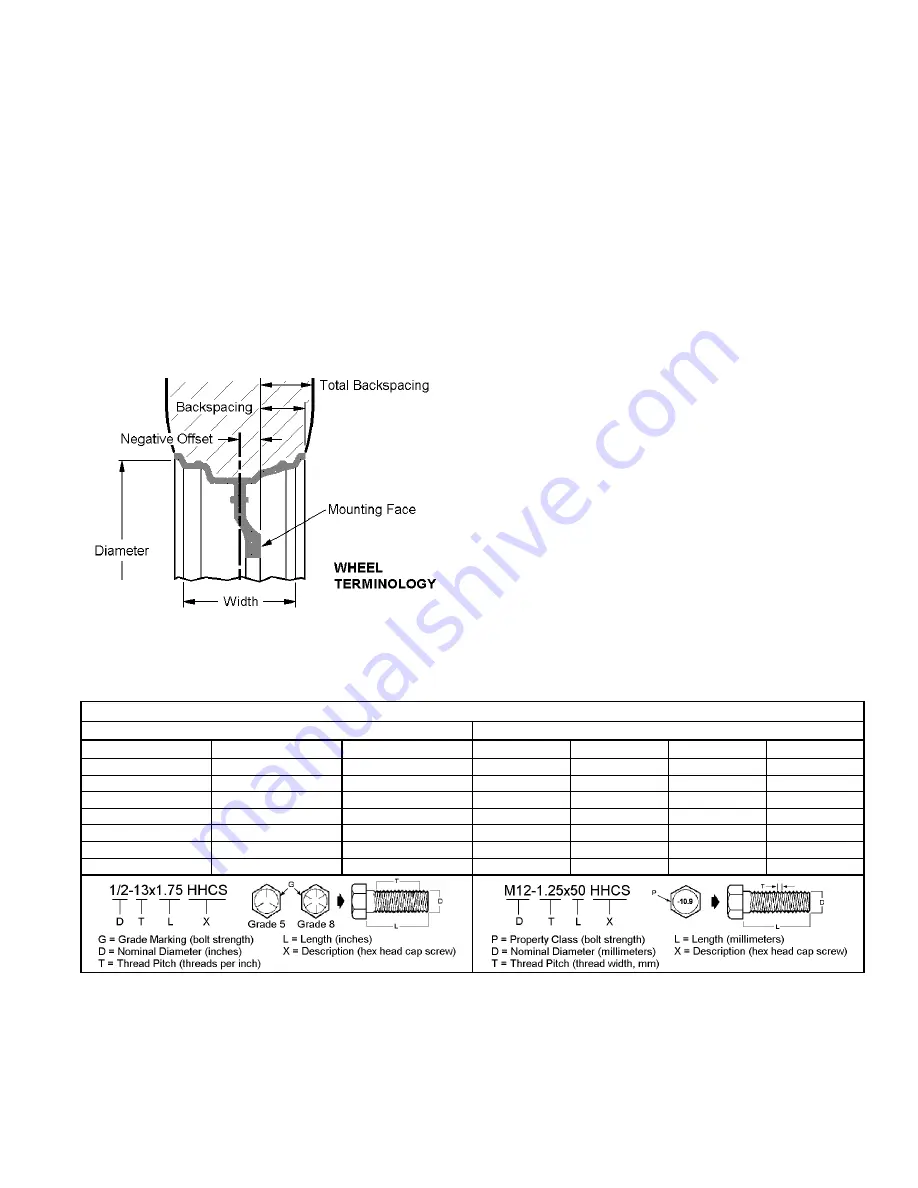
This  suspension  system  was  developed  using  the 

following  tire  &  wheel  combination:    BFG  All  Terrain™ 
315/70  R17  tire,  17  x  8  wheel  with  5.5  inches  of  wheel 
backspacing.    Total  backspacing  is  6.5  inches.   

Trimming 

the bottom corners of the front bumper is required.

  20” 

OE wheels with 275/65 R20 tires will fit this system.  Before 
installing  any  other  combination,  consult  your  local  tire  and 
wheel specialist. 


P. 

Rear axle offset may be noticed on some vehicles.  The 

offset  will  vary  somewhat  with  vehicle  loading.    Another 
factor is how centered the axle was under the body from the 
factory.  For reference, it is recommended that you measure 
your vehicle’s rear axle offset before installation of this kit. 
 

Q. 

This  suspension  system  will  fit  both  2WD  and  4WD 

vehicles.  If you are installing this system on a 2WD vehicle, 
omit steps pertaining to the front axle assembly.  Also, follow 
the specific 2WD steps for aft brace installation. 
 

R. 

Important  information  for  the  end  user  is  contained  in 

the consumer/installer information pack.  If you are installing 
this system for someone else, place the information pack on 
the driver’s seat.  Please include the installation instructions 
when you finish. 
 

S. 

Thank  you  for  purchasing  the  best  suspension  system 

available.    For  the  best-installed  system,  follow  these 
instructions.    If  you  do  not  have  the  tools  or  are  unsure  of 
your  abilities,  have  this  system  installed  by  a  certified 
technician. 


RANCHO 

SUSPENSION 

IS 

NOT 

RESPONSIBLE  FOR  DAMAGE  OR  FAILURE  RESULTING 
FROM AN IMPROPER OR MODIFIED INSTALLATION… 


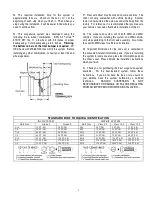
STANDARD BOLT TORQUE & IDENTIFICATION 

INCH SYSTEM 

METRIC SYSTEM 

Bolt Size 

Grade 5 

Grade 8 

Bolt Size 

Class 9.8 

Class 10.9 

Class 12.9 

5/16 

15 FT-LB 

20 FT-LB 

M6 

5 FT-LB 

9 FT-LB 

12 FT-LB 

3/8 

30 FT-LB 

35 FT-LB 

M8 

18 FT-LB 

23 FT-LB 

27 FT-LB 

7/16 

45 FT-LB 

60 FT-LB 

M10 

32 FT-LB 

45 FT-LB 

50 FT-LB 

1/2 

65 FT-LB 

90 FT-LB 

M12 

55 FT-LB 

75 FT-LB 

90 FT-LB 

9/16 

95 FT-LB 

130 FT-LB 

M14 

85 FT-LB 

120 FT-LB 

145 FT-LB 

5/8 

135 FT-LB 

175 FT-LB 

M16 

130 FT-LB 

165FT-LB 

210 FT-LB 

3/4 

185 FT-LB 

280 FT-LB 

M18 

170 FT-LB 

240FT-LB 

290 FT-LB 


Summary of Contents for RS6583B

Page 1: ...88583 Rev E Suspension System RS6583B 2013 2007 Chevrolet Silverado GMC Sierra 1500 88583 Rev E...

Page 2: ...Each hardware kit in this system contains fasteners of high strength and specific size Do not mix hardware kits or substitute a fastener of lesser strength See bolt identification table on page 2 G Co...

Page 3: ...D vehicle omit steps pertaining to the front axle assembly Also follow the specific 2WD steps for aft brace installation R Important information for the end user is contained in the consumer installer...

Page 4: ...4 RS6583B Suspension System...

Page 5: ...140 HHCS 2 M16 2 0 x 120 HHCS 2 M16 2 0 Stover Nut 4 M16 Washer 8 860547 Sway Bar Hardware Kit 1 M10 1 50 x 30 HHCS 4 P N DESCRIPTION QTY M10 1 50 x 60 HHCS 4 M10 1 50 x Nyloc Nut 4 M10 Washer 12 Loop...

Page 6: ...at the frame rail See illustration 2 Illus 2 NOTE For vehicles equipped with Electronic Suspension Control Autoride separate brake hose from sensor link bracket 2 Remove the brake caliper anchor bolts...

Page 7: ...metal 3 Reference mark the front drive shaft U joint to the differential yoke Remove the bolts and retainers from the yoke and slide the shaft rearward to disengage Tape the bearing cap assemblies and...

Page 8: ...t U joint to the differential yoke Tighten bolts to 22 ft lbs SUBFRAME INSTALLATION 1 Using a round file enlarge the inside corners of both lower control arm front brackets See illustration 7 Illus 7...

Page 9: ...lign flange marks and place the half shaft flange against the spacer Apply thread lock to bolts and attach the half shaft to the differential with the hardware from kit 860176 See illustration 10 Tigh...

Page 10: ...y bar to the lower control arms with the original end link assemblies BRAKE HOSE INSTALLATION 1 Install the brake rotor Apply thread lock and attach the caliper to the knuckle with the original mounti...

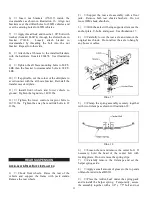
Page 11: ...3 Loosely attach the aft braces to subframe 176385B with the hardware from kit 860474 See illustration 16 NOTE Both aft braces should angle slightly outward from front to rear 4 If applicable remove...

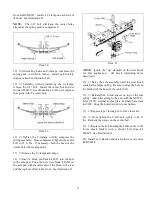
Page 12: ...ighten the sway bar end link bolts to 22 ft lbs REAR SUSPENSION ADD A LEAF RISER BLOCK INSTALLATION 1 Chock front wheels Raise the rear of the vehicle and support the frame with jack stands Remove the...

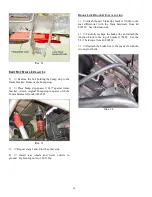
Page 13: ...hole in the axle pad Place the new riser block 15080 on the axle pad with the taller end of the block in the rear and the top hole offset to the front See illustration 21 Illus 21 NOTE Ignore the up...

Page 14: ...1 and 2 for the other side 4 Install rear wheels and lower vehicle to ground Tighten lug nuts to 140 ft lbs BRAKE LINE BRACKET INSTALLATION 1 Attach the new brake line bracket 170014 to the rear diffe...

Page 15: ...r slip yoke insertion The slip yoke should be inserted a minimum of one inch into the transfer case and or transmission 3 Ensure that the vehicle brake system operates correctly If new brake hoses wer...

Reviews: