background image

8

6. INSTALLATION


5. TRANSPORT

5.1 Packaging

The machine is delivered in a strong cardboard box
with internal protection.

The packaging bears symbols which must be 
observed during handling and stocking of the item.  

Always keep the package in a vertical position

 during transport. Do not turn it over or lay it on 

  its side. Avoid bumping and exposure to 

   harmful atmospheric agents. 

5.2. Inspection on receipt

Verify that the machine received corresponds to
the one indicated on the delivery receipt, including
any accessories. 
Examine it for any damage during transport. If 
damaged, inform the forwarder and our customer 
service office immediately. 
 

The packing elements(plastic bags, expanded

 polystyrene, nails, cardboard, etc.) must not

  be left within reach of children, as they are 

   potential sources of danger. Dispose of the 

    packing elements properly in accord with 

     local ordinances and regulations.  


6.1 Connections to be made by the user


 Hook-up must be carried out by qualified

 personnel in full accordance with federal, 

 state, and local regulations. 

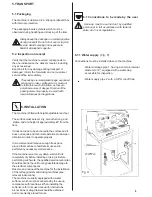
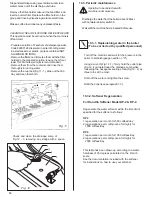
6.1.1 Water supply  

(Fig. 6)

Connections must be installed close to the machine.


·

 Water drainage pipe 1, having a minimun internal


  diameter of 2", equipped with a water-trap


  accessible for inspection. 


·

 Water supply pipe 2, with a 3/8"G cut-off trap.


The machine is fitted with height adjustable rear feet.

The surface must be level, dry, smooth, strong, and
 stable; and at a height of approximately 44" from the 
floor. 

It does not need to be anchored to the surface and it 
does not require and technical operations to dampen 
vibrations in order to operate properly. 

It is recommended to leave enough free space 
around the machine to facilitate its use and to 
perform any necessary maintenance. 

If the machine is wet or very damp, wait until it is
completely dry before installing or using it. Before
performing such work, the qualified service technician 
should examine the unit for any possible damage to 
the electrical components. 
Reserve an area near the machine for the installation 
of the coffee grinders and dosing machines(see 
relevant instructions). 
The machine is usually equipped with a water 
softener, which must be connected by the user in 
compliance with local laws. When installing the 
softener, refer to its user manual for instructions.
A knock box or dreg drawer should be obtained 
and conveniently placed for use.  

Summary of Contents for Epoca S

Page 1: ...epoca USE AND MAINTENANCE S CD DE version 2 0...

Page 2: ...asures 7 5 Transport 8 5 1 Packaging 8 5 2 Inspection Upon Receipt 8 6 Installation 8 6 1 Connections Made By User 8 6 1 1 Water Supply 8 6 1 2 Electric Supply 9 6 2 Preliminary Operations 9 6 3 Conne...

Page 3: ...Fig 1 Fig 2 1 Manufacturer 2 Model and version 3 Voltage 4 EC conformity mark if required 5 Serial number 6 Boiler data 7 Wattage 8 Protection level 9 Motor power 10 Heating element power 11 Frequency...

Page 4: ...hree items of the same kind Do not place heavy items on the packaging In an emergency such as the machine catching on fire unusual noises coming from the machine overheating etc IMMEDIATELY disconnect...

Page 5: ...2 1 Specifications and composition Fig 3 4...

Page 6: ...ee dispensing units groups D Number of steam spouts E Number of hot water spouts Cup warmer available upon request 1 Steam knob 2 Steam spout 3 Hot water knob 4 Hot water spout 5 Coffee dispensing uni...

Page 7: ...on valve in the hydraulic system and valve on to boiler to avoid overpressure Anti siphon valve on the hydraulic system to avoid backflow to the main supply 2 4 Power safety devices The safety devices...

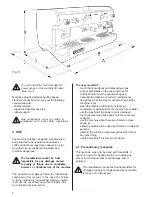
Page 8: ...amage and or pollute it The manufacturer cannot be held responsible for damage to people or things caused by unsuitable incorrect or irrational use Fig 5 You will find all the technical data for power...

Page 9: ...ons must be installed close to the machine Water drainage pipe 1 having a minimun internal diameter of 2 equipped with a water trap accessible for inspection Water supply pipe 2 with a 3 8 G cut off t...

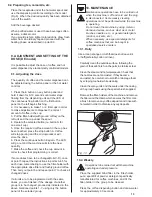
Page 10: ...n anti siphon valve When installing the machine make sure to remove the plastic fork Fig 8 A and check that the pin Fig 8 B is not blocked This operation is VERY important to ensure the proper perform...

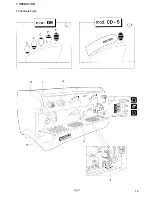
Page 11: ...7 OPERATION 7 1 Controls Fig 8 Fig 8 10...

Page 12: ...d to the element for heating the boiler water 3 4 Coffee dispensing switch mod CD Press and release the button LED on coffee is continuously dispensed Press and release the button again and coffee sto...

Page 13: ...he steam that disperses into the liquid heats it to the desired temperature Turn off the steam knob when the desired temperature has been reached Immediately after carrying out this operation clean th...

Page 14: ...use the filter holder with the appropriate dose filter and freshly ground coffee Then carry out point 6 and repeat point 7 to check all changed doses If all units are to be programmed with the same d...

Page 15: ...Operation to be carried out with machine under pressure Discharge the water from the boiler about 4 litres with hot water delivery switch 6 Wait until the machine has re heated before use 10 3 1 Reple...

Page 16: ...er 12 PROBLEMS AND REMEDIES Check operations to be carried out by the user with the plug disconnected For any type of problem or inconvenience not specifically indicated disconnect the plug and contac...

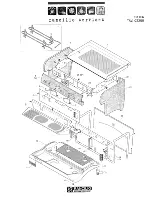
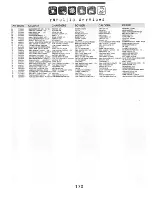
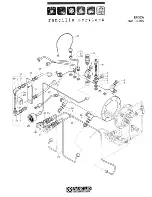
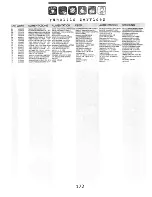
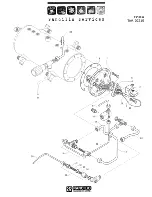
Page 17: ...epoca PARTS BREAKDOWN CD DE version 1 01...

Page 18: ......

Page 19: ......

Page 20: ......

Page 21: ......

Page 22: ......

Page 23: ......

Page 24: ......

Page 25: ......

Page 26: ......

Page 27: ......

Page 28: ......

Page 29: ......

Page 30: ......

Page 31: ......

Page 32: ...epoca DIAGRAMS S CD DE version 1 01...

Page 33: ......

Page 34: ......

Page 35: ......

Page 36: ......

Page 37: ......

Page 38: ......

Page 39: ......

Page 40: ......

Page 41: ......

Page 42: ......

Page 43: ......

Page 44: ...E1 S1 S1 TANK Macchina per caff Machine caf Kaffeemaschinen Coffee machine M quina para caf Uso e manutenzione Emploi et entretien Gebrauch und Instandhaltung Use and maintenance Uso y manutenci n...

Page 45: ...suchungen und Tests um Ihnen in Bezug auf Funktionalit t Sicherheit Leitungsf higkeit sowie Design ein Produkt anbieten zu k nnen das das Beste auf Markt befindliche ist Das B chlein mit den Anwiesung...

Page 46: ...2 2 EN 60335 1 EN 60335 2 15 EN 55014 EN 61000 3 EN 61000 4 ENV 50141 EN 55104 Norme EN armonizzate Normes EN harmonis es Harmonisierte EN Norme Harmonized EN norms Normas EN armonizadas VSR S M ed 78...

Page 47: ...nnections 64 7 Operation 65 7 1 Controls 65 7 2 Control instruments 66 7 3 Starting up 66 8 Use 67 8 1 Preparing coffee 67 8 2 Preparing cappuccino 68 8 3 Warming a beverage 68 8 4 Preparing tea camom...

Page 48: ...ents or damage to the machine This manual is an integral and essential part of the product and must be delivered to the user The warnings contained in it must be read carefully as they supply importan...

Page 49: ...e kind Do not place heavy items on the packaging In an emergency such as the breaking out of a fire unusual noise overheating etc take imme diate action disconnecting the power and closing gas and wat...

Page 50: ...59 2 1 Specifications and composition mod S1 mod E1 Fig 3 Fig 2 1 2 3 4 5 6 7 9 10 8 1 2 3 4 5 6 7 9 10 8...

Page 51: ...water spouts 1 Steam tap 2 Steam spout 3 Hot water tap 4 Hot water spout 5 Coffee dispensing unit 6 Coffee dispensing button 7 Boiler water level indicator 8 Gauge 9 Power on off switch and led 10 Swi...

Page 52: ...pump motor safe resistance thermal 2 5 Aerial noise Noise level in the working place does not usually exceed 70dB A 2 6 Vibrations The machine is supplied with rubber vibration damping feet In normal...

Page 53: ...or dispersal grilles with cloth or any other thing do not use the machine when wet or very damp 4 USE The machine have been designed manufactured and protected to be used to make express coffee and ho...

Page 54: ...electric components Reserve an area near the machine for the installation of the coffee grinding and dosage machine see relevant documentation The machine is usually equipped with a water softener typ...

Page 55: ...vent any risks 6 3 Connections Place the machine on the horizontal surface previously prepared Before connecting thoroughly wash the mains water pipes Leave the water supply taps running at full press...

Page 56: ...65 7 OPERATION 7 1 Controls Fig 8 Fig 8 A B C D E 4 mod E1 S1 mod S1 TANK mod S1 TANK 1 2 2 3 5 6 7 8 8 9 1...

Page 57: ...ANK On pressing the button continuous coffee dispensing begins and the led comes on On re pressing the switch the coffee delivery stops and the led goes out 4 Electronic coffee delivery button panel m...

Page 58: ...rim of the filter while pressing If ground coffee is left on the rim of the filter a leaktight seal is not ensured with consequent leaking of water and coffee grounds Lock the filter holder into the...

Page 59: ...ired tempera ture has been reached Immediately after carrying out this operation clean the spout with a sponge or clean cloth Be careful as the spout is hot and may burn your hand 8 2 Preparing cappuc...

Page 60: ...oint 6 and repeat point 7 to check all changed doses If all units are to be programmed with the same doses the selection of coffee doses is finished If the dosage of another unit is to be changed 1 2...

Page 61: ...d blind filter in the filter holder put in a spoonful of detergent in powder for coffee machines and fit the filter holder in the unit to be cleaned Press the coffee dispensing button and draw water f...

Page 62: ...1000 coffees day DP4 nr 1 regeneration per month for 1000 coffees day nr 2 regenerations per month once a fortnight for 2000 coffees day This table has been drawn up according to a water hardness of 2...

Page 63: ...rs A The machine does not start check that the plug is connected In case of power failure wait for the power to return and check if the earth leakage protection circuit breaker or the main switch is o...

Page 64: ...Water lack indicator Indicador por falta agua MO Morsettiera Bornes Klemme Clamp Borne MP Motore pompa Moteur pompe Pumpen motor Motor Pump Motor bomba MT Morsetto di terra Borne du sol Erdklammer Ea...

Page 65: ...91 REV 00 J5 J6 J4 GR...

Page 66: ...92...

Page 67: ...93...

Page 68: ...RD TARJETA ELECTR NICA E 1 R23 Regolazione pressione Pressure setting R glage pression Duck einstellung Regulaci n presi n W8 Abilitazione programmazione dosi Dose setting mode Habilitation r glage de...

Page 69: ...e volumetric pump bomba volum trica RA rubinetto acqua robinet eau Wasserhahn water tap grifo de agua RL rubinetto carico robinet d arriv e Auff llhahn inlet water tap grifo de carga RV rubinetto vapo...

Page 70: ...96 EPOCA E1...

Page 71: ...97 PV EPOCA S1...

Page 72: ...98 EPOCA S1 TANK...

Reviews: