R
andall
UnIOn
l
Ock
-S
tItch
Threading
Since 1858
Since 1858
www.Campbell-randall.com
5
6
threADING the WAx Pot
1. Mount your thread on the spool holder, with the side up
as indicated on the spool.
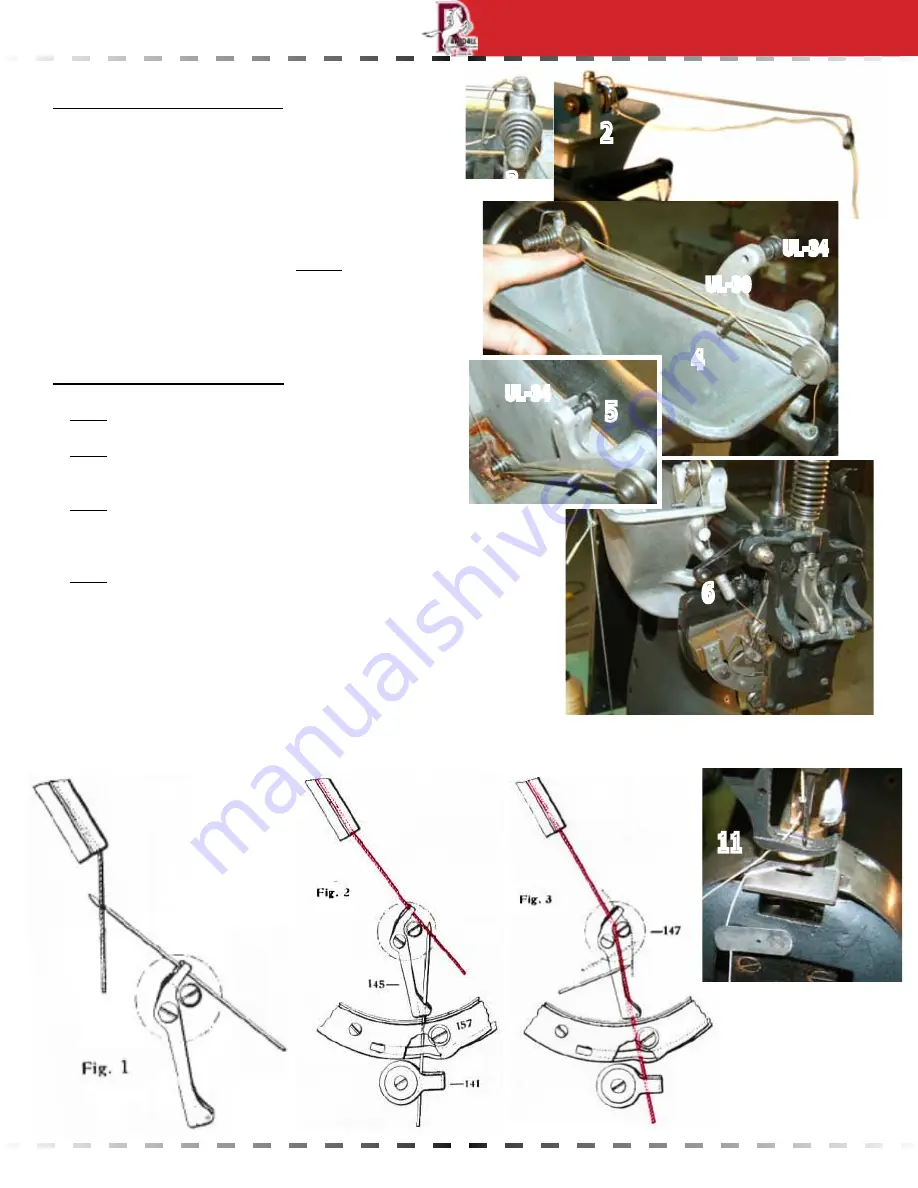
2. on the top of the wax pot, bring the thread through the
extended wire first and then through the small hook.
3. Go underneath the tension disk and around over the top
of the disk.
4. lift the arm (Ul-30) out of the wax pot. Draw the thread
o over the top roller, down over the bottom roller and
then back over the top roller again.
NOTE: If the thread
is carrying too much wax on it, then twist the thread
twice over then place back on the roller. This will clear off
excess wax.
5. To complete threading the wax pot, tighten the thumb nut
(Ul-34) to secure the arm into the wax pot.
2
2
3
4
UL-30
UL-34
9
7
8
6
UL-531
UL-531
11
threADING the MAChINe
6.
F
ig
. 1 :
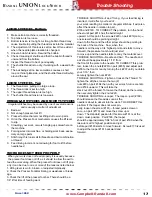
put the threading wire (Ul-531) through the wax pot
extension and pull the thread through.
7.
F
ig
. 1 :
Turn the hand wheel to get access to the lock (Ul-
145). put the threader through the lock (Ul-145), grab the
thread and pull down through the lock (Ul-145).
8.
F
ig
. 2 :
now, to pull the thread through the bottom of the
lock (Ul-145), put the threader (Ul-531) thru the tension
spring (Ul-157) and roller on the bottom of the tension
spring. This should put the thread behind the roller.
9.
F
ig
. 3 :
Turn the hand wheel until the take-up (Ul-135) is at
its lowest point. put the threading wire towards the back of
the machine in between the spring and metal base. put the
threader (Ul-531) through all 3 pieces at one time. Take the
threading wire and place the thread between the lock (Ul-
145) and the roller (Ul-147).
10. pass thread through the Thread Guide (Ul-165) and and
pull it through, leaveing about 8 inches loose. note:make
sure that the thread pulls free.
11. lift the foot, pull the thread through the slot and then pull
the thread towards the back of the machine.
5
UL-34


