Remote Commands for Analog Demodulation Measurements
R&S
®
FSW-K7
305
User Manual 1173.9240.02 ─ 23
<Position>
New vertical or horizontal position of the splitter as a fraction of
the screen area (without channel and status bar and softkey
menu).
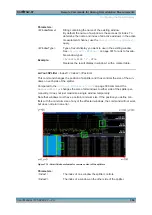
The point of origin (x = 0, y = 0) is in the lower left corner of the
screen. The end point (x = 100, y = 100) is in the upper right cor-
ner of the screen. (See
.)
The direction in which the splitter is moved depends on the
screen layout. If the windows are positioned horizontally, the
splitter also moves horizontally. If the windows are positioned
vertically, the splitter also moves vertically.
Range:
0 to 100
Example:
LAY:SPL 1,3,50
Moves the splitter between window 1 ('Frequency Sweep') and 3
('Marker Table') to the center (50%) of the screen, i.e. in the fig-
ure above, to the left.
Example:
LAY:SPL 1,4,70
Moves the splitter between window 1 ('Frequency Sweep') and 3
('Marker Peak List') towards the top (70%) of the screen.
The following commands have the exact same effect, as any
combination of windows above and below the splitter moves the
splitter vertically.
LAY:SPL 3,2,70
LAY:SPL 4,1,70
LAY:SPL 2,1,70
LAYout:WINDow<n>:ADD?
<Direction>,<WindowType>
This command adds a measurement window to the display. Note that with this com-
mand, the suffix <n> determines the existing window next to which the new window is
added, as opposed to
, for which the existing window is
defined by a parameter.
To replace an existing window, use the
This command is always used as a query so that you immediately obtain the name of
the new window as a result.
Suffix:
<n>
.
Parameters:
<Direction>
LEFT | RIGHt | ABOVe | BELow
<WindowType>
Type of measurement window you want to add.
See
on page 301 for a list of availa-
ble window types.
Return values:
<NewWindowName> When adding a new window, the command returns its name (by
default the same as its number) as a result.
Configuring the Result Display


