background image

Instrument Functions

R&S

®

NGE100B

26

User Manual 5601.1343.02 ─ 02

Function

Description

TMC/VCP

USB connection with USB-VCP or USB-TMC setting.

Indicate buzzer state (Disabled, Fault Events, Any Events).

The status bar shows the state of some of the instrument functions. The state can be
enabled, disabled, switched on, switched off or operating in a certain mode. The state
is indicated by the icon color.

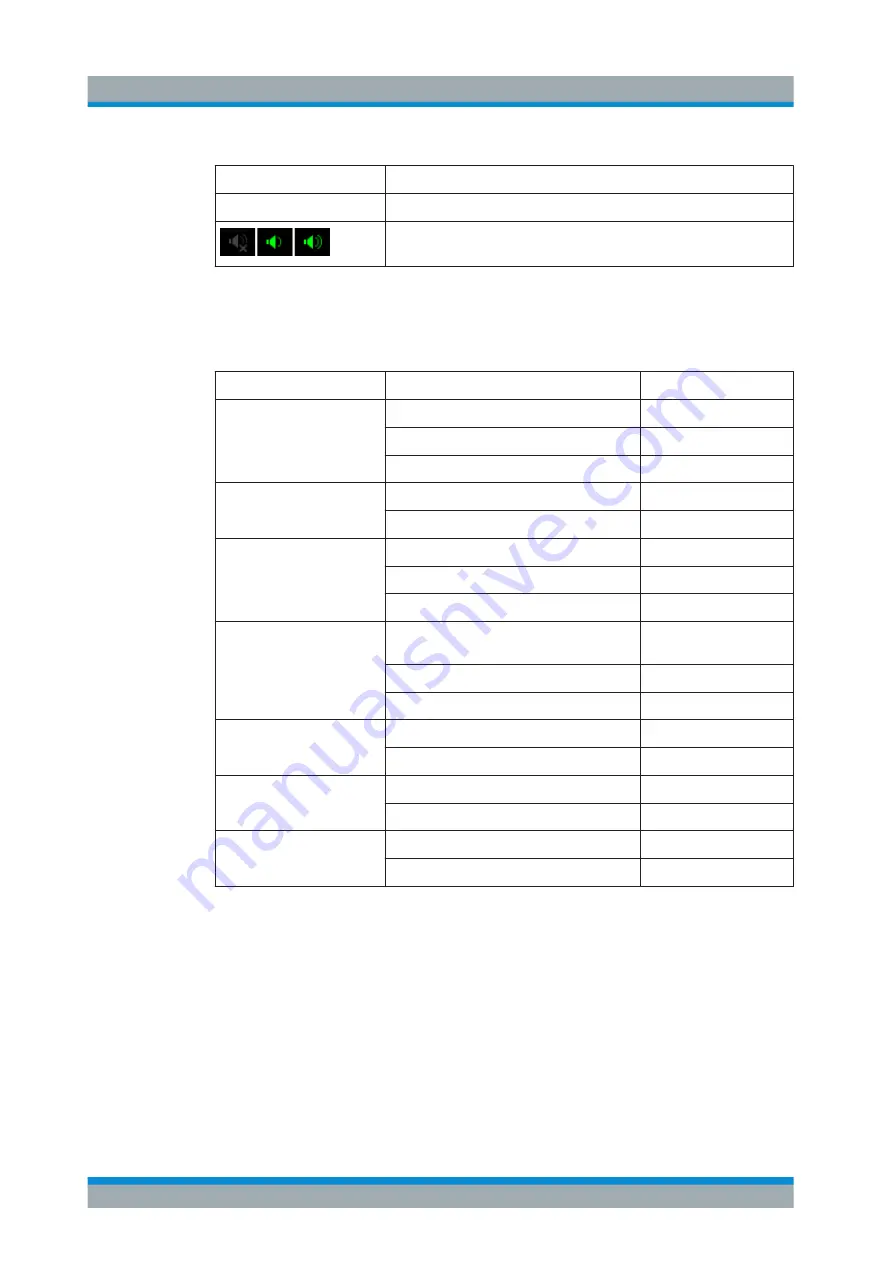
Table 5-2: Summary of function status

Function

State

Font color

EasyArb

Disabled

Grey

Enabled

White

In use

Green

EasyRamp

Disabled

Grey

In use for any channel

Green

DIO

Disabled or option NGE-K103 uninstalled

Grey

Enabled

White

In use

Green

WLAN

Disconnected or disabled or option NGE-
K102 uninstalled

Grey

Connecting to access point

Yellow

Connected to access point

Green

LXI

LAN/LXI fault or option NGE-K101 uninstalled Red

LAN/LXI in operation

Green

USB

TMC connection selected

Green

VCP connection selected

Green

Speaker

Disabled

Grey

Enabled

Green

Channel display area

Three channels are shown on the channel display area for NGE103B, and two for the
NGE102B. The respective channel settings and functions are displayed in the individ-
ual channel.

User Interface

www.allice.de 

Allice Messtechnik GmbH 

Summary of Contents for NGE-K101

Page 1: ...R S NGE100B Power Supply User Manual User Manual Version 02 5601134302 1 2 www allice de Allice Messtechnik GmbH...

Page 2: ...load from the R S NGE100B product page at www rohde schwarz com product nge100b Downloads Firmware Rohde Schwarz would like to thank the open source community for their valuable contribution to embedd...

Page 3: ...ons and the product documentation in a safe place and pass them on to the subsequent users Riesgo de lesiones y da os en el instrumento El instrumento se debe usar de manera adecuada para prevenir des...

Page 4: ...tation gut auf und geben Sie diese an weitere Benutzer des Produkts weiter Risque de blessures et d endommagement de l appareil L appareil doit tre utilis conform ment aux prescriptions afin d viter l...

Page 5: ...ting into Operation 13 4 1 1 Safety 14 4 1 2 Intended Operation 15 4 1 3 Unpacking and Checking the Instrument 17 4 1 4 Setting Up the Instrument 17 4 1 4 1 Bench Operation 18 4 1 4 2 Rack Mounting 18...

Page 6: ...1 Setting the Channels Voltage and Current 35 5 4 2 Tracking Function 36 5 4 3 Activating Fuse 37 5 4 4 Activating the Channels Output 38 5 4 5 Store and Recall 38 5 5 Advanced Functions 40 5 5 1 Prot...

Page 7: ...onnection 64 6 3 SCPI Command Structure and Syntax 65 6 3 1 Structure of a Command 65 6 3 1 1 Common Commands 65 6 3 1 2 Device Specific Commands 66 6 3 1 3 Overview of Syntax Elements 69 6 3 2 Parame...

Page 8: ...5 7 Fuse Setting 83 6 5 8 OVP Setting 85 6 5 9 OPP Setting 86 6 5 10 Measurement Commands 88 6 5 11 Voltage and Current Configuration Commands 89 6 5 12 EasyRamp Commands 90 6 5 13 Arbitrary Commands...

Page 9: ...lobal Rohde Schwarz information system GLORIS https gloris rohde schwarz com Basic safety instructions Contains safety instructions operating conditions and further important information The printed d...

Page 10: ...R S NGE100B manual 1 2 1 Typographical Conventions Convention Description Graphical user interface elements Names of graphical user interface elements on the screen such as dialog boxes menus options...

Page 11: ...re turned off when the set channel reaches its limit The EasyArb function allows channel 1 Ch 1 to have a freely definable voltage and current sequences with a timeframe as short as 10 ms It allows yo...

Page 12: ...ust and humidity levels if danger of explosion exists or with aggres sive chemical agents Any operating position may be used however adequate air circulation must be main tained For continuous operati...

Page 13: ...easurements at the source of the low voltage installations e g meters Measurement CAT III Measurements in building installations e g power distribu tion installations power switches firmly installed s...

Page 14: ...ssible electrical shock The maximum values for the instrument must not be excee ded The protection limits are listed on the front panel of the R S NGE100B to ensure the safe operation of the instrumen...

Page 15: ...ctric shock fire personal injury or damage Do not open the instrument casing Read and observe the Basic Safety Instructions delivered as a printed brochure with the instrument Note that the basic safe...

Page 16: ...1 1 Safety This instrument was built in compliance with DIN EN 61010 1 VDE 0411 part 1 safety regulations for electrical instruments control units and Iaboratory equipment It has been tested and shipp...

Page 17: ...terminal connection For the series connection of all output voltages it is possible to exceed the low voltage protection of 42 V Please note that in this case any contact with live components is life...

Page 18: ...usi ness and commercial areas and small businesses The instrument is designed for indoor use only Before each measurement you need to verify at a known source if the instrument functions properly To d...

Page 19: ...c protection are provided When shipping an instrument the original packaging should be used If you do not have the original packaging use sufficient padding to prevent the instrument from moving aroun...

Page 20: ...a manner that allows the user to disconnect the unit from the mains at any time and without restrictions 4 1 4 2 Rack Mounting The instrument can be installed in a 19 rack mount using a rack adapter...

Page 21: ...the display The various connectors are located below the display and function keys Figure 4 3 Front panel of R S NGE100B 1 Display 2 Function keys 3 Rotary knob and arrow keys 4 Output channels three...

Page 22: ...nfirmation of entries For detailed description on rotary knob and arrow keys see section Navigation Con trols in the User Manual Output channels Depending on the instrument type up to three output cha...

Page 23: ...nnected Never use the product if the power cable is damaged See Chapter 4 2 2 Switching On the Instrument on page 22 for more information Voltage selector The voltage selector selects the mains voltag...

Page 24: ...loaded fuses from the fuse holder 4 Check the caps of both fuses that you want to change to for their ratings There should be written either T5A250V for 115 V or T2 5A250V for 230 V The fuse size is 5...

Page 25: ...e value on the respective channel becomes editable and the digit for adjustment is indicated by a blue cursor 3 Press the right or left arrow key to move the cursor 4 Press the up down arrow key or tu...

Page 26: ...dust cloth Instrument damage caused by cleaning agents Cleaning agents contain substances that may damage the instrument For example cleaning agents that contain a solvent may damage the front panel l...

Page 27: ...l or 2 channel instrument Status bar Table 5 1 Status bar function Function Description EasyArb Arbitrary output sequences on Ch 1 EasyRamp Output voltage to ramp continuously within a 10 ms to 10 s u...

Page 28: ...e Green EasyRamp Disabled Grey In use for any channel Green DIO Disabled or option NGE K103 uninstalled Grey Enabled White In use Green WLAN Disconnected or disabled or option NGE K102 uninstalled Gre...

Page 29: ...d the indicator shows flashing and displays in red OVP OPP OTP Indicator to show that the overload voltage or current protection is triggered When triggered the indicator shows flashing and displays i...

Page 30: ...nd functions 3 Navigation keys Memory functions These keys are dedicated for a specific preprogrammed function Function keys Description M1 to M5 Five memory keys to save or recall instrument settings...

Page 31: ...l mode Fuse Toggles the fuse on off See Chapter 5 5 2 Fuse on page 42 Navigation keys These keys provide navigation control in the instrument Function keys Description Enter Confirms menu selection or...

Page 32: ...ey if you want to create a space between characters To delete the last entered character select the key To delete the current entry select the key Select the key to alternate between capital and small...

Page 33: ...of numeric value when in editing mode Navigate through the menu or menu items in the dialog box Long press on the up and down keys increase or decrease the numeric value of the menu items to the maxi...

Page 34: ...natively press Menu key to exit the menu mode from any menu level Table 5 4 Main menu hierarchy Menu Descriptions Output Menu items related to the instrument s advanced output functions Interface Menu...

Page 35: ...gures the USB connection See Figure 5 23 Requires restart of the instrument to apply the setting Table 5 7 Device menu hierarchy Menu Menu items Descriptions Device Information Displays instrument inf...

Page 36: ...results for the maximum power per channel NGE102B 33 6 W per channel 67 W max for the combination of two channels NGE103B 33 6 W per channel 100 W max for the combination of three channels For more in...

Page 37: ...ay area changes to red See Figure 5 3 5 4 Basic Functions 5 4 1 Setting the Channels Voltage and Current NGE103B comes with three channels and NGE102B comes with two channels Toggle the respective cha...

Page 38: ...s to yellow Figure 5 10 Voltage and current settings in the instrument See Chapter 5 1 4 3 Live Mode on page 31 for alternative way to configure the volt age and current values See also General Instru...

Page 39: ...t in general the R S NGE100B power supply includes an electronic fuse which can be switched on individually for each channel To switch on the fuse for each channel first ensure that the output is turn...

Page 40: ...Press the desired channels Selected channel keys Ch 1 Ch 2 Ch 3 illuminate 2 Press Output key The R S NGE100B output the set voltage of the selected channel Depending on the output mode the font text...

Page 41: ...Fuse settings Protection settings EasyRamp settings Set voltage level Set current level 1EasyArb settings 1Digital IO settings 1The EasyArb or DIO settings can only be saved in the respective dialog...

Page 42: ...cted memory location 5 5 Advanced Functions The following chapters provide information about the menu items found in the Menu key 1 Press Menu key The R S NGE100B displays the main menu of the instrum...

Page 43: ...s triggered the OVP if the condition remains Protected The output is disabled if the setting exceeds the set limit Disabled OVP is set to maximum value supported by hardware See the R S NGE100B brochu...

Page 44: ...ly interlink channels with their elec tronic fuses During operation if the fuse trips all channels interlinked with this channel will be turned off See Chapter 5 4 3 Activating Fuse on page 37 for mor...

Page 45: ...00B enabled the EasyArb function for Ch 1 Note If EasyArb Mode is set disabled corresponding output state of Ch 1 is also disabled 3 Set the desired data points for the EasyArb function The R S NGE100...

Page 46: ...t and Duration Repetition Set the number of times the waveform is output in the EasyArb table If this is set to 0 the waveform is output continuously EasyArb table Configures the EasyArb data table Us...

Page 47: ...o disabled 4 Set the Ramping Time of the selected channel 5 Press Enter key to confirm the settings Table 5 10 EasyRamp input field EasyRamp input field Description Ch 1 Ch 2 Ch 3 Enable or disable th...

Page 48: ...is toggled when the selected logic pulse is met Output Inhibit Level Selected channel Output is inhibited when the selected logic level is met When the selected channel Output is put to inhibit state...

Page 49: ...level Current Level set value Output the selected logic level when the current level of the selected channel is greater or equal to the set level Critical Event OVP Output the selected logic level whe...

Page 50: ...r number 5601 2204 03 option is required to connect the R S NGE100B to a network via LAN connection There are two methods to establish a local area network LAN connection with the R S NGE100B for remo...

Page 51: ...affect the entire network If your network does not support DHCP or if you choose to disable dynamic TCP IP configuration you must assign valid address information before connecting the instrument to t...

Page 52: ...with the network Manually configure this field if IP Mode set to Static Manual Default Gateway Gateway address to connect to the network Manually configure this field if IP Mode set to Static Manual...

Page 53: ...ction is alive the WLAN icon turns green on the status bar See Figure 5 1 Figure 5 22 WLAN connected 6 To disconnect select Disconnect in the WLAN dialog 5 6 2 USB Connection Alternatively connect a U...

Page 54: ...S NGE100B to apply changes 5 7 General Instrument Settings The following chapters provide the general instrument information and utilities services in R S NGE100B 5 7 1 Instrument Information The Info...

Page 55: ...gistered date when calibration was car ried out on the instrument Mac Address Mac address of the network interface Export OSA to USB The Open Source Acknowledgment OSA of the R S NGE100B can be export...

Page 56: ...entering a registered license key code You may choose to install from an xml file on USB or by manually entering the key code Select Device License menu item The R S NGE100B displays the License dialo...

Page 57: ...to factory default settings Select Device Reset menu item The R S NGE100B displays the General dialog See Figure 5 27 Figure 5 27 Reset dialog 5 7 5 System Test This function provides a system test t...

Page 58: ...z com product nge100b For firmware update using SCPI command see Firmware update via SCPI command for version 1 3 and above on page 57 Do not power off or operate the instrument during a firmware upda...

Page 59: ...e There are two files after the unzip do not rename these files 3 Connect the USB flash drive to the USB port of the instrument and wait for ten sec onds 4 Connect to the instrument via USB LAN or WLA...

Page 60: ...2 Use a QR code reader to scan the QR code to link to the online product home page Alternatively you could enter the address http www rohde schwarz com product nge100b into a browser to access the la...

Page 61: ...re interface that allows the communi cation to the R S NGE100B using any terminal program e g HMExplorer via SCPI commands once the corresponding Windows drivers have been installed The actual USB VCP...

Page 62: ...n determine if commands have been terminated and if they have been processed correctly With USB TCP communication with instrument requires analysis and polling mechanisms within the controlling softwa...

Page 63: ...ble either an uncrossed or a cross over cable can be used It is possible to perform a complete parameter setting via the manual assignment of a fixed IP address or automatic assignment of a dynamic IP...

Page 64: ...s based on each other hierarchically Class C devices are characterized by a uniform LAN implementation Including an ICMP ping responder for diagnostic purposes Devices can be configured with a WEB bro...

Page 65: ...ee Figure 6 2 Figure 6 2 Instrument web browser view 6 1 5 SCPI SCPI Standard Commands for Programmable Instruments commands messages are used for remote control Commands that are not taken from the S...

Page 66: ...COM port number shown on the controlling PC e g ASRL15 INSTR LAN WLAN Refer to Chapter 5 6 Connecting to a Network on page 48 for configuring the LAN and WLAN parameters To set up the connection the I...

Page 67: ...based on standard IEEE 488 2 i e it uses the same syntactic basic elements as well as the common commands defined in this standard Part of the syntax of the device responses is defined with greater re...

Page 68: ...9 Hierarchy Device specific commands are of hierarchical structure The different levels are repre sented by combined headers Headers of the highest level root level have only one key word This key wor...

Page 69: ...TATe This command contains key word STATe in the fifth command level It defines the sta tus of DHCP Optional Keywords Some command systems permit certain key words to be inserted into the header or om...

Page 70: ...in a command they are separated by a comma A few queries permit the parameters MINimum MAXimum and DEFault to be entered Refer to Chapter 6 3 2 Parameters on page 70 for a detailed description of the...

Page 71: ...with 1 Suffix 1 is the default state and used when no specific suffix is specified Some standards define a fixed numbering starting with 0 With GSM for instance slots are counted from 0 to 7 In the ca...

Page 72: ...a may comprise up to 255 characters the exponent must lie inside the value range 32000 to 32000 The exponent is introduced by an E or e Entry of the exponent alone is not permissible In the case of ph...

Page 73: ...ly true is represented by ON or a numerical value unequal to 0 The OFF state logically untrue is represen ted by OFF or the numerical value 0 The numerical values are provided as response for query Ex...

Page 74: ...e separated by a semicolon If the next command belongs to a different command system the semicolon is followed by a colon A colon at the beginning of a command marks the root node of the command tree...

Page 75: ...This is only the case after the Operation Com plete bit has been set in the ESR This bit indicates that the previous setting has been completed Sending OPC directly after the command whose processing...

Page 76: ...ndard event register ESR and the EVENt part of the QUEStionable and the OPERation registers to zero The command does not alter the mask and transition parts of the registers It clears the output buffe...

Page 77: ...form writes a 1 into the output buffer as soon as all preceding commands have been executed This is used for command synchronization OPT Option identification query Queries the options included in the...

Page 78: ...Event SYSTem LOCal This command sets the system to front panel control The front panel control is unlocked Usage Event SYSTem REMote This command sets the system to remote state The front panel contr...

Page 79: ...Municate SOCKet DHCP STATe arg0 This command sets or queries LAN interface mode ON automatic IP address from DHCP server OFF manually set IP address Available only if option R S NGE K101 is installed...

Page 80: ...ATe arg0 This command activates deactivates or queries the enable state of the wireless inter face Available only if option R S NGE K102 is installed Parameters arg0 SYSTem COMMunicate WLAN PASSword a...

Page 81: ...ontent BMP format is supported Return values arg0 Usage Query only HCOPy SIZE X This command returns the horizontal expansion of the screenshots Return values arg0 Usage Query only HCOPy SIZE Y This c...

Page 82: ...nt which is required by the SCPI standard Parameters arg0 OUTPut1 OUTPut2 OUTPut3 OUTP1 OUTP2 OUTP3 OUT1 OUT2 OUT3 OUTPut1 OUTP1 Ch 1 OUTPut2 OUTP2 Ch 2 OUTPut3 OUTP3 Ch 3 Example INSTrument OUTPut1 I...

Page 83: ...rg0 OFF ON 0 1 ON 1 Output state will be activated OFF 0 Output state will be deactivated Example INST OUT1 OUTP SEL ON Volt 12 Curr 0 1 Ch 1 is activated INST OUT2 OUTP SEL ON Volt 12 Curr 0 2 Ch 2 i...

Page 84: ...arameters arg0 OFF ON 0 1 ON 1 Selected channel will be activated OFF 0 Selected channel will be deactivated RST OFF 0 Example INST OUT1 OUTP SEL ON Ch 1 is activated OUTP SEL 1 Return the state of th...

Page 85: ...l 1 to 50 ms FUSE DEL 50 Return the fuse delay time of the selected channel FUSE LINK arg0 This command defines or queries the channel fuses fuse linking for the previous selected channel Parameters a...

Page 86: ...el Parameters arg0 1 2 3 1 channel Ch 1 2 channel Ch 2 3 channel Ch 3 Example INST OUT1 FUSE LINK 2 FUSE UNL 2 Fuse Ch 1 is unlinked with Ch 2 Usage Setting only FUSE STATe arg0 This command defines o...

Page 87: ...so refer to function MEASured Example INST OUT1 VOLT PROT MODE PROT Sets OVP protected mode for Ch 1 VOLT PROT MODE PROT Return the selected channel OVP mode SOURce VOLTage PROTection TRIPped This com...

Page 88: ...mV steps MIN Set the OVP value to minimum MAX Set the OVP value to maximum Default unit V Example INST OUT1 VOLT PROT LEV 5 Set the OVP value of Ch 1 to 5 V VOLT PROT LEV Return the selected channel...

Page 89: ...ection TRIPped This command queries the OPP tripped status of the previous selected channel Return values arg0 1 0 1 OPP is tripped 0 OPP is not tripped Example INST OUT1 POW PROT TRIP 0 OPP state of...

Page 90: ...the measured current Default unit A Example MEAS CURR 1 000 Usage Query only MEASure SCALar POWer This command queries the measured power value of the previous selected channel Return values Power Num...

Page 91: ...to minimum MAX Set current to maximum Example INST OUT1 APPLY 6 2 Set channel 1 to output 6 V and 2 A APPLY 6 2 Return voltage and current value of the selected channel SOURce CURRent LEVel IMMediate...

Page 92: ...state for the previous selected channel See also SOURce VOLTage RAMP STATe Parameters arg0 SOURce VOLTage EASYramp TIME Time This command sets queries the EasyRamp time of the previous selected chann...

Page 93: ...hannel 1 The dwell time between two points is from 10ms to 600s Parameters arg0 Voltage1 Current1 Time1 Voltage2 Current2 Time2 Volt age128 Current128 Time128 Voltage1 Voltage128 Defines the arbitrary...

Page 94: ...s command returns the number of arbitrary points of EasyArb waveform Return values arg0 Usage Query only ARBitrary STATe arg0 This command activates deactivates or queries the EasyArb state ON Ch 1 is...

Page 95: ...1 4 Parameters arg0 OUTPut INPut Example TRIG DIR DIO2 OUT TRIGger ENABle DIO IO arg0 This command sets or queries the state of the specified Digital I O line The state is disabled when any setting h...

Page 96: ...ital I O line Suffix IO 1 4 Parameters arg0 ON OFF TOGGle INHibit ARBitrary ON Output is switched on OFF Output is switched off TOGGle Output state is toggled INHibit Output state remains off as long...

Page 97: ...nd sets or queries the trigger logic Active High Active Low of the speci fied Digital I O line Suffix IO 1 4 Parameters arg0 LOW HIGH RST HIGH TRIGger OUT CONDition DIO IO arg0 This command sets the t...

Page 98: ...output is linked to a EasyArb event RST ON TRIGger OUT CRITevent DIO IO arg0 This command sets or queries the critical event of the trigger output of the specified Digital I O line Suffix IO 1 4 Param...

Page 99: ...age level of the the trigger output of the specified Digital I O line Triggers when output voltage level exceeds or equals to the set level Suffix IO 1 4 Parameters Voltage RST 0 0 Default unit V TRIG...

Page 100: ...utputs wired in series should be set to the identical value If one of the outputs exceeded the current limit the total volt age will naturally collapse See Chapter 5 3 Output Modes on page 34 It is ad...

Page 101: ...r slight voltage differences it is common in this operating mode to first charge a voltage output up to the current limit the other voltage output provides the remaining current See Principles of oper...

Page 102: ...entical voltage values to display a low voltage difference By increasing the voltage slightly the load distribution can be manipulated If the volt age for a channel is to be increased by 50mV for inst...

Page 103: ...42 Fuse Delay 42 Fuse Linking 42 FuseLink 42 G General Instrument Settings 52 53 Buzzer 53 Display 53 Display Brightness 53 Key Fallback Time 53 Keypad 53 Sound 53 Getting Started 7 H Help 57 I Ident...

Page 104: ...ack Mounting 17 Status byte Remote 74 75 Store and Recall 38 Switching On the Instrument 22 System Test 55 T Tracking Function 36 Trying Out the Instrument Activating the Channels Output 23 Selecting...

Page 105: ...lsterbacher Strasse 15 19 60528 Frankfurt am Main Tel 49 0 69 67724 583 Fax 49 0 69 67724 582 info allice de www allice de Verwendete Warenzeichen und Schutzrechte sind Eigentum der jeweiligen Herstel...

Reviews: