Manual-10
OPERATING INSTRUCTIONS
Selecting Crossover Frequencies
Most speaker manufacturers supply low and/or high
frequency cut-off points for each driver, especially if these
are supplied in a system. These cut-off frequencies are based
on each driver’s performance at and beyond this point, with a
certain safety margin to accommodate more gentle filter
roll-offs and resultant higher output beyond the recommended
performance range.
The AC 23B utilizes 41-detent crossover frequency
selectors which are precision potentiometers. The detents will
assure consistent accuracy from Channel to Channel and unit
to unit. This is a distinct advantage over the continuously
variable designs with low-tolerance parts, possible knob
misalignment and panel screening variations. Even with 41
choices it is possible that the exact recommended crossover
frequency may not fall on one of the detents on the selector.
Not to panic, for these sound reasons:
1. The AC 23B possesses 24 dB/octave roll-off, so the
crossover points may be set to the nearest detent above or
below the recommended limit with virtually no hazard to
the driver or degradation in sound quality. If extremely
high power levels are expected, it is safer to defer to the
high frequency drivers and shift the crossover point
up
in
frequency rather than down.
2. Detents do not rely on knob alignment, silk-screen
accuracy, parallax and other variables which erode the
accuracy of continuously variable designs. Chances are
that even careful visual alignment on these will often yield
a frequency error greater than a full detent on the AC 23B.
3. If it is absolutely critical to obtain the exact crossover
frequency (Mil Spec., P.A., etc.), the selector
can be
positioned between detents
if necessary. This of course will
require the aid of a precision signal generator and other
equipment to verify the exact setting.
For best overall system results, try to choose the speaker
components so that each operates well within its recom-
mended limits. This will provide valuable leeway so that you
may move crossover points in order to fine-tune the system,
and will also yield higher system reliability. If at all possible,
beg, borrow or best yet always use some kind of realtime
analyzer to tune your crossover and fine-tune the system for
each different location with an equalizer. Refer to the follow-
ing pages for further alignment details.
Time Delay Adjustment
Procedure
Before jumping feet first into the realm of time delay and
how to adjust it, it might help to spend a moment here to
re-affirm why on earth this delay is really necessary. For a
short course on time delay, Linkwitz-Riley and other
mouth-watering details, we urge you to read the “Linkwitz-
Riley Crossovers” RaneNote from Rane’s web site.
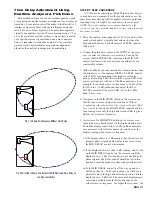
Problems pop up when two different speakers emit the
same frequency as occurs in the crossover regions of two,
three, four and five way systems. Because the two drivers are
displaced vertically, cancellation occurs somewhere off-axis
because the sound waves have to travel different distances
from the two speakers and hence, will arrive out of phase.
This forms a “lobe” or radiation pattern, bounded on either
side by cancellation lines or axes, which narrow the disper-
sion pattern or listening area of the speaker.
Fine. So we put up with it. But to make matters worse,
when the two drivers are horizontally displaced – that is, one
is in the front of or behind the other, this “lobe” or dispersion
pattern gets
tilted
(usually upward) toward the driver that is
further behind. This gets hard to put up with, because the end
result is that your speaker system will have two, three, four or
more tilted radiation patterns and only two or three people in
the house will have decent seats. And we’re not talking trivial
pursuits here—this rampant lobing error can make a sound
system a real headache to listener and operator alike.
The idea, then, is to be sure that all drivers are vertically
aligned and that all components are always in phase. Then all
the main lobes are on-axis, well behaved, and the system
enjoys the widest possible dispersion pattern so that everyone
gets good sound. The one catch is that in many cases it is
physically or otherwise impossible to get all the drivers
vertically lined up at the sound source.
This
is where time
delay comes in.
By electronically delaying the signal going to the front
driver, enough time allows the sound from the rear driver to
literally catch up to the forward driver’s voice coil, so that
signal from both drivers is emitted in phase—and it works!
Time delay makes an appreciable improvement in overall
sound. The trick is finding the proper time delay amount:
hence the rest of this section.
Unfortunately the amount of time delay is a function of
two
factors (life ceased to be simple after age 9, right?): the
amount of horizontal displacement between driver voice
coils,
and
the actual crossover frequency involved. Setting
delay controls by ear is supposedly possible, but
very
tricky
and unreliable. The following methods are a couple of (but by
no means all) means of setting time delay.


