Manual-1
OPERATORS MANUAL
MM 42
MONITOR PROCESSOR
WEAR PARTS:
This product contains no wear parts.
–36
dBFS
PEAK
+8
–12
–24
dBu
dBu
0
–3
+4
+8
–12
–24
0
–3
+4
PROCESSOR
MONITOR
10
–12
–24
–8
10
3
1
6
–4
–36
–12
–24
–8
–4
–36
–12
–24
–8
–4
–36
–12
–24
–8
–4
3
1
dB
6
10
0
2
4
8
6
PUSH:
FINE
PUSH:
SELECT
MM 42
DATA
OUTPUT
INPUT
PHONES
GAIN REDUCTION
CONFIG
FILTER/SUB
A
MEMORY
UTILITIES
CUE BUS
B
C
D
1
2
LEVEL
COMPRESS
EQ
LIMIT
ENTER
CANCEL
FILTERS, COMPRESSOR, PARAMETRIC EQ, LIMITER
FOR PERSONAL MONITOR APPLICATIONS
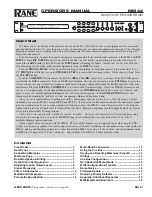
Quick Start
We know you’re excited about the purchase of your new MM 42. But trust us: take your earphones out for a moment
and read this Quick Start. It covers the basics to get you tweaking your ear mixes into submission in no time. The following
paragraphs assume you’re working with a stereo (left/right) mix. For more advanced applications you’ll have to dig a bit
deeper into this manual.
First, the hardware. Connect the console aux/groups corresponding to the left and right ear mixes to the MM 42’s
LINE
INPUT A
and
LINE INPUT B
respectively. Send the MM 42 a good, healthy signal, aiming to keep the loudest peaks
around the
-8 dBFS
mark (yellow LEDs) on the
INPUT meters
. Running the Inputs “into the red” is only cool with old-
school analog gear. If needed, make further adjustments using the
INPUT
controls.
Turn the
PHONES LEVEL
all the way down and plug your earphones or headphones directly into either the 1/4" or
1/8"
PHONES
jack. Slowly turn up the
PHONES LEVEL
to a comfortable listening volume. Not hearing anything? Press
the
CUE BUS
button.
Press the
COMPRESS
button and use the Previous
and Next
cursor keys to navigate to the M-BAND param-
eter. Rotate the
DATA
control clockwise until SET starts flashing. Don’t panic; instead, press the
ENTER
key to go to the
crossover frequency page. Adjust the frequency splits for each range, pushing and turning the
DATA
control to make fine
adjustments. Press the
ENTER
or
COMPRESS
key to return to the Compressor page. Adjust the THRSH parameter until
you see a few blinky lights on the Gain Reduction meter. Press the
COMPRESS
button again to move on to band 2, and
again to move to 3, merrily making adjustments. No, you’re not hallucinating – the
GAIN REDUCTION
meter does
indeed switch automatically to show you what’s happening within each frequency band.
Okay, if you’re comfortable with getting around the various pages then the dry run is over. If you’re using a wireless
transmitter, connect the MM 42’s main
OUT 1
and
OUT 2
to the inputs of the transmitter and adjust the transmitter’s input
gain to a nominal level. If you’re using a hardwired beltpack, connect the MM 42’s main Outputs directly to the beltpack
inputs, making sure the beltpack level is turned all the way down. Plug your earphones into the beltpack and
slowly
turn its
level up to a comfortable listening volume.
That’s it! You’re ready to rock. Or folk. Or country. Or polka….whatever your musical style. Tweak each processing
section to taste, making sure you go to the MEMORY page once satisfied and store your hard work to one of the 16
available Memory (preset) locations.
There’s plenty more you can do with the MM 42. The rest of this manual covers important topics like using the SUB
Output to augment an earphone mix with onstage subwoofers or “shakers”, handling two independent mono mixes with one
MM 42, linking and unlinking parameters, connecting multiple MM 42s together via the Cue Bus, and the wonderful world
of MIDI, just to name a few. So don’t stop here - keep reading! You still have 3 hours until show time...
Contents
Front Panel ....................................................................... 2
Rear Panel ........................................................................ 3
Connection Examples ................................................... 4
Welcome Page ................................................................ 7
Basic Navigation & Editing .......................................... 7
Output Chain Configuration ........................................ 7
Adjusting Input & Output Levels ................................ 8
Signal Processing .......................................................... 9
Filters & Subwoofer ....................................................... 10
Multi-Band Compressor ............................................... 11
Parametric Equalization ............................................... 12
Multi-Band Peak Limiter ............................................... 12
Using the Cue Bus .......................................................... 13
Storing and Recalling Memories (Presets) ............. 14
Utilities .............................................................................. 14
Cue Bus Configuration .................................................. 14
Gain Reduction Meter Mode ....................................... 15
MIDI Configuration & Transfer .................................... 15
Name Device .................................................................... 16
Firmware Update ............................................................ 16
Restoring Factory Defaults .......................................... 17
Appendix: Additional Resources ................................ 17
MIDI Implementation Chart ......................................... 18

