background image


10 

10.


Desenchufe este equipo durante las tormentas eléctricas o cuando no lo use por períodos prolongados. 

11.


Solicite todo servicio a personal de servicio calificado. Se requiere servicio cuando el equipo se dañó de cualquier 
manera, por ejemplo si se dañaron el cable o el enchufe de alimentación, si se derramó líquido o cayeron objetos dentro 
del equipo, si el mismo estuvo expuesto a la lluvia o la humedad, si no funciona normalmente o se dejó caer. 

12.


Suministro eléctrico (si es aplicable): Conecte este producto solamente a un suministro eléctrico del tipo que se describe 
en estas instrucciones de operación o según se indique en la unidad. 

13.


Selectores de voltaje interno/externo (si es aplicable): Los conmutadores selectores de voltaje interno y externo, si 
existen, solo deben ser reconfigurados y reequipados con un enchufe adecuado para voltaje alternativo por un técnico 
cualificado. No intente modificar esto usted mismo. 

14.


Agua y humedad (si es aplicable): Este producto se debe mantener fuera del contacto directo con los líquidos. El aparato 
no debe ser expuesto al goteo o a la salpicadura y ningun objeto lleno de líquidos, como serián los floreros, debe ser 
colocados cerca del aparato. 

15.


Precaución

 (si es aplicable):


Peligro de la explosión si la batería se substituye incorrectamente. Substituir solamente por 

el mismo o el tipo equivalente. Las baterías (un bloque de baterías o una batería instalada) no se deben exponer a calor 
excesivo, tal como la luz solar, el fuego, etc. 

16.


(Si es aplicable) Cuando se usa el enchufe del suministro eléctrico o el acoplador de un artefacto como dispositivo de 
desconexión, el mismo debe permanecer listo a operar. 

17.


Terminal de conexión a tierra de protección (si es aplicable): El artefacto debe conectarse a un tomacorriente del 
suministro eléctrico con una conexión a tierra de protección. 

18.


Solamente para aparatos de Clase 2

: Este símbolo significa que el equipo es un artefacto eléctrico Clase 2 o de 

doble aislamiento. Está diseñado de manera tal que no requiere una conexión de seguridad a la tierra eléctrica. 

19.


Cableado de Clase 2

 (si aplica): Para reducir el riesgo de choque eléctrico, el cableado externo conectado a los terminales 

marcados como “Cableado de Clase 2” requiere la instalación de un cableado de Clase 2 por una persona capacitada o el 
uso de conductores o cables prearmados. 

20.


Precaución

 (si es aplicable): Antes de conectar el cable de alimentación a la corriente eléctrica, consiga una conexión a 

tierra. Además, a la hora de desconectar esta toma de tierra, asegúrese de hacerlo después de haber extraído el cable de 
alimentación del chasis. 

21.


Este aparato es para uso profesional únicamente. Climas de funcionamiento previstos: moderado. 

22.


(Si es aplicable) Cuando traslade o no use el artefacto, sujete el cable de alimentación (por ejemplo, envuélvalo con un 
precinto). Tenga cuidado de no dañar el cable de alimentación. Antes de usarlo nuevamente, asegúrese de que el cable 
de alimentación no esté dañado. Si dicho cable presenta algún daño, lleve la unidad y el cable a un técnico de servicio 
calificado para reparación o reemplazo según lo especifique el fabricante. 

23.


Advertencia

 (si es aplicable): La presión sonora excesiva (altos volúmenes) de los auriculares puede causar pérdidas de audición. 

24.


Advertencia

 (si es aplicable): Antes de instalar u operar el producto, consulte toda la información importante (como la 

relativa a electricidad, seguridad, etc.) impresa en la envuelta inferior exterior o el panel trasero. 

25.


Advertencia

 (si aplica): Los terminales marcados con el símbolo de relámpago pueden ser de suficiente magnitud 

como para presentar un riesgo de choque eléctrico. 


Las instrucciones de servicio 


Desconecte el cable eléctrico antes de empezar el servicio.  


Substituya los componentes críticos 

 solamente por las piezas de la fábrica o las piezas equivalentes recomendadas. 


Para las unidades accionadas por CA: Antes de devolver la unidad reparada al utilizador, utilice un ohmímetro para medir entre 
las dos láminas del enchufe de CA y todas las partes expuestas. La resistencia tiene que ser más de 2,000,000 ohms. 


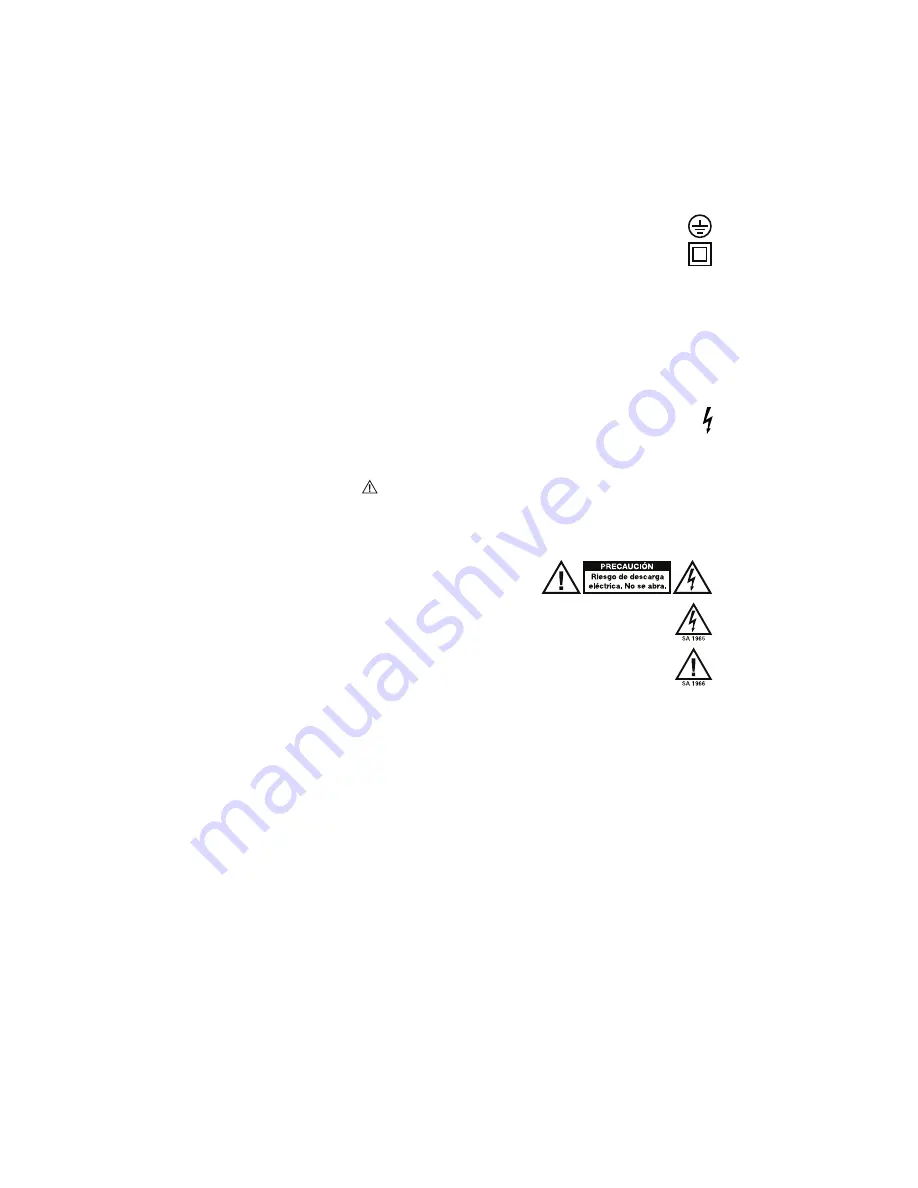
Señales de advertencia 


PRECAUCIÓN

: PARA REDUCIR EL RIESGO DE DESCARGA ELÉCTRICA NO 

QUITE NINGUN TAPADERO. DENTRO DE LA UNIDAD NO HAY 
COMPONENTES ÚTILES PARA EL UTILIZADOR. PARA EL SERVICIO SE DEBE 
DIRIGIRSE SOLAMENTE AL PERSONAL DE SERVICIO CUALIFICADO. 

VOLTAJE PELIGROSO NO AISLADO

:


La seña de relámpago con la punta de la flecha dentro del triángulo equilátero 

está puesto para alertar al utilizador de la presencia del “voltaje peligroso no aislado” dentro del recinto de producto 
que puede tener la magnitud suficiente de correr un riesgo de descarga eléctrica. 

INSTRUCCIONES

:


El signo de exclamación, dentro del triángulo equilátero, es para alertar el utilizador de la 

presencia de las instrucciones importantes de funcionamiento y de mantenimiento (servicio) en la literatura que 
acompaña este dispositivo. 

ADVERTENCIA

: Para reducir el riesgo de incendio o descarga eléctrica, no exponga este aparato a la lluvia o a la humedad. 

Los equipos eléctricos NUNCA deberían guardarse o almacenarse en ambientes húmedos. 

SOLO PARA LOS MODELOS DE LOS EE.UU. Y CANADÁ

: PARA EVITAR DESCARGAS ELÉCTRICAS, NO UTILICE ESTE 

ENCHUFE (POLARIZADO) CON UN CABLE DE EXTENSIÓN, RECEPTÁCULO U OTRA TOMA DE CORRIENTE A MENOS 
QUE LAS PALAS DEL ENCHUFE PUEDAN SER INSERTADAS POR COMPLETO PARA EVITAR SOBREEXPOSICIÓN. 

AVISO SOBRE LOS PRODUCTOS LÁSER

:

 PELIGRO

: RADIACIÓN LÁSER INVISIBLE CUANDO ESTÁ ABIERTO Y EL 

BLOQUEO FALLA O ES INUTILIZABLE. EVITE LA EXPOSICIÓN DIRECTA AL HAZ. EL USO DE CONTROLES O AJUSTES NO 
ESPECIFICADOS AQUÍ PUEDE RESULTAR EN LA RADIOEXPOSICIÓN PELIGROSA.


AVISO SOBRE LAS REGULACIONES DEL FCC 

(

Federal Communications Commission

):


Este equipo genera y usa energía 

de radiofrecuencia y puede causar interferencia en la recepción de radio y de televisión si no la opera estrictamente según los 
procedimientos detallados en este manual de operación. Esta unidad cumple con las reglas de aparatos informáticos de 
Clase B en conformidad con las especificaciones en la Subparte J o Parte 15 de las Reglas FCC, que están diseñadas para 
proporcionar una protección razonable contra tal interferencia en una instalación residencial. Sin embargo, no existen 

Summary of Contents for Zonetech

Page 1: ...UserGuide English 3 25 Appendix English 26 27...

Page 2: ...2...

Page 3: ...ts green for audio inputs 3 6 pin 3 8 mm Euroblock outputs orange for zone outputs 1 3 pin 3 8 mm Euroblock outputs orange for zone outputs 1 3 pin 3 8 mm Euroblock inputs black for logic input Blueto...

Page 4: ...otes or paging devices e g Rane DR6 Rane DRZH Rane RAD devices to the Master Remote Port Zone Remotes Ports and Pager Port on the rearpanel 4 Attach the Bluetooth antenna included to the Bluetooth ant...

Page 5: ...play Press this knob to cycle through the Infopages shown in thedisplay 6 Left Right Press each of these buttons to select the previous or next option respectively shown in thedisplay 7 Bluetooth Pres...

Page 6: ...sources and adjust levels for the zonesremotely 8 Master Remote Port RJ45 shielded Cat5e or Cat6 cables Connect an optional Rane DR6 remote control to this port which will allow you to select sources...

Page 7: ...Level LS Level This is the amount of boost increase or cut decrease of the low frequency shelving filter 15 0 to 8 0 dB Tip If you are unsure of what this level should be it is better to use a lower s...

Page 8: ...e Inputs 5 and 6 only This is the type of device connected to Input 5 and Input 6 Dynamic microphone Condenser Microphone Unbalanced Line Balanced Line default Balanced Line Stream Source This is the...

Page 9: ...ow long it will take in seconds for the output to switch back to the original audio source after the priority source signal falls below the threshold 1 60 Sec default 3 Sec Tip Enabling this feature i...

Page 10: ...f the high frequency shelving filter 630 Hz 16 kHz default 630 Hz Page Enable PG Enable This feature determines whether or not the zone will receive an audio signal from the pager Enabled on Disabled...

Page 11: ...e the mono setting and use the X Over Freq Low Level and High Level settings to manage the signal X Over Frequency X Freq Zone 6 only This determines the frequency at which the low frequencies and hig...

Page 12: ...the Zone level Low Shelf Level LS Level This is the amount of boost increase or cut decrease of the low frequency shelving filter 15 0 to 8 0 dB Low Shelf Frequency LS Freq This is the frequency of t...

Page 13: ...default 630 Hz Chime This determines whether the pager s chime sound is on Enabled or off Disabled The chime will be mixed with the paging output signal Chime Level This is the volume level of the pag...

Page 14: ...the Bluetooth audio signal to an input on Zonetech 1 On Zonetech press and release the Bluetooth button Stream will appear at the top of the display as well as the name of the streaming device 2 Use t...

Page 15: ...treaming 1 Make sure the PC and Zonetech are powered on and connected to the samenetwork 2 On your PC open a DLNA compatible media server Windows Media Player is recommended for most users but other s...

Page 16: ...settings Meters This view shows multicolor level meters for all inputs and zones Device Port Status This view shows information about the devices currently connected to Zonetech and their current oper...

Page 17: ...g your system always begin by reviewing this information and the Wireless Network Settings Important When diagnosing or troubleshooting your system always begin by reviewing this information and the W...

Page 18: ...to that router or access point wired orwirelessly Use an Ethernet crossover cable to connect Zonetech s Computer Ethernetport directly to a computer To open the Zonetech web interface 1 Open a web bro...

Page 19: ...5and6Tabs Thisisthe type of device connected to Input 5 and Input6 Stream Source Stream Tab This is the source from which Zonetech will play streamed audio Pairing and Status Stream Tab Click the Pair...

Page 20: ...ency of the mid range parametric equalization band Bandwidth This is the width of the mid range parametric equalization band High Shelf Level This is the amount of boost increase or cut decrease of th...

Page 21: ...low frequency shelving filter Parametric EQ PEQ Level This is the amount of boost increase or cut decrease of the mid range parametric equalization band Frequency This is the center frequency of the m...

Page 22: ...is determines the frequency at which the low frequencies and high frequencies are split between the subwoofer and main loudspeaker X Over Low Level This is the output volume level of the audio frequen...

Page 23: ...his enables or disables wireless network connection SSID This is the name of the connected wireless network Password This is the password of the connected wireless network Connection Status This is th...

Page 24: ...n for DR6 and the Halogen system to for additionalinformation To set up Zonetech for use with a DR6 use a shielded Cat5e or Cat6 Ethernet cable to connect the DR6 to the Master Remote port on Zonetech...

Page 25: ...ctions are secure and correct soundisdistorted Make sure none of thecablesare Operation Info damaged Make sure all devices connected to Zonetech are properly powered connected and supported Check the...

Page 26: ...3 pin 3 8 mm Euroblock outputs Zone 5 balanced line level orange Impedance 200 each leg toground MaximumOutputLevel 20 dBu Frequency Response 40 Hz 16 kHz 0 3 dB Dynamic Range 111 dB A weighted THD N...

Page 27: ...ange without notice Bluetooth range is affected by walls obstructions and movement For optimal performance place the product in the center of the room so it is unobstructed by walls furniture etc Trad...

Page 28: ...rane com Manual Version 1 0...

Page 29: ...de seguridad e informaci n de la garant a Espa ol 8 11 Instructions importantes de s curit et informations de garantie Fran ais 12 15 Istruzioni importanti di sicurezza e le informazioni della garanzi...

Page 30: ...s Inc registered in the U S and other countries NEMA is the registered trademark and service mark of the National Electrical Manufacturers Association All other product names company names trademarks...

Page 31: ...duct is not covered by this Limited Warranty purchaser must pay all parts shipping and labor charges for the repair or return of such product 4 What are the limits on inMusic s liabilities THE WARRANT...

Page 32: ...ARISING OUT OF THE USE MISUSE OR INABILITY TO USE ANY AKAI PRO PRODUCT BREACH OF WARRANTY OR NEGLIGENCE INCLUDING BUT NOT LIMITED TO INMUSIC S OR AKAI PRO S OWN NEGLIGENCE EVEN IF INMUSIC AKAI PRO OR...

Page 33: ...hing Clipping is when the power amplifier is distorting and working beyond its limits Amplifier distortion is the main cause of speaker failure To prevent fire or shock hazard do not expose the unit t...

Page 34: ...g if applicable Terminals marked with the lightning bolt symbol may be of sufficient magnitude to constitute a risk of electric shock Service Instructions Disconnect power cord before servicing Replac...

Page 35: ...vironment In an environment with radio frequency interference the unit may malfunction and resume normal operation after removal of the interference For 240 volt use in U K use NEMA style 240 volt plu...

Page 36: ...A INCAPACIDAD DE USAR UN PRODUCTO DE AKAI PRO INCUMPLIMIENTO DE GARANT A O NEGLIGENCIA INCLUYENDO PERO NO LIMITADA A LA PROPIA NEGLIGENCIA DE INMUSIC O AKAI PRO AUNQUE INMUSIC AKAI PRO O SU AGENTE HAY...

Page 37: ...es Intente moverlos lentamente Los ajustes r pidos pod an da ar el equipo debido al truncamiento de amplificador Evite el truncamiento del amplificador a toda costa esto ocurre cuando los LED rojos ge...

Page 38: ...la unidad y el cable a un t cnico de servicio calificado para reparaci n o reemplazo seg n lo especifique el fabricante 23 Advertencia si es aplicable La presi n sonora excesiva altos vol menes de lo...

Page 39: ...ponsablemente a fin de promover la reutilizaci n sustentable de los recursos materiales Para devolver su producto usado use los sistemas de devoluci n o recolecci n o p ngase en contacto con el comerc...

Page 40: ...OU DE BLESSURES L ACHETEUR OU DES TIERS D COULANT DE L UTILISATION DE L USAGE ABUSIF OU DE L INCAPACIT D UTILISER TOUS PRODUIT AKAI PRO D UN NON RESPECT DE GARANTIE OU DE N GLIGENCE INCLUANT MAIS NON...

Page 41: ...aus s sur le haut parleur Usez de la restriction en op rant les contr les Essayez de les bouger doucement Les ajustements rapides peuvent causer du dommage l quipement d au coupage d amplificateur Evi...

Page 42: ...uer la pr sence d une tension pouvant tre suffisamment lev e pour constituer un risque d lectrocution Instructions de service D connectez l appareil avant le service Remplacez les components seulement...

Page 43: ...fr quences radio Lorsqu utilis en pr sence d interf rences aux fr quences radio lectriques l appareil pourrait d faillir et reprendre un fonctionnement normal une fois les interf rences supprim es Uti...

Page 44: ...I ALL ACQUIRENTE O AD ALTRI IN SEGUITO ALL UTILIZZO AL CATTIVO UTILIZZO O ALL IMPOSSIBILIT DI UTILIZZARE UN PRODOTTO AKAI PRO VIOLAZIONI DI GARANZIA O NEGLIGENZA INCLUSA MA NON LIMITATA LA NEGLIGENZA...

Page 45: ...attenzione al manneggiare i controlli Provare di spostarli lentamente Gli aggiustamenti rapidi possono deteriorare l impianto a causa del clipping dell amplificatore Evitare a tutti i costi il clippi...

Page 46: ...limentazione ad es avvolgendolo con una fascetta serracavi Prestare attenzione a non danneggiare il cavo di alimentazione Prima di riutilizzarlo assicurarsi che il cavo non sia danneggiato In caso di...

Page 47: ...sto simbolo indica che nell Unione Europea questo prodotto non deve essere smaltito insieme ai rifiuti domestici Per evitare possibili danni ambientali o alla salute causati da uno smaltimento incontr...

Page 48: ...UKTS VON AKAI PRO GARANTIEVERLETZUNG NACHL SSIGKEIT EINGESCHLOSSEN ABER NICHT BESCHR NKT AUF NACHL SSIGKEIT DURCH INMUSIC ODER AKAI PRO SOGAR DANN WENN INMUSIC AKAI PRO ODER DEREN VERTRETER BER SOLCHE...

Page 49: ...e die Lautst rke aufdrehen Dies verhindert Transiente die zur Sch digung der Lautsprecher f hren k nnen Bet tigen Sie die Regler mit Vorsicht Versuchen Sie diese langsam zu bewegen Schnelle Bewegungen...

Page 50: ...ie das Netzkabel wenn Sie das Ger t bewegen oder l nger nicht benutzen Verwenden Sie beispielsweise einen Kabelbinder Achten Sie darauf das Netzkabel nicht zu besch digen Bevor Sie es wieder in Betrie...

Page 51: ...e die f r die Steckdose passenden Stecker Doppelisoliert Verwenden Sie bei der Wartung nur identische Ersatzteile Korrekte Entsorgung dieses Produkts Diese Kennzeichnung gibt an dass dieses Produkt in...

Page 52: ...I 02864 USA Tel 401 658 4032 Fax 401 658 3640 U K Office inMusic Europe Ltd Unit 3 Nexus Park Lysons Avenue Ash Vale HAMPSHIRE GU12 5QE UNITED KINGDOM Tel 01252 896 040 Fax 01252 896 021 Germany Offic...

Reviews: