background image


18 

10.


Scollegare il dispositivo dalla corrente elettrica durante temporali con fulmini o se inutilizzato per lunghi periodi. 

11.


Affidare la manutenzione unicamente ad apposito personale qualificato. La manutenzione è necessaria nel caso in cui il 
dispositivo sia stato danneggiato in qualsiasi modo, ad esempio per danni al cavo di alimentazione o alla spina, nel caso 
in cui acqua o altri liquidi siano stati versati nell’apparecchio o in caso di caduta di oggetti al suo interno, nel caso in cui il 
dispositivo sia stato esposto a pioggia o umidità, non funzioni normalmente o sia stato fatto cadere. 

12.


Sorgenti di alimentazione (si applicabile): il prodotto va collegato unicamente a sorgenti di alimentazione del tipo descritto 
in queste istruzioni per l’uso, o come indicato sull’apparecchio. 

13.


Selettori di voltaggio interno/esterno (si applicabile): gli interruttori di selezione del voltaggio interno o esterno, se presenti, 
devono essere unicamente azzerati ed equipaggiati con una spina adeguata per il voltaggio alternato da un tecnico della 
manutenzione qualificato. Non cercare di effettuare questo tipo di operazione da soli. 

14.


Acqua e umidità (si applicabile): Questo prodotto deve essere mantenuto lontano dal contatto diretto con liquidi. 
L’apparecchio non deve essere esposto alla spruzzatura o al versamento dei liquidi, e gli oggetti che contengono liquidi, 
come per esempio i vasi, non devono essere collocati sull’apparecchio. 

15.


Attenzione

 (si applicabile): pericolo dell’esplosione se la batteria è sostituita in modo errato. Sostituire soltanto con lo 

stesso o il tipo equivalente. Le batterie (un gruppo batterie o una batteria installata) non devono essere esposte a fonti di 
eccessivo calore quali la luce diretta del sole, fuoco, ecc. 

16.


(Si applicabile) Quando una spina di rete o un accoppiatore dell’apparecchio vengono utilizzati per scollegare il 
dispositivo, questi devono rimanere accessibili e prontamente utilizzabili. 

17.


Terminale di protezione di messa a terra (si applicabile): l’apparecchio deve essere collegato ad una presa 
elettrica dotata di un collegamento a terra di protezione. 

18.


Unicamente per apparecchi di Classe 2

: Questo simbolo indica che l’attrezzatura è un apparecchio elettrico di 

classe 2 o a doppio isolamento. È stata concepita in modo tale da non richiedere un collegamento di sicurezza a terra. 

19.


Cablaggio di classe 2

 (se applicabile): per ridurre il rischio di scossa elettrica, il cablaggio esterno collegato ai terminali 

contrassegnati con la scritta “Cablaggio di classe 2” richiede l’installazione di cavi di Classe 2 da parte di una persona 
esperta o l’uso di fili o cavi già pronti. 

20.


Attenzione

 (se applicabile): Prima di collegare la spina alla rete elettrica, assicurarsi che la presa disponga di messa a terra. Inoltre, 

nel disconnettere la connessione con messa a terra, assicurarsi di aver precedentemente scollegato la spina dalla rete elettrica. 

21.


Questo apparecchio è stato concepito unicamente per un uso professionale. Clima operativo previsto: temperato. 

22.


(Si applicabile) Al momento di trasferire l’apparecchio o in caso di mancato utilizzo dello stesso, fissare il cavo di alimentazione 
(ad es. avvolgendolo con una fascetta serracavi). Prestare attenzione a non danneggiare il cavo di alimentazione. Prima di 
riutilizzarlo, assicurarsi che il cavo non sia danneggiato. In caso di danni a livello del cavo di alimentazione, portare l’apparecchio 
e il cavo stesso ad un tecnico di assistenza qualificato affinché venga riparato o sostituito come specificato dal produttore. 

23.


Avvertenza

 (si applicabile): un’eccessiva pressione audio (alto volume) proveniente dalle cuffie può causare danni all’udito. 

24.


Avvertenza

 (si applicabile): fare riferimento a qualsiasi informazione importante (ad es. in materia di collegamenti elettrici e sicurezza) 

stampata sulla parte inferiore esterna dell’alloggiamento o sul pannello posteriore prima di installare o utilizzare il prodotto. 

25.


Avvertenza

 (se applicabile): i terminali contrassegnati con il simbolo del fulmine possono essere di ampiezza sufficiente a 

costituire un rischio di scossa elettrica. 


Istruzioni di service 


Togliere l’apparecchio dalla presa prima della riparazione.  


Sostituire i componenti critici 

 soltanto con pezzi di fabbrica o con pezzi equivalenti raccomandati. 


Per le unità alimentate con corrente alternativa (AC): Prima di ritornare l’unità riparata all’utilizzatore si deve utilizzare un 
ohmetro per misurare fra i due connettori della spina di corrente alternativa (AC) e tutte le parti esposte dell’unità. La 
resistenza dovrebbe essere di più di 2.000.000 Ohm. 


Precauzioni per la sicurezza 
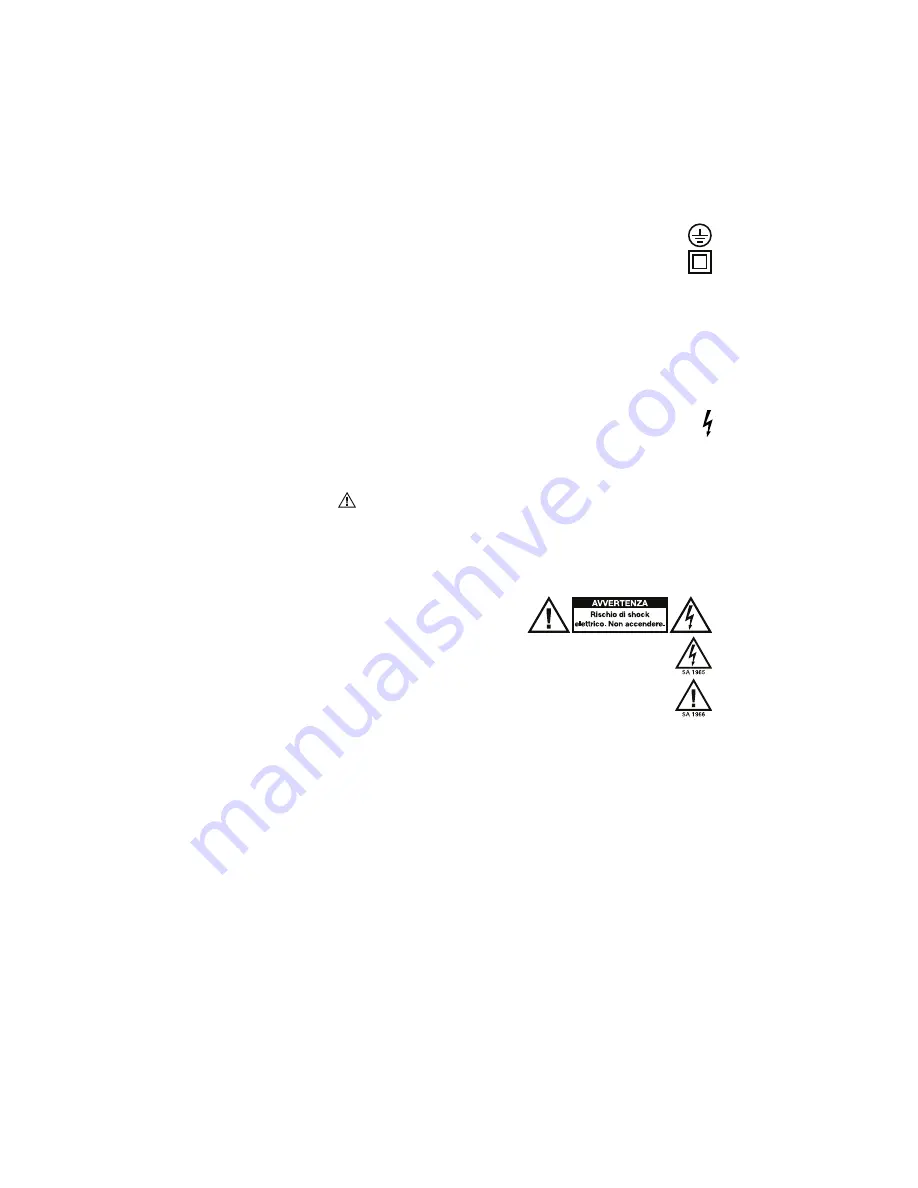
 

AVVERTENZA 

: PER RIDURRE IL RISCHIO DI SHOCK ELETTRICO NON SI 

DEVE SPOSTARE NESSUN COPERCHIO. NON ESISTONO DELLE PARTI 
UTILI PER L’UTILIZZATORE NELL’INTERIORE. PER IL SERVICE RIVOLGERSI 
SOLTANTO AL PERSONALE SERVICE QUALIFICATO. 

TENSIONI PERICOLOSE

: Quando il pulsante con il simbolo di un lampo terminato con una freccia nell’interiore di un 

triangolo equilatero è acceso, esso avverte l’utilizzatore sulla presenza delle “tensioni pericolose” non isolate dell’interiore 
della carcassa del prodotto e questo fatto può avere una magnitudine sufficiente per costituire un rischio di shock elettrico. 

ISTRUZIONI

: Il punto esclamativo dell’interiore di un triangolo equilatero ha lo scopo di avvertire l’utilizzatore sulla 

presenza di alcune istruzioni importanti di funzionamento e di manutenzione (di service) di questo dispositivo. 

AVVERTENZA

: Per ridurre il rischio di incendio o di scossa elettrica, non esporre questo apparecchio alla pioggia o all’umidità. 

L’equipaggiamento elettrico non deve MAI essere mantenuto o riposto in ambiente umido. 

ESCLUSIVAMENTE PER MODELLI USA & CANADESI

: PER PREVENIRE SCOSSE ELETTRICHE NON UTILIZZARE QUESTA 

PRESA (POLARIZZATA) CON UNA PROLUNGA, O ALTRE PRESE DI CORRENTE A MENO CHE LE LAMINETTE NON 
POSSANO ESSERE INSERITE A FONDO EVITANDO DI RIMANERE ESPOSTE. 

NOTA RIGUARDANTE PRODOTTI CHE IMPIEGANO RAGGI LASER

:

 PERICOLO

: RAGGI LASER INVISIBILI IN CASO DI 

APERTURA DELL’APPARECCHIO E DI GUASTO O DI ANNULLAMENTO DEGLI INTERRUTTORI. EVITARE L’ESPOSIZIONE 
DIRETTA AL FASCIO. L’USO DI FUNZIONI O RIPARAZIONI NON DESCRITTE NEL PRESENTE MANUALE È A RISCHIO DI 
ESPOSIZIONE A RADIAZIONI PERICOLOSE. 

NOTA RIGUARDANTE LE REGOLAMENTAZIONI FCC

:


Quest’attrezzatura genera e utilizza energia in radiofrequenza e può 

causare interferenze nella ricezione della radio o della televisione nel caso in cui non venga utilizzata nello stretto rispetto delle 

Summary of Contents for Zonetech

Page 1: ...UserGuide English 3 25 Appendix English 26 27...

Page 2: ...2...

Page 3: ...ts green for audio inputs 3 6 pin 3 8 mm Euroblock outputs orange for zone outputs 1 3 pin 3 8 mm Euroblock outputs orange for zone outputs 1 3 pin 3 8 mm Euroblock inputs black for logic input Blueto...

Page 4: ...otes or paging devices e g Rane DR6 Rane DRZH Rane RAD devices to the Master Remote Port Zone Remotes Ports and Pager Port on the rearpanel 4 Attach the Bluetooth antenna included to the Bluetooth ant...

Page 5: ...play Press this knob to cycle through the Infopages shown in thedisplay 6 Left Right Press each of these buttons to select the previous or next option respectively shown in thedisplay 7 Bluetooth Pres...

Page 6: ...sources and adjust levels for the zonesremotely 8 Master Remote Port RJ45 shielded Cat5e or Cat6 cables Connect an optional Rane DR6 remote control to this port which will allow you to select sources...

Page 7: ...Level LS Level This is the amount of boost increase or cut decrease of the low frequency shelving filter 15 0 to 8 0 dB Tip If you are unsure of what this level should be it is better to use a lower s...

Page 8: ...e Inputs 5 and 6 only This is the type of device connected to Input 5 and Input 6 Dynamic microphone Condenser Microphone Unbalanced Line Balanced Line default Balanced Line Stream Source This is the...

Page 9: ...ow long it will take in seconds for the output to switch back to the original audio source after the priority source signal falls below the threshold 1 60 Sec default 3 Sec Tip Enabling this feature i...

Page 10: ...f the high frequency shelving filter 630 Hz 16 kHz default 630 Hz Page Enable PG Enable This feature determines whether or not the zone will receive an audio signal from the pager Enabled on Disabled...

Page 11: ...e the mono setting and use the X Over Freq Low Level and High Level settings to manage the signal X Over Frequency X Freq Zone 6 only This determines the frequency at which the low frequencies and hig...

Page 12: ...the Zone level Low Shelf Level LS Level This is the amount of boost increase or cut decrease of the low frequency shelving filter 15 0 to 8 0 dB Low Shelf Frequency LS Freq This is the frequency of t...

Page 13: ...default 630 Hz Chime This determines whether the pager s chime sound is on Enabled or off Disabled The chime will be mixed with the paging output signal Chime Level This is the volume level of the pag...

Page 14: ...the Bluetooth audio signal to an input on Zonetech 1 On Zonetech press and release the Bluetooth button Stream will appear at the top of the display as well as the name of the streaming device 2 Use t...

Page 15: ...treaming 1 Make sure the PC and Zonetech are powered on and connected to the samenetwork 2 On your PC open a DLNA compatible media server Windows Media Player is recommended for most users but other s...

Page 16: ...settings Meters This view shows multicolor level meters for all inputs and zones Device Port Status This view shows information about the devices currently connected to Zonetech and their current oper...

Page 17: ...g your system always begin by reviewing this information and the Wireless Network Settings Important When diagnosing or troubleshooting your system always begin by reviewing this information and the W...

Page 18: ...to that router or access point wired orwirelessly Use an Ethernet crossover cable to connect Zonetech s Computer Ethernetport directly to a computer To open the Zonetech web interface 1 Open a web bro...

Page 19: ...5and6Tabs Thisisthe type of device connected to Input 5 and Input6 Stream Source Stream Tab This is the source from which Zonetech will play streamed audio Pairing and Status Stream Tab Click the Pair...

Page 20: ...ency of the mid range parametric equalization band Bandwidth This is the width of the mid range parametric equalization band High Shelf Level This is the amount of boost increase or cut decrease of th...

Page 21: ...low frequency shelving filter Parametric EQ PEQ Level This is the amount of boost increase or cut decrease of the mid range parametric equalization band Frequency This is the center frequency of the m...

Page 22: ...is determines the frequency at which the low frequencies and high frequencies are split between the subwoofer and main loudspeaker X Over Low Level This is the output volume level of the audio frequen...

Page 23: ...his enables or disables wireless network connection SSID This is the name of the connected wireless network Password This is the password of the connected wireless network Connection Status This is th...

Page 24: ...n for DR6 and the Halogen system to for additionalinformation To set up Zonetech for use with a DR6 use a shielded Cat5e or Cat6 Ethernet cable to connect the DR6 to the Master Remote port on Zonetech...

Page 25: ...ctions are secure and correct soundisdistorted Make sure none of thecablesare Operation Info damaged Make sure all devices connected to Zonetech are properly powered connected and supported Check the...

Page 26: ...3 pin 3 8 mm Euroblock outputs Zone 5 balanced line level orange Impedance 200 each leg toground MaximumOutputLevel 20 dBu Frequency Response 40 Hz 16 kHz 0 3 dB Dynamic Range 111 dB A weighted THD N...

Page 27: ...ange without notice Bluetooth range is affected by walls obstructions and movement For optimal performance place the product in the center of the room so it is unobstructed by walls furniture etc Trad...

Page 28: ...rane com Manual Version 1 0...

Page 29: ...de seguridad e informaci n de la garant a Espa ol 8 11 Instructions importantes de s curit et informations de garantie Fran ais 12 15 Istruzioni importanti di sicurezza e le informazioni della garanzi...

Page 30: ...s Inc registered in the U S and other countries NEMA is the registered trademark and service mark of the National Electrical Manufacturers Association All other product names company names trademarks...

Page 31: ...duct is not covered by this Limited Warranty purchaser must pay all parts shipping and labor charges for the repair or return of such product 4 What are the limits on inMusic s liabilities THE WARRANT...

Page 32: ...ARISING OUT OF THE USE MISUSE OR INABILITY TO USE ANY AKAI PRO PRODUCT BREACH OF WARRANTY OR NEGLIGENCE INCLUDING BUT NOT LIMITED TO INMUSIC S OR AKAI PRO S OWN NEGLIGENCE EVEN IF INMUSIC AKAI PRO OR...

Page 33: ...hing Clipping is when the power amplifier is distorting and working beyond its limits Amplifier distortion is the main cause of speaker failure To prevent fire or shock hazard do not expose the unit t...

Page 34: ...g if applicable Terminals marked with the lightning bolt symbol may be of sufficient magnitude to constitute a risk of electric shock Service Instructions Disconnect power cord before servicing Replac...

Page 35: ...vironment In an environment with radio frequency interference the unit may malfunction and resume normal operation after removal of the interference For 240 volt use in U K use NEMA style 240 volt plu...

Page 36: ...A INCAPACIDAD DE USAR UN PRODUCTO DE AKAI PRO INCUMPLIMIENTO DE GARANT A O NEGLIGENCIA INCLUYENDO PERO NO LIMITADA A LA PROPIA NEGLIGENCIA DE INMUSIC O AKAI PRO AUNQUE INMUSIC AKAI PRO O SU AGENTE HAY...

Page 37: ...es Intente moverlos lentamente Los ajustes r pidos pod an da ar el equipo debido al truncamiento de amplificador Evite el truncamiento del amplificador a toda costa esto ocurre cuando los LED rojos ge...

Page 38: ...la unidad y el cable a un t cnico de servicio calificado para reparaci n o reemplazo seg n lo especifique el fabricante 23 Advertencia si es aplicable La presi n sonora excesiva altos vol menes de lo...

Page 39: ...ponsablemente a fin de promover la reutilizaci n sustentable de los recursos materiales Para devolver su producto usado use los sistemas de devoluci n o recolecci n o p ngase en contacto con el comerc...

Page 40: ...OU DE BLESSURES L ACHETEUR OU DES TIERS D COULANT DE L UTILISATION DE L USAGE ABUSIF OU DE L INCAPACIT D UTILISER TOUS PRODUIT AKAI PRO D UN NON RESPECT DE GARANTIE OU DE N GLIGENCE INCLUANT MAIS NON...

Page 41: ...aus s sur le haut parleur Usez de la restriction en op rant les contr les Essayez de les bouger doucement Les ajustements rapides peuvent causer du dommage l quipement d au coupage d amplificateur Evi...

Page 42: ...uer la pr sence d une tension pouvant tre suffisamment lev e pour constituer un risque d lectrocution Instructions de service D connectez l appareil avant le service Remplacez les components seulement...

Page 43: ...fr quences radio Lorsqu utilis en pr sence d interf rences aux fr quences radio lectriques l appareil pourrait d faillir et reprendre un fonctionnement normal une fois les interf rences supprim es Uti...

Page 44: ...I ALL ACQUIRENTE O AD ALTRI IN SEGUITO ALL UTILIZZO AL CATTIVO UTILIZZO O ALL IMPOSSIBILIT DI UTILIZZARE UN PRODOTTO AKAI PRO VIOLAZIONI DI GARANZIA O NEGLIGENZA INCLUSA MA NON LIMITATA LA NEGLIGENZA...

Page 45: ...attenzione al manneggiare i controlli Provare di spostarli lentamente Gli aggiustamenti rapidi possono deteriorare l impianto a causa del clipping dell amplificatore Evitare a tutti i costi il clippi...

Page 46: ...limentazione ad es avvolgendolo con una fascetta serracavi Prestare attenzione a non danneggiare il cavo di alimentazione Prima di riutilizzarlo assicurarsi che il cavo non sia danneggiato In caso di...

Page 47: ...sto simbolo indica che nell Unione Europea questo prodotto non deve essere smaltito insieme ai rifiuti domestici Per evitare possibili danni ambientali o alla salute causati da uno smaltimento incontr...

Page 48: ...UKTS VON AKAI PRO GARANTIEVERLETZUNG NACHL SSIGKEIT EINGESCHLOSSEN ABER NICHT BESCHR NKT AUF NACHL SSIGKEIT DURCH INMUSIC ODER AKAI PRO SOGAR DANN WENN INMUSIC AKAI PRO ODER DEREN VERTRETER BER SOLCHE...

Page 49: ...e die Lautst rke aufdrehen Dies verhindert Transiente die zur Sch digung der Lautsprecher f hren k nnen Bet tigen Sie die Regler mit Vorsicht Versuchen Sie diese langsam zu bewegen Schnelle Bewegungen...

Page 50: ...ie das Netzkabel wenn Sie das Ger t bewegen oder l nger nicht benutzen Verwenden Sie beispielsweise einen Kabelbinder Achten Sie darauf das Netzkabel nicht zu besch digen Bevor Sie es wieder in Betrie...

Page 51: ...e die f r die Steckdose passenden Stecker Doppelisoliert Verwenden Sie bei der Wartung nur identische Ersatzteile Korrekte Entsorgung dieses Produkts Diese Kennzeichnung gibt an dass dieses Produkt in...

Page 52: ...I 02864 USA Tel 401 658 4032 Fax 401 658 3640 U K Office inMusic Europe Ltd Unit 3 Nexus Park Lysons Avenue Ash Vale HAMPSHIRE GU12 5QE UNITED KINGDOM Tel 01252 896 040 Fax 01252 896 021 Germany Offic...

Reviews: