3
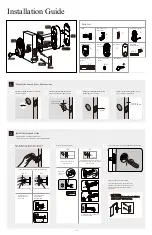
Install exterior assembly
A
IMPORTANT:
Before installation, make sure the latch is fully retracted (in the unlocked position) .
B
Route the cable below the latch
and
insert the cylinder tailpiece horizontally through the slot in the latch.
2 / 6
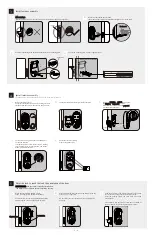
4
Install interior assembly
Connect the cable and ensure tight cable connection.
B
Rotate the
turnpiece
in
vertical
position
and
the tailpiece
in
horizontal
position
.
M
ake sure
the latch is still fully retracted
(in the unlocked position).
C
5
Reset the lock to teach the lock the orientation of the door
While the door is OPEN and UNLOCK,
load 3 AA batteries into the interior assembly.
For best results, use new, non-rechargeable Alkaline
batteries only
. Do not mix old and new batteries.
A
Press and hold the Reset button on the interior assembly
using a pen or a paper clip.
Do not release the reset button until you completed the
next step.
B
Load the
4th
battery and keep holding the reset button
for
10
seconds, until you hear the sound of “beep”.
After the beeping sound, t
he latch bolt will extend
automatically.
This indicates that the lock has
learn the orientation of
the door
and the lock is restored to factory setting.
C
Test operation using backup key and thumbpiece
for smooth rotation.
If turnpiece doesn’t rotate, repeat step 4C, making
sure the turnpiece in vertical position, and touque
blade in horizontal position.
D
IMPORTANT:
Always run this step a
fter installation.
The motor will not operate before completing the step.
IMPORTANT: Do not load batteries until lock is completely installed.
Remove the battery cover.
Locate the slot at the bottom and use your fingernail or a
flat head screwdriver to pry the cover up and pull it off.
A
Secure the interior assembly
with the supplied screws.
E
K
Secure the mounting plate with the supplied screws.
D
J
Keep Parallel to door edge.
Horizontal
unlocked
Send the cable through the bottom horizontal slot in the mounting plate.
C
E
unlocked
G
F
Horizontal
horizontal
Unlocked
VERTICAL
UNLOCKED


