background image

15

Using your Induction Cooker

If you have not used an induction cooker before please be 

aware of the following:

• 

Make sure that the pans you have or buy are suitable 

for use on the induction hob. Stainless steel, enamelled 

steel or cast iron is ideal. Double check before you buy 

pans – they must have magnetic bases.

• 

Allow time to get used to induction cooking; it is fast 

and powerful as well as being gentle. When simmering, 

you may notice that liquids appear to stop bubbling and 

then start again almost immediately. This is perfectly 

normal.

• 

You may notice a faint vibrating sound coming from 

the pans when using the induction hob. Again, this is 

perfectly normal and will depend upon the type and 

style of pans you are using.

• 

The induction heating elements will phase on and off 

when cooking. Although an active cooking zone may 

appear to switch on and off, a constant heat is still being 

supplied to the base of the pan – this is completely 

normal.

Tips on Cooking with the Timer

If you want to cook more than one dish, choose dishes that 

require approximately the same cooking time. However, 

dishes can be ‘slowed down’ slightly by using small containers 

and covering them with aluminium foil, or ‘speeded up’ 

slightly by cooking smaller quantities or placing them in 

larger containers.
Very perishable foods such as pork or fish should be avoided 

if a long delay period is planned, especially in hot weather.

n

n

DO NOT place warm food in the oven to be timed.

n

n

DO NOT use a timed oven that is already warm.

n

n

DO NOT use the timed oven if the adjoining oven is 

already warm.

Whole poultry must be thoroughly defrosted before being 

placed in the oven. Check that meat and poultry are fully 

cooked before serving.

General Oven Tips

The wire shelves should always be pushed firmly to the back 

of the oven.

Baking trays with food cooking on them should be placed level 

with the front edge of the oven’s wire shelves. Other containers 

should be placed centrally. Keep all trays and containers away 

from the back of the oven, as overbrowning of the food may 

occur.

For even browning, the maximum recommended size of a 

baking tray is 340 mm (13 ½”) by 340 mm (13 ½”) in the main 

oven and 232 mm (9 

1

/

8

”) and 321 mm (12 

5

/

8

”) in the tall oven.

When the oven is on, do not leave the door open for 

longer than necessary, otherwise the knobs may get very 

hot. 

• 

Always leave a “finger’s width” between dishes on 

the same shelf. This allows the heat to circulate freely 

around them.

• 

To reduce fat splashing when you add vegetables to hot 

fat around a roast, dry them thoroughly or brush lightly 

with cooking oil.

• 

Where dishes may boil and spill over during cooking, 

place them on a baking tray.

• 

The ‘Cook & Clean’ oven liners (see 

‘Cleaning Your 

Cooker’

) work better when fat splashes are avoided. 

Cover meat when cooking.

• 

Sufficient heat rises out of the oven while cooking to 

warm plates in the grill compartment.

• 

If you want to brown the base of a pastry dish, preheat 

the baking tray for 15 minutes before placing the dish in 

the centre of the tray.
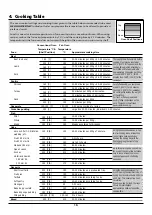
3.  Cooking Tips

DocNo.030-0009 - Cooking tips - 90 induction generic

Summary of Contents for 90 Induction

Page 1: ...90 Induction Britain s No 1 Range Cooker USER GUIDE INSTALLATION INSTRUCTIONS...

Page 2: ...sugar and serve immediately with cream or cr me fraiche FRUITY BAKED PUDDING Serves 4 6 Ingredients 3kg 6 lb skinned and boned loin of pork 2 x 70g packs prosciutto Grated zest of 2 lemons Bay leaves...

Page 3: ...rol Panel and Doors 18 Ovens 18 Door Panel 19 The Tall Oven 19 Cleaning Table 20 6 Troubleshooting 21 7 Installation 24 Dear Installer 24 Safety Requirements and Regulations 24 Provision of Ventilatio...

Page 4: ...ii...

Page 5: ...e make sure that the kitchen is well ventilated keep natural ventilation holes open or install a powered cookerhood that vents outside If you have several hotplates on or use the cooker for a long tim...

Page 6: ...watch as it heats Deep fry pans should be only one third full of fat Filling the pan too full of fat can cause spill over when food is added If you use a combination of oils or fats in frying stir th...

Page 7: ...e for its repair Always LIFT pans off the hob Sliding pans may cause marks and scratches Fig 1 4 Always turn the control to the OFF position before removing a pan n n Take care when placing hot lids o...

Page 8: ...r ceramic are not suitable for use on an induction hob The kind of pan you use and the quantity of food affects the setting required Higher settings are required for larger quantities of food Pots and...

Page 9: ...n begin After 10 minutes without detecting a pan the cooking zone will switch off automatically Table 2 1 shows the minimum pan sizes recommended for each cooking zone Note Using pans with a base diam...

Page 10: ...off this will activate the hob display then simultaneously turn both rear outer induction controls counter clockwise Fig 2 6 until L appears in the hob control display for all cooking areas This will...

Page 11: ...o the time of day before the ovens will work See the following section on The Clock for instructions on setting the time of day References to left hand and right hand ovens apply as viewed from the fr...

Page 12: ...st It is also possible to bake on two shelves at one time although they will need to be swapped over during the cooking time as the heat at the top of the oven is greater than at the base when using t...

Page 13: ...nction Ovens The multi function oven has two controls a function selector and a temperature setting knob Fig 2 15 Turn the function selector control to a cooking function Turn the oven temperature kno...

Page 14: ...en will not operate unless the clock has been set Setting the minute minder To activate the minute minder turn the Timer knob to the right to the minute minder setting it should click into position Fi...

Page 15: ...old the Timer knob to the clock symbol for about 8 seconds On appears on the display Fig 2 24 While still holding the Timer knob turned to the clock symbol turn the Adjusting knob clockwise until the...

Page 16: ...u must have two numbers clearly in mind the cook period and the stop time Note You cannot set a start time directly this is set automatically by setting the cook period and the stop time Press and hol...

Page 17: ...t will not come on The right hand oven can be operated as usual To activate the key lock Make sure that the clock is in manual mode and cancel any active programs Hold the Minute Minder and Cook perio...

Page 18: ...n the door is open The maximum weight that can be held by the Handyrack is 5 5kg 12lb It should only be used with the supplied roasting tin which is designed to fit the Handyrack Any other vessel coul...

Page 19: ...in the oven to be timed n n Do not use a timed oven that is already warm n n Do not use the timed oven if the adjoining oven is already warm Whole poultry must be thoroughly defrosted before being pla...

Page 20: ...utes 20 30 minutes on a preheated tray 35 45 minutes 10 20 minutes according to size 20 40 minutes according to size 2 3 hours 45 60 minutes 40 45 minutes 2 to 3 hours 20 30 minutes Conventional Oven...

Page 21: ...lean paper towel If a spill other than a sugary substance is on the hot zone do not clean until the unit has completely cooled down and then follow the instructions below Cleaning burned on spills If...

Page 22: ...he grill chamber you can unhook them from the grill chamber sides Fig 5 5 and wipe the sides clean with a soft cloth and mild detergent n n DO NOT put the side runners in a dishwasher Once you have fi...

Page 23: ...e panels should then be dried and replaced and the oven heated at 200 C for about one hour This will make sure that the panels are working effectively Removing the Panels to clean the Enamel Interior...

Page 24: ...nth Painted surface Hot soapy water soft cloth Splashback rear grille Enamel or stainless steel Hot soapy water soft cloth Cream cleaner with care if necessary Control panel Paint enamel or stainless...

Page 25: ...gh power settings or if 5 pans are used simultaneously The type of pan may also contribute to induction noise The cooling fan The induction hob incorporates a cooling fan This cooling fan is active wh...

Page 26: ...the same depth all over For example if it is deeper at the back then the back of the cooker should be raised up or the front lowered If the cooker is not level arrange for your supplier to level it f...

Page 27: ...a glove in case the bulb should shatter unscrew the old bulb Screw in the new bulb clockwise and then screw the bulb cover back on Turn on the electricity supply and check that the bulb now lights Th...

Page 28: ...uivalent while some rooms require a permanent vent in addition to the window Location of Cooker The cooker may be installed in a kitchen kitchen diner but NOT in a room containing a bath or shower Thi...

Page 29: ...in types of vinyl or laminate kitchen furniture are particularly prone to heat damage and discolouration We cannot accept responsibility for damage caused by normal use of the cooker to any material t...

Page 30: ...tioning the Cooker Following Connection If you need to move the cooker once it has been connected make sure it is switched off at the supply switch before gripping under the fascia panel and lifting t...

Page 31: ...If in doubt please consult a suitably qualified electrician n n WARNING THE APPLIANCE MUST BE EARTHED Note The cooker must be connected to the correct electrical supply as stated on the voltage label...

Page 32: ...he 4mm Allen screws from the top corners of the fascia Fig 7 12 Fit the front handrail in position and secure using the 4mm screws Fitting the Plinth Loosen the three screws along the front bottom edg...

Page 33: ...w r v y w r v y v y b br b br y v w r v y b br w r Code Description A Touchlite panel B Distribution board C Left hand front control D Left hand rear control E Central control F Right hand rear contro...

Page 34: ...b b b o br w g y o bk o y br w v r gr bk w L N A1 A2 A3 J J B4 B1 B2 D H B3 G1 G2 C4 J H C3 C1 C2 F K Multi pin plug Code Description A1 Grill energy regulator A2 Grill front switch A3 Grill elements...

Page 35: ...3 B4 B2 B5 B6 B7 D2 J D1 D3 B8 D4 F2 J H J H G J H F1 H K Multi pin plug Code Description A1 Grill front switch A2 Grill energy regulator A3 Grill elements B1 Left hand oven front switch B2 Left hand...

Page 36: ...A2 C A1 B1 A3 B3 B4 B2 B5 B6 B7 D2 I D1 D3 B8 D4 F1 F2 I H I H G I H H K Multi pin plug Code Description A1 Grill front switch A2 Grill energy regulator A3 Grill elements B1 Left hand oven front switc...

Page 37: ...oven Tall oven Forced air convection Multi function Multi function with Rapid Response Forced air convection 2 5kW 2 5kW 3 7kW 2 5kW Energy efficiency class on a scale of A more efficient to G less e...

Page 38: ...34 Notes...

Page 39: ...n repaired by persons or organisations other than those authorised to act on behalf of AGA Rangemaster Exceptions Items not included under the free 1 year guarantee include pan supports griddles wok r...

Page 40: ...red Office Juno Drive Leamington Spa Warwickshire CV31 3RG Search Rangemaster UK Rangemaster continuously seeks improvements in specification design and production of products and thus alterations tak...

Reviews: