background image

3

ArtNo.090-0007 90 Ceramic: 

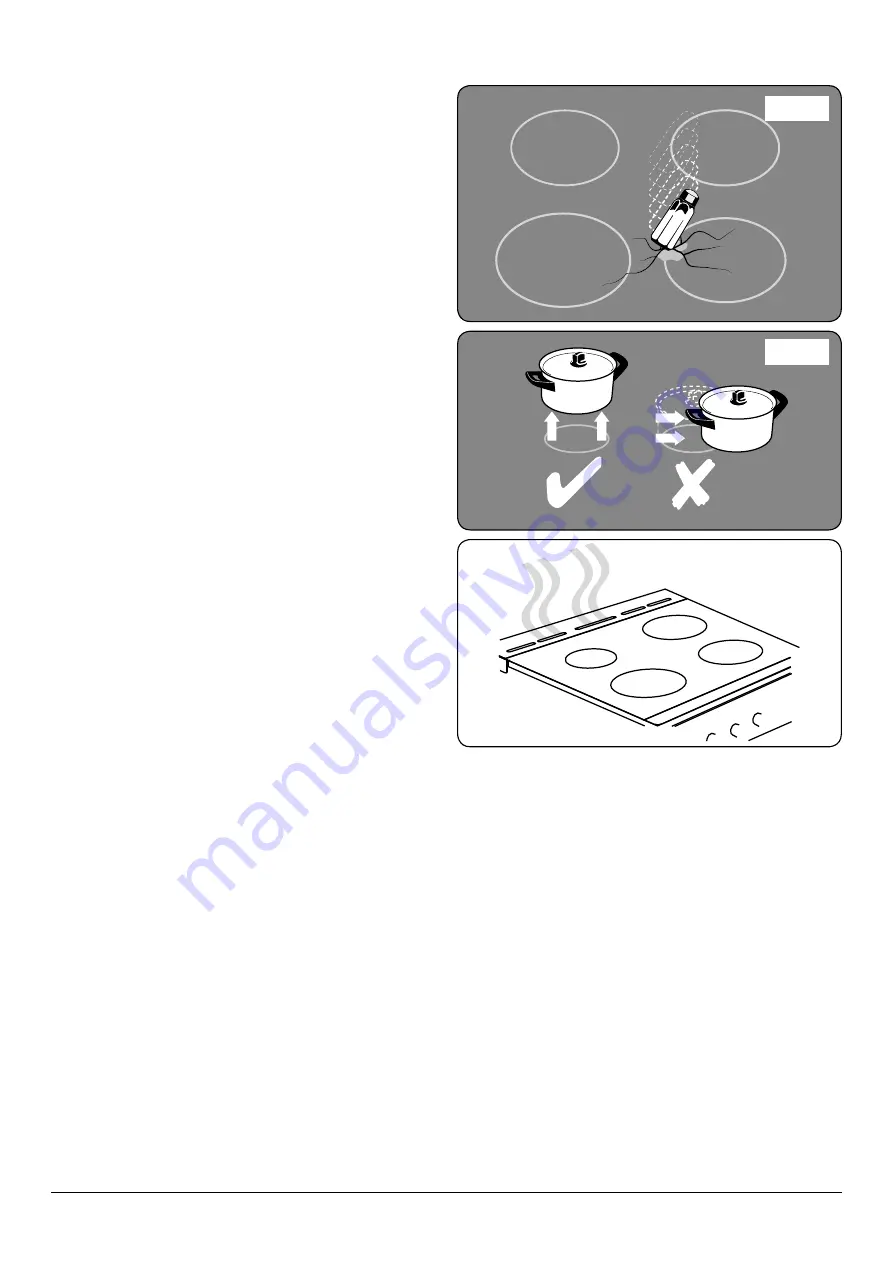
oven steam out the back  

Do not stand or rest heavy objects on the hob. Although the 

ceramic surface is very strong, a sharp blow or sharp falling 

object (e.g. a salt cellar) might cause the surface to crack or 

break 

(Fig. 1.3)

.

n

n

Should a crack appear in the surface, disconnect the 

appliance immediately from the supply and arrange 

for its repair.

Always LIFT pans off the hob. Sliding pans may cause marks 

and scratches 

(Fig. 1.4)

. Always turn the control to the OFF 

position before removing a pan.

DO NOT

 place anything between the base of the pan and the 

hob surface (e.g. asbestos mats, aluminium foil, Wok stand).

n

n

Avoid heating an empty pan. Doing so may damage 

both the hob and pan.

Only certain types of glass, glass-ceramic, earthenware or 

other glazed containers are suitable for hob cooking; others 

may break because of the sudden change in temperature. 

Cooker Care

As steam can condense to water droplets on the cool outer 

trim of the oven, it may be necessary during cooking to wipe 

away any moisture with a soft cloth. This will also help to 

prevent soiling and discolouration of the oven exterior by 

cooking vapours 

(Fig. 1.5)

.

Cleaning

n

n

DO NOT use abrasive cleaners/pads, oven aerosols/

pads or stain removers on the surface.

In the interests of hygiene and safety, the cooker should be 

kept clean at all times as a build up in fats and other food 

stuff could result in a fire.
Clean only the parts listed in this guide.
We recommend that you avoid wiping any surface unit areas 

until they have cooled and the indicator light has gone off. 

Sugar spills are the exception to this (see 

‘Cleaning your 

Cooker’

). After cleaning, use a dry cloth or paper towel to 

remove any cleaning cream residue.
The ceramic surface should be washed after use in order to 

prevent it from becoming scratched or dirty. 

However, you 

should clean the hob with caution as some cleaners can produce 

noxious fumes if applied to a hot surface.

Clean with caution. If a wet sponge or cloth is used to wipe 

spills on a hot surface, be careful to avoid steam burns. Some 

cleansers can produce noxious fumes if applied to a hot 

surface.

If a Fault Occurs

If your appliance develops a fault and you are unable to solve 

the problem, contact one of our service centres on the below 

numbers:

UK Service Centre Tel: 0844 847 6711. 

Republic of Ireland Service Centre Tel: 051 302 333

ArtNo.312-0001 Not cooking surface

ArtNo.312-0003 Moving pans

Fig. 1.4 

Fig. 1.5 

Fig. 1.3 

Summary of Contents for Arleston 60 Ceramic

Page 1: ...Arleston 60 Ceramic User Guide Installation Service Instructions U110332_04...

Page 2: ...Oven 9 Using the Clock 10 Oven Accessories 12 Main Oven Light 12 3 Cooking Tips 13 Tips on Cooking with the Timer 13 General Oven Tips 13 4 Cooking table 14 5 Cleaning Your Cooker 15 Hob 15 Grill 16...

Page 3: ...l a powered cooker hood that vents outside If you have several hotplates on or use the cooker for a long time open a window or turn on an extractor fan Personal Safety n n DO NOT modify this appliance...

Page 4: ...f hot fat especially a deep fat fryer Wait until the fat is cool Do not use the top of the flue the slot along the back of the cooker for warming plates dishes drying tea towels or softening butter n...

Page 5: ...or by cooking vapours Fig 1 5 Cleaning n n DO NOT use abrasive cleaners pads oven aerosols pads or stain removers on the surface In the interests of hygiene and safety the cooker should be kept clean...

Page 6: ...should have thick smooth flat bottoms Fig 2 2 This allows the maximum heat transfer from the hob to the pan making cooking quick and energy efficient Never use a round bottomed wok even with a stand...

Page 7: ...of the hob surface and remove There are indicator lights for each of the cooking areas Fig 2 6 The lights come on when a hob control is turned on and stays lit while the surface cools n n Always take...

Page 8: ...slide the grill pan and trivet back into the grill chamber and remove the handle n n The grill door must be kept completely open whilst the grill is being used n n Accessible parts may be hot when the...

Page 9: ...ating elements One element is in the top of the oven and the second is under the oven base Take care to avoid touching the top element and element deflector when placing or removing items from the ove...

Page 10: ...dairy foods meat and poultry are completely defrosted before cooking Fan Oven Main Oven Only ArtNo 030 0016 MF Fan Oven Symbol This function operates the fan and the heating element around it An even...

Page 11: ...controls a function selector and a temperature setting knob Fig 2 13 Turn the function selector control to a cooking function The indicator light will illuminate to signify that the oven is on Turn th...

Page 12: ...h at the end of which an alarm will sound 1 Press the mode Mode button once Fig 2 16 The bell symbol will flash on the display Select the desired countdown from 00 01h to 23 59h using the or buttons F...

Page 13: ...period and stop time You cannot set a start time directly this is set automatically by a combination of the cook period and stop time 1 Press the mode Mode button until the display flashes dur Fig 2 2...

Page 14: ...ven sides Fig 2 25 Lift up the front of the shelf so the back of the shelf will pass under the shelf stop and then pull the shelf forward Fig 2 26 To refit the shelf line up the shelf with a groove in...

Page 15: ...laced level with the front edge of the oven s wire shelves Other containers should be placed centrally Keep all trays and containers away from the back of the oven as overbrowning of the food may occu...

Page 16: ...o size 20 40 minutes according to size 2 3 hours 45 60 minutes 40 45 minutes 2 to 3 hours 20 30 minutes 15 20 minutes 15 20 minutes per 500g Steaks according to thickness Conventional Oven Temperature...

Page 17: ...a clean paper towel If a spill other than a sugary substance is on the hot zone do not clean until the unit has completely cooled down and then follow the instructions below Cleaning Burned on Spills...

Page 18: ...ter You can use the same method for cleaning the control panel and knobs After cleaning polish with a dry cloth Top Oven Door Panel The top oven door can be removed for ease of cleaning Open the oven...

Page 19: ...for about one hour This will make sure that the panels are working effectively Removing the Wire Shelving and Catalytic Panels to Clean The main oven lining panels can be removed for cleaning If you...

Page 20: ...positions see the oven cooking guide Then adjust the settings according to your own individual tastes The oven is not cooking evenly If you are cooking a large item be prepared to turn it round during...

Page 21: ...supply and make sure that the oven is cool Open the oven door and remove the oven shelves Locate the bulb cover and unscrew it by turning it counter clockwise it may be very stiff Fig 6 2 Taking care...

Page 22: ...trical chord is not wedged during installation If the chord is damaged it must be replaced by the manufacturer its service agent or similarly qualified person n n Read the instructions before installi...

Page 23: ...mbustible surface Any cookerhood should be installed in accordance with the hood manufacturer s instructions Any splashback must be fitted in accordance with the manufacturers instructions It is recom...

Page 24: ...y as stated on the voltage label on the cooker through a suitable cooker control unit incorporating a double pole switch having a contact separation of at least 3mm in all poles n n The cooker MUST NO...

Page 25: ...7 N 4 8 H 4 S 2 H 4 S 2 H 4 S 2 H 4 S 2 7 6 5 4 3 2 1 P1 P2 P3 P4 P5 P6 P7 P8 3 1 2 5 P3 P1 P2 S2 S1 Pilot Operation lamp Thermostat MO Safety limiter To Safety Limiter P1 P2 2 4 P1 S2 S1 Pilot P1 P2...

Page 26: ...60 Ceramic Hob Type Electric Number of Cooking Zones 4 Heating Technology 1 Radiant Size 1 cm 14 5 Energy Consumption 1 Wh kg 192 Heating Technology 2 Radiant Size 2 cm 14 5 Energy Consumption 2 Wh kg...

Page 27: ...onsumption electricity conventional kWh cycle 0 94 Energy consumption electricity forced air convection kWh cycle 0 84 Energy Efficiency Index conventional 116 6 Energy Efficiency Index forced air con...

Page 28: ...w rangemaster co uk DocNo 000 0001 Back cover Rangemaster Clarence Street Royal Leamington Spa Warwickshire CV31 2AD England Tel 44 0 1926 457400 Fax 44 0 1926 450526 E mail consumers rangemaster co u...

Reviews: