background image

29

INSTALLATION

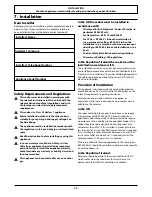
Check the appliance is electrically safe and gas sound when you have finished.

ArtNo.215-0026 - Handle gaskets fixed

ArtNo.210-0006 - Classic fitting the handles 2 

Fig.7-10

Fig.7-11

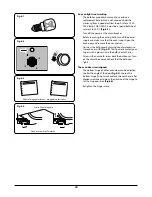
Conversion to Another Gas

If the appliance is to be converted to another gas do the 

conversion at this point. See the conversion section of these 

instructions and see the instructions in the conversion kit.

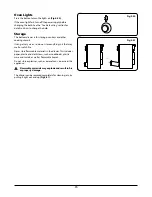
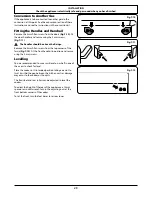
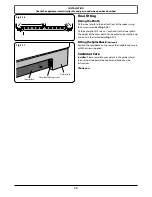
Fitting the Handles and Handrail

Remove the 4 mm Allen screws from the doors 

(Fig.7-10)

. Fit 

the door handles and secure using the 4 mm screws  

(Fig.7-11)

.

n

n

The handles should be above the fixings.

Remove the 4 mm Allen screws from the top corners of the 

fascia 

(Fig.7-12)

. Fit the front handrail in position and secure 

using the 4 mm screws.
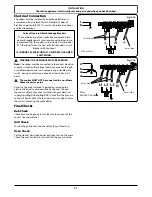
Levelling

You are recommended to use a spirit level on a shelf in one of 

the ovens to check for level.
Place the cooker in its intended position taking care not to 

twist it within the gap between the kitchen units as damage 

may occur to the cooker or the units.
The front feet and rear rollers can be adjusted to level the 

cooker. 
To adjust the height of the rear of the cooker use a 13 mm 

spanner or socket wrench to turn the adjusting nuts at the 

front bottom corners of the cooker.
To set the front, turn the feet bases to raise or lower.

Art No 215-0028 - Handrail fascia fixings

Fig.7-12

Summary of Contents for Classic 110 Deluxe Duel Fuel

Page 1: ...Classic Deluxe 110 Dual Fuel Britain s No 1 Range Cooker USER GUIDE INSTALLATION INSTRUCTIONS...

Page 2: ...sugar and serve immediately with cream or cr me fraiche FRUITY BAKED PUDDING Serves 4 6 Ingredients 3kg 6 lb skinned and boned loin of pork 2 x 70g packs prosciutto Grated zest of 2 lemons Bay leaves...

Page 3: ...ramic Hotplate 19 The Griddle 19 Glide out Grill 20 Control Panel and Doors 21 Ovens 21 Cleaning Table 22 6 Troubleshooting 23 7 Installation 25 Dear Installer 25 Safety Requirements and Regulations 2...

Page 4: ...ii...

Page 5: ...ure the room is well ventilated to the outside air see Ventilation below People with respiratory or allergy problems should vacate the area for this brief period If You Smell Gas Do not turn electric...

Page 6: ...stir them together before heating or as the fats melt Foods for frying should be as dry as possible Frost on frozen foods or moisture on fresh foods can cause hot fat to bubble up and over the sides o...

Page 7: ...ring cooking to wipe away any moisture with a soft cloth This will also help to prevent soiling and discolouration of the oven exterior by cooking vapours Cleaning In the interests of hygiene and safe...

Page 8: ...the central knobs indicates which burner that knob controls Each burner has a Flame Supervision Device FSD that prevents the flow of gas if the flame goes out When a hotplate control knob is pressed...

Page 9: ...The minimum recommended pan diameter is 120mm The maximum allowable pan base diameter is 260mm DO NOT use cooking vessels on the hotplate that overlap the edges Wok Burner The wok burner is designed...

Page 10: ...to the pan making cooking quick and energy efficient Never use a round bottomed wok even with a stand The very best pans have bases that are very slightly curved up when cold If you hold a ruler acro...

Page 11: ...knob will come on when a hob control is turned on and stay lit while the surface cools It is designed for cooking food on directly DO NOT use pans of any kind on it The griddle surface is non stick a...

Page 12: ...nd the food placed on it while you are waiting for the grill to preheat n n DO NOT leave the grill on for more than a few moments without the grill pan underneath it otherwise the knobs may become hot...

Page 13: ...used in the latter part of the cooking process to fine tune the results to your particular requirements Use fanned grilling for all your grilling needs and defrost to safely thaw small items of froze...

Page 14: ...ven The combination of fan and conventional cooking top and base heat makes this function ideal for cooking large items that need thorough cooking such as a large meat roast It is also possible to bak...

Page 15: ...t hand multi function oven The multi function oven has two controls a function selector and a temperature setting knob Fig 2 24 Turn the function selector control to a cooking function Fig 2 25 shows...

Page 16: ...to 0 first and then press B once press B again to return to manual cooking To Start and Stop the Oven Automatically Before you set the clock you must have two numbers clearly in mind the cook period a...

Page 17: ...the button once The key symbol F and OF will now show on the display Fig 2 39 Release the buttons The left hand oven is now locked as confirmed by the display showing the time of day alongside the key...

Page 18: ...ccessible when the door is open The maximum weight that can be held by the Handyrack is 5 5kg 12lb It should only be used with the supplied roasting tin which is designed to fit the Handyrack Any othe...

Page 19: ...t very warm so do not store anything in it that may melt or catch fire Never store flammable materials in the drawer This includes paper plastic and cloth items such as cookbooks plastic ware and towe...

Page 20: ...always be pushed firmly to the back of the oven Baking trays with food cooking on them should be placed level with the front edge of the oven s wire shelves Other containers should be placed centrall...

Page 21: ...0 minutes according to size 2 3 hours 45 60 minutes 40 45 minutes 2 to 3 hours 20 30 minutes 15 20 minutes 15 20 minutes per 500g Steaks according to thickness Conventional Oven Temperature C Shelf Po...

Page 22: ...ds and caps can be removed for cleaning Make sure they are absolutely dry before replacing them The Single Ring Burners When refitting the burner head make sure that the notch lines up with the electr...

Page 23: ...ld area Then turn the unit OFF and allow to cool before cleaning further After the cooking surface cools down and the heat indicator lights go off follow the Daily Care procedure outlined above Cleani...

Page 24: ...l pan support frame by pulling the grill pan forward Fig 5 6 Lift the grill pan clear of the support frame The support frame is held to the side rails by two clips on each side Fig 5 7 For each side s...

Page 25: ...an the oven door glass since they can scratch the surface which may result in shattering of the glass Ovens Cook Clean Panels The ovens have side Cook Clean panels which have been coated with a specia...

Page 26: ...ng Control knobs handles trims Plastic chrome copper or lacquered brass Warm soapy water soft cloth Brass Brass polish Oven door glass glass lid some models only Toughened glass Hot soapy water cream...

Page 27: ...nstaller 6 Troubleshooting Power failure In the event of a failure in the electrical supply remember to reset the clock to make sure that the timed oven continues to operate Food is cooking too slowly...

Page 28: ...o protect your fingers with a glove in case the bulb should shatter Screw in the new bulb screw back the bulb cover Turn on the circuit breaker and check that the bulb now lights The oven door is misa...

Page 29: ...ety Installation and Use regulations The relevant Building IEE regulations In the Republic of Ireland the cooker must be installed in accordance with The installation must be carried out by a competen...

Page 30: ...ted to another gas we recommend that this is carried out before installation See the instructions that are supplied with the conversion kit After converting the appliance please attach the Gas Convers...

Page 31: ...responsibility for damage caused by normal use of the cooker to any material that de laminates or discolours at temperatures less than 65 C above room temperature We recommend a gap of 1110mm between...

Page 32: ...bility chain Fig 7 7 then the chain should be kept as short as is practicable and fixed firmly to the rear of the cooker If you are using a stability bracket Fig 7 8 and Fig 7 9 then adjust the bracke...

Page 33: ...dles should be above the fixings Remove the 4mm Allen screws from the top corners of the fascia Fig 7 12 Fit the front handrail in position and secure using the 4 mm screws Levelling You are recommend...

Page 34: ...nections are vertical so that the hose hangs downwards in a U shape Ideally the hose supply connection should be within the shaded area A Fig 7 13 For Natural Gas the flexible hose must be in accordan...

Page 35: ...onnected to the correct electrical supply as stated on the voltage label on the cooker through a suitable cooker control unit incorporating a double pole switch having a contact separation of at least...

Page 36: ...o the inner plinth The height of the outer plinth can be adjusted by sliding it up or down via the slotted hole Fig 7 17 Fitting the Splashback optional Position the splashback on the rear of the hotp...

Page 37: ...uthorised gas controls n n Disconnect from the electricity and gas supply before servicing n n Before electrical reconnection check that the appliance is electrically safe Injectors Remove the burner...

Page 38: ...one of the hotplate injectors not a wok burner Lift off a burner head Fit the pressure gauge to the jet Turn on and light one of the other burners Turn on and press in the control knob for the burner...

Page 39: ...Code Description A1 Grill energy control A2 Grill element left hand side A3 Grill element right hand side B1 Left hand MF oven thermostat B2 Left hand MF oven control B3 Left hand MF oven base elemen...

Page 40: ...external 77 Large burner 40 3 0kW 134 3 0kW 210g h 87 Medium burner 32 1 7kW 109 1 7kW 119g h 68 Small burner 28 1 0kW 75 1 0kW 70g h 51 Ceramic Hob Front element Rear element Power rating 1 1kW 1 1k...

Page 41: ...37 Notes...

Page 42: ...38 Notes...

Page 43: ...ations concerning cleaning materials have been followed Has not been repaired by persons or organisations other than those authorised to act on behalf of AGA Rangemaster Exceptions Items not included...

Page 44: ...ed Office Juno Drive Leamington Spa Warwickshire CV31 3RG Search Rangemaster UK Rangemaster continuously seeks improvements in specification design and production of products and thus alterations take...

Reviews: