28
INSTALLATION
Check the ap pli ance is electrically safe and gas sound when you have fi nished.
Although a 900mm hose can be used, a 1250mm hose
will allow slightly more fl exibility in the positioning of the
bayonet and make moving the cooker easier. The hose
should be fi tted so that both inlet and outlet connections
are vertical so that the hose hangs downwards.
The connector is located just below the hotplate level at
the rear of the cooker.
For Natural Gas the fl exible hose must be in
accordance with B.S.669.
For LP Gas it should be capable of 50mbar pressure,
70°C temperature rise and carry a red stripe, band or
label.
If in doubt contact, your supplier.
Screw connect the threaded end of the hose into the gas
inlet in the underside of the connector block on the back
of the cooker.
After completing the gas connection, check the cooker is
gas sound with a pressure test.
Pressure testing
The gas pressure can be measured at one of the centre
hotplate burner injectors (not the Wok burner). Lift off a
burner head. Fit the pressure gauge to the injector. Turn
on and light one of the other hotplate burners. Turn on
the control knob for the burner with the pressure gauge
fi tted to let gas through.
Pressures
Natural Gas
LP Gas cookers
20mbar.
Butane
29mbar
Propane
37mbar
Turn off the burners. Reassemble burner top, making sure
it is re as sem bled in the correct way on the burner body.
Electrical Connection
This appliance must be installed by a qual i fi ed electrician
to comply with the relevant In sti tute of Electrical
Engineers (I.E.E.) regulations and also the local elec tric i ty
supply company re quire ments.
WARNING: THIS APPLIANCE MUST BE EARTHED
Note
The cooker must be connected to the cor rect electrical
supply as stated on the voltage la bel on the cooker,
through a suitable cooker control unit incorporating a
double pole switch having a contact separation of at least
3mm in all poles. This cooker must not be connected to an
ordinary domestic power point.
Single phase
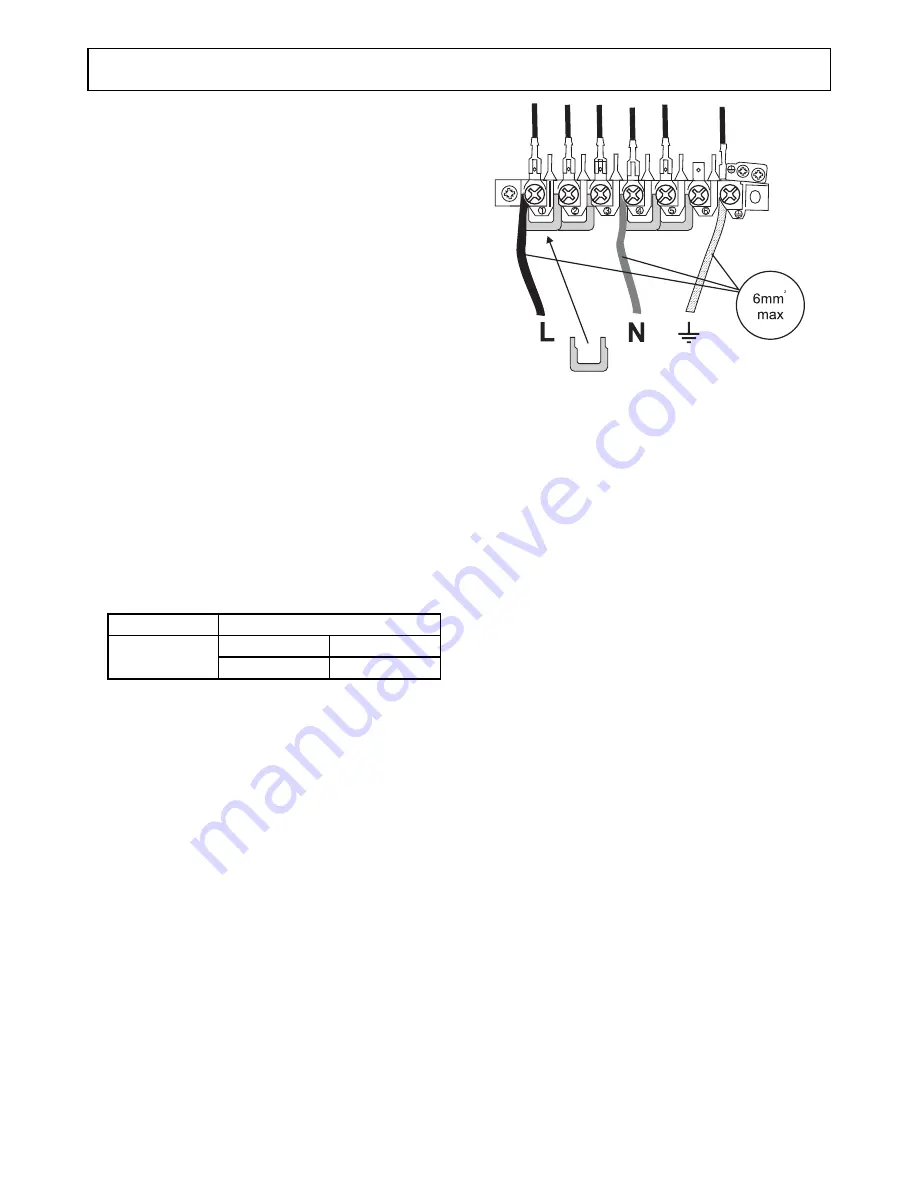
Access to the mains terminal is gained by re mov ing the
electrical terminal cover on the back panel.
When preparing the electrical supply leads, make sure
that the earth wire is longer that the phase or neutral
wires. The earth lead should be long enough that it is
never under any strain.
Connect the mains cable to the correct terminals for your
electrical sup ply type (see fi g.). Check that the links are
correctly fi tted and that the terminal screws are tight.
Secure the mains cable us ing the cable clamp.
These appliances are of type X with regard to protection
against over heating of the sur round ing surfaces.
Current Operated Earth Leakage Breakers
Where the installation is protected by a 30 milliamp
sensitivity residual current device (RCD), the combined
use of your cooker and other domestic appliances may
oc ca sion al ly cause nuisance tripping. In these instances
the cooker circuit may need to be protected by fi tting
100mA device. This work should be carried out by a
qualifi ed electrician.
Hotplate
Check each burner in turn. There is an ignition system that
works when the control knob is pressed in. Push in tap
and turn to the large fl ame symbol.
Check that the burner lights correctly.
Summary of Contents for Classic Deluxe 90 Induction
Page 1: ...Classic Deluxe 90 Dual Fuel Users Guide Installation Service Instructions U109300 01 ...
Page 39: ......
Page 40: ...070606 ...


