background image

12

Removing the Upper Freezer Drawer Inner 
Compartment

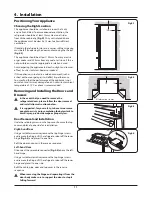
Open the drawer as far as possible. Remove the ice tray. Pull 

the rear section of the drawer inner compartment upwards 

slightly to enable the front section to be released from the 

door 

(Fig.4.5)

.

Hold and pull the front section of the inner compartment 

upwards to remove it from the refrigerator.

Removing the Lower Freezer Drawer Inner 
Compartment

Open the drawer as far as possible. Pull the rear section of the 

drawer inner compartment upwards slightly to enable the 

front section to be released from the door 

(Fig.4.6)

.

Hold the front section of the inner compartment and pull it 

upwards to remove it from the refrigerator. 

Adjustable Feet

Make sure that the appliance is on solid level flooring. If the 

refrigerator is placed on a plinth, flat, strong and fire resistant 

materials must be used.
This appliance has front adjustable feet, which can be used to 

level the appliance.
Insert a suitable flat screwdriver into the slots of the 

adjustable feet. Turn the screwdriver clockwise to raise the 

feet 

(Fig.4.7)

, and anti-clockwise to lower the feet 

(Fig.4.8)

.

Levelling the Doors

If the door heights are uneven, spacer rings (supplied) can be 

inserted to raise the door level.
Raise the door up from the lower hinge. Using a suitable pair 

of pliers, insert a clip ring between the door and hinge  

(Fig.4.9)

. Up to three clip rings can be inserted as required.

Installing the Bottom Decorative Strip 

and Handles

The supplied decoratiove strip should be fixed to the base of 

the refrigerator, using the 2 screws provided. 
The door handles fix onto mounting studs (supplied).

1. 

Screw the mounting studs into the holes located on the 

door shells. 

2. 

Place the handle firmly over the mounting studs.

3. 

Using the M3 Allen key, tighten the grub screw fixing 

the handle to the door.

Do not over-tighten the grub screw.

ArtNo.600-0035 - Adjusting the feet

ArtNo.600-0035 - Adjusting the feet

ArtNo.600-0003 - Door alignment

Fig.4.6 

Fig.4.8 

Fig.4.9 

Fig.4.7 

Fig.4.5 

Summary of Contents for DxD 15

Page 1: ...DxD 15 Refrigerator User Guide Installation Service Instructions U110466 01B...

Page 2: ...unction 7 3 Food Storage Tips 8 Tips on Storing Fresh Food 8 Tips on Freezing Food 9 4 Installation 10 Positioning Your Appliance 10 Removing and Installing the Doors and Drawers 10 Adjustable Feet 11...

Page 3: ...ing any routine maintenance or minor repairs disconnect the appliance from the electrical supply DO NOT touch cold surfaces of the appliance while it is in use as this will cause hands to stick to the...

Page 4: ...any event should you inhale or come into contact with R600a gas we advise you to consult your own doctor Caring for the Environment Disposing of Your Packaging Your new refrigerator was protected by...

Page 5: ...is for ice cubes regularly used foods and left overs The lower freezer drawer is for deep longer duration freezing CFC free Frost free and Fast freeze option LED interior lights come on when the door...

Page 6: ...e clear of the side guides Fig 2 3 and pull towards you Keep the shelf tilted to allow the retaining stops to clear the side guides When repositioning make sure the shelf is pushed back fully and the...

Page 7: ...re ice or frequently frozen and frequently used foods on the right hand side of the drawer The lower deep freeze drawer Fig 2 10 is for longer duration freezing Note Do not pull the freezer drawers wi...

Page 8: ...water dispenser digital display and function buttons are shown in Fig 2 11 Lock Mode This feature will lock the temperature and function settings When locked the lock icon is displayed To Lock 1 Press...

Page 9: ...T Make sure that you empty the ice maker container before you turn off the ice maker as the ice will melt Super Freeze Mode This function is designed to freeze food completely in the shortest possible...

Page 10: ...g the water dispenser for the first time you may not get water out immediately since air will be in the line Please press the dispenser tab for at least 1 minute to clear the air and replace it with w...

Page 11: ...life Some foods like onions garlic bananas and root vegetables are better stored at room temperature than in the fridge Melon pineapples and bananas can go directly into the freezer after preparing f...

Page 12: ...pe and when it is safe to eat Take food from the freezer to defrost when needed Defrosted food cannot be refrozen unless it is cooked Do not put too much fresh food into the freezer at once This could...

Page 13: ...nce of the appliance is not consistent and this may damage foods A consistent ambient temperature of 10 C or above is recommended Removing and Installing the Doors and Drawers n n In the event that yo...

Page 14: ...hich can be used to level the appliance Insert a suitable flat screwdriver into the slots of the adjustable feet Turn the screwdriver clockwise to raise the feet Fig 4 7 and anti clockwise to lower th...

Page 15: ...e cold water dispenser and ice maker Open the water valve to flush the pipe check leakage in the water pipe joints and allow the water to run until it is clear The water pipe cannot withstand heat Kee...

Page 16: ...hands are not wet when touching the parts n n DO NOT use HOT water to clean the glass shelves as they may break or crack 5 Cleaning and Maintenance Shutting Off the Refrigerator In the event of a pow...

Page 17: ...high 2 1 1 The doors or drawers are open frequently or for too long each time 2 1 1 1 Try to reduce frequency of opening doors and drawers 2 1 2 The doors or drawers are left open 2 1 2 1 Take extra...

Page 18: ...lower drawer to increase ice cube harvest 5 1 2 The water supply valve is closed 5 1 2 1 Turn on the water supply valve 5 1 3 The freezer section is not cold enough 5 1 3 1 Adjust the setting to the f...

Page 19: ...damp cloth then wipe dry 7 1 2 The foods in the fridge have been stored beyond their useful life 7 1 2 1 Wrap and cover foods to extend useful food life The door or drawer is hard to open and or close...

Page 20: ...dds extra work load in the refrigerator 9 2 3 The doors or drawers are frequently opened and closed 9 2 3 1 Try to reduce frequency of door or drawer openings 9 2 4 The control settings in the freezer...

Page 21: ...number is located inside the refrigerator on the top left hand side The 2 years free maintenance for the operation of the appliance started from the date of purchase of this product Any cosmetic damag...

Page 22: ...le of A more efficient to G less efficient A Climate class SN 10 32 C N 16 32 C ST 18 38 C T 18 43 C SN T Freezer compartment star rating Temperature range refrigerator freezer from to 9 1 C 16 24 C G...

Page 23: ...21 Notes...

Page 24: ...w rangemaster co uk DocNo 000 0001 Back cover Rangemaster Clarence Street Royal Leamington Spa Warwickshire CV31 2AD England Tel 44 0 1926 457400 Fax 44 0 1926 450526 E mail consumers rangemaster co u...

Reviews: