background image

15


Conventional oven (top and 
base heat)

This function combines the heat from the top 
and base elements. It is particularly suitable for 
roasting and baking pastry, cakes and biscuits. 
Food cooked on the top shelf will brown and 
crisp faster than on the lower shelf, because the 
heat is greater at the top of the oven than at the 
base, as in ‘Fan assisted oven’ function. Similar 
items being cooked will need to be swapped 
around for even cooking. This means that foods 
requiring different temperatures can be cooked 
together, using the cooler zone in the lower half 
of the oven and hotter area to the top. 


Browning element 

This function uses the element in the top 

of the oven only. It is a useful function for the 
browning or fi nishing of pasta dishes, vegetables 
in sauce, shepherds pie and lasagne, the item to 
be browned being already hot before switching 
to the top element.


Base heat

This function uses the base element only. 

It will crisp up your pizza or quiche base or 
fi nish off cooking the base of a pastry case on a 
lower shelf. It is also a gentle heat, good for slow 
cooking of casseroles in the middle of the oven 
or for plate warming. 

The Browning and Base heat functions are 
useful additions to your oven, giving you 
fl ex 

i bil i ty to fi nish off items to perfection. With 

use, you will soon realise how these functions 
can com bine to extend your cooking skills.
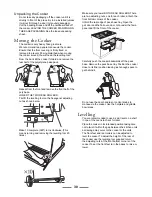
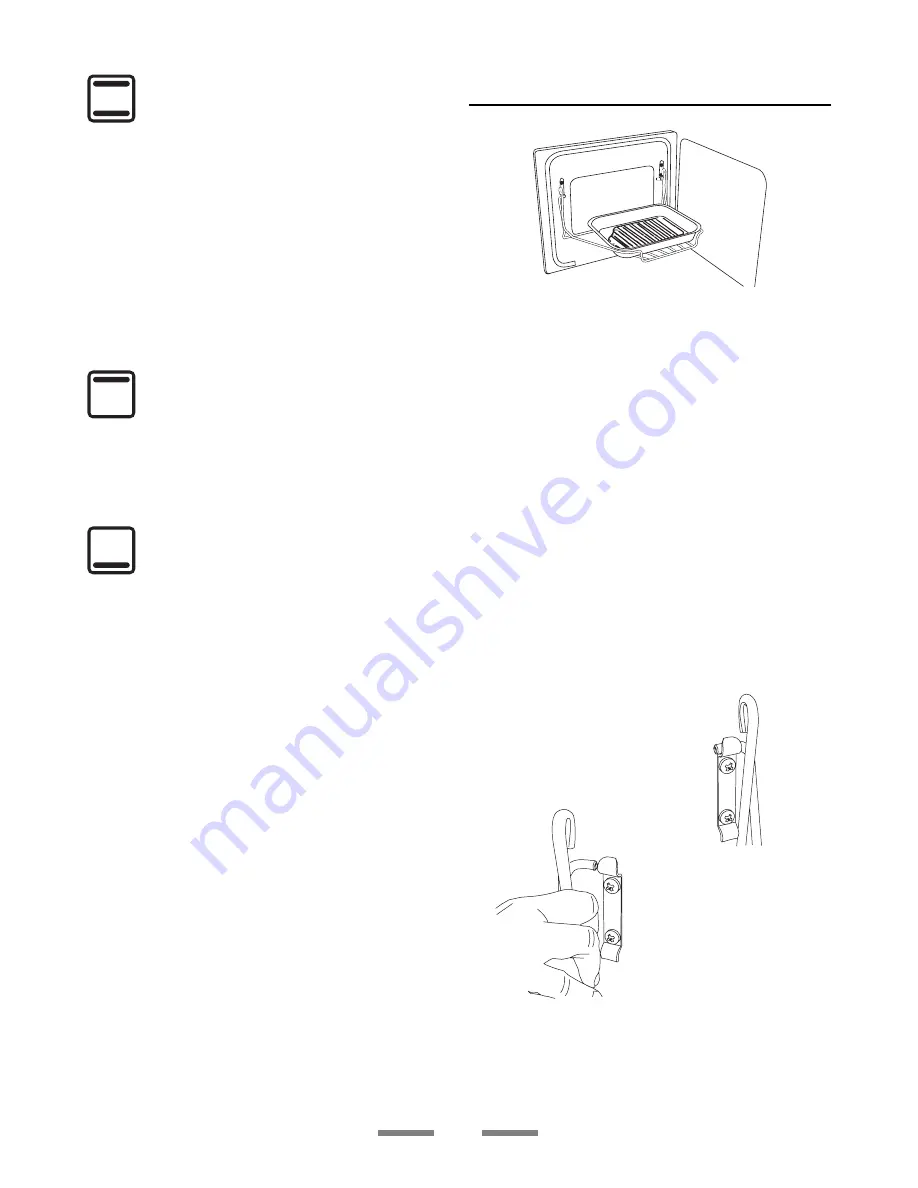
Handyrack


The maximum weight than can be held by the 
Handyrack is 5.5kg (12lb). It should only be used 
with the supplied meat tin, which is designed 
to fi t the Handyrack. Any other vessel could be 
unstable.

The Handyrack fi ts on the oven door. Food 
cooking on it is easy to attend to, because it’s 
accessible when the door is open. It can be fi tted 
at two different heights. One of the oven shelves 
must be removed and the other positioned to 
suit. 

When the Handyrack is used in its highest 
position, other dishes can be cooked on the 
bot tom shelf position of the oven or standing on 
the base of the oven

When the Handyrack is used in its lowest 
position, other dishes can be cooked on the 
second shelf position of the oven or standing on 
the base of the oven.

To fi t the Handyrack, 
locate one side of it 
on the door bracket.

Then spring the 
other side out to 
clip it onto the other 
bracket.

Summary of Contents for Elan 90 Induction

Page 1: ...90 Ceramic Users Guide Installation Service Instructions U105530 01...

Page 2: ...that no water seeps into the appliance During use and afterwards the appliance will be warm so be careful with little children If the younger members of your family are allowed into the kitchen we st...

Page 3: ...i function oven Page 14 Handyrack Page 15 Main Oven shelves Page 16 Steam Page 16 Oven light Page 16 Tall oven shelves Page 17 Multi function Oven cooking guide Page 18 Oven Cooking chart 19 Cleaning...

Page 4: ...y residue burning onto the hob panel This also helps prevent scratches and deposits such as lime specks 4 Always use pans that are the same size as or slightly larger than the areas marked on the hob...

Page 5: ...Sugar spillage will permanently damage the hob and therefore must be cleaned off with care immediately Never let sugar spillage cool before trying to remove it If sugar or foods with high sugar conte...

Page 6: ...onto the side supports Adjust the heat to suit by turning the knob Make sure it is pushed right in and touches the back stop Never close the grill door when the grill is on 5 The grill pan grid can be...

Page 7: ...lti function oven The fan in the right hand oven circulates hot air continuously which means faster more even cooking The recommended cooking temperatures for a fanned oven are generally lower than a...

Page 8: ...sh and alternately To set the clock to read the time of day turn and hold the Setting knob to the clock symbol At the same time turn the Adjusting knob left or right until the clock shows the time of...

Page 9: ...ve it in the minute minder position as the time ticks down To stop the beeper when it sounds Turn the Adjusting knob anticlockwise To stop automatically Use when you have started the oven manually Tur...

Page 10: ...the cook period you just set Use the Adjusting knob to set the Stop time you need Stop Time shows AUTO will show in the display Set the oven s to the cooking temperature you need don t forget to set a...

Page 11: ...ep holding the Timer knob turned to the clock symbol and turn the Adjusting knob clockwise until the key symbol and Of shows on the display Let go of the knobs The ovens are now locked After a few sec...

Page 12: ...g smaller quantities or placing in larger containers Very perishable foods such as pork or fish should be avoided if a long delay period is planned especially in hot weather Don t place warm food in t...

Page 13: ...oisture content foods can create a steam burst when the oven door is opened When opening the oven stand well back and allow any steam to disperse When the oven is on don t leave the door open for long...

Page 14: ...ng on several shelves at one time and is a good all round function It may be necessary to reduce the temperature by approximately 10 C for recipes previously cooked in a conventional oven If you wish...

Page 15: ...er shelf It is also a gentle heat good for slow cooking of casseroles in the middle of the oven or for plate warming The Browning and Base heat functions are useful additions to your oven giving you f...

Page 16: ...front so the shelf ends clear the shelf stops and then lower the front so that the shelf is level and push it fully back Steam During cooking food naturally produces steam particularly when cooking fo...

Page 17: ...ll oven is supplied with four normal cooking shelves and a plate warming shelf When using the tall oven you can cook on all four shelves at the same time but make sure they are well spaced out to allo...

Page 18: ...at least one runner space between them Place baking trays individual cake tins or baking dishes centrally on the oven shelf For best results pre heat the oven until the oven indicator light goes out C...

Page 19: ...ns per 500g 20 25mins 200 C 2 3 190 C 15 20mins per 500g 15 20mins Turkey 160 C 2 150 C 20 25mins per 500g 20 25mins 200 C 2 190 C 15 20mins per 500g 15 20mins Stuffed Poultry Cook at 200 C or at 200...

Page 20: ...an dry paper towel Cleaning for spills For spills and boil overs that occur while cooking turn the unit off and wipe the area surrounding the hot zone with a clean paper towel If a spill other than a...

Page 21: ...nt of manual cleaning needed The Cook Clean panels work better above 200 C If you do most of your cooking below this temperature occasionally remove the panels and wipe with a lint free cloth and hot...

Page 22: ...ven Door Glass Glass Lid Toughened glass Hot soapy water cream cleaner scourer if necessary Oven and Grill Part Finish Recommended Cleaning Method Sides floor roof of oven NOT COOK CLEAN OVEN PANELS s...

Page 23: ...en Lift the front of the cooker slightly and pull forward Do not move the oven by pulling the door handles or knobs Move the oven a bit at a time checking behind it to make sure the electricity supply...

Page 24: ...when grilling If there is an installation problem and I don t get my original installer to come back to fix it who pays You do Service organisations will charge for their call outs if they are correc...

Page 25: ...nformation on the key lock feature of the clock Oven temperature getting hotter as the cooker gets older If turning the knob down has not worked or only worked for a short time then you may need a new...

Page 26: ...ny other part of the cooker Never store anything of interest to children in cabinets above a cooker children climbing on the cooker to reach them could be seriously injured Clean only parts listed in...

Page 27: ...others may break because of the sudden change in temperature Use proper pan size select pans having flat bottoms large enough to cover the surface unit s heating area The use of undersized pans will e...

Page 28: ...ny Installer s Telephone number Installation Regulations This appliance must be installed by a qualified electrician to comply with the relevant regulations and also the local electricity supply compa...

Page 29: ...laminate kitchen furniture are particularly prone to heat damage and discolouration We cannot accept responsibility for damage caused by normal use of the cooker to any material that de laminates or d...

Page 30: ...g the levelling tool 20 times Make sure you lower BOTH REAR ROLLERS There are two adjusting nuts one for each roller at both the front bottom corners of the cooker Unfold the rear edge of pack base tr...

Page 31: ...a multi pole circuit breaker that completely disconnects the appliance from the mains with a minimum contact break distance of 3mm WARNING THIS APPLIANCE MUST BE EARTHED The appliance must be connect...

Page 32: ...that it heats up Grill Open the grill compartment door Turn on the grill control and check that the grill heats up Oven check Set the clock to the time of day When the clock is first connected the dis...

Page 33: ...ments are now accessible 4 To Remove the Control Panel Disconnect from electricity supply Remove the handrail by removing the 2 end bracket fixing screws Pull off the push fit control panel end caps a...

Page 34: ...centre cover strip 5 screws 2 top 2 bottom 1 in middle Remove the two countersunk screws 1 each side securing the grill hinge arms to the front of the grill chamber NOTE The arms are spring tensioned...

Page 35: ...l Fit door handle bracket and door handle to new panel Fit panel to door Take care to make sure the sensor of the Thermodial is sealed to the door by the rubber grommet Reassemble in reverse order 17...

Page 36: ...d connect to the replacement elements and re assemble parts in reverse order Check operation of grill 22 To Remove the LH Oven Bottom and Top Elements Disconnect from the electricity supply Bottom Ele...

Page 37: ...g See Positioning the Cooker Minimum space above hotplate 650mm Ratings Total Load At 230V 14 8kW approximate total including oven lights oven fan etc Hob Ovens Left hand Multifunction Oven Right hand...

Page 38: ...SERVICING WARNING Disconnect from electricity supply before servicing Check appliance is safe when you have finished 38...

Page 39: ...at J2 Multi function oven function switches J3 Multi function oven fan J4 Multi function oven fan element J5 Multi function oven browning element inner pair J6 Multi function oven top element outer pa...

Page 40: ......

Reviews: