background image

1

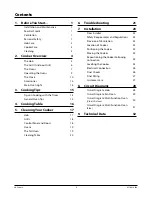
1.  Before You Start...

This User Guide covers a number of different models. 

Although some of the illustrations will look different to 

your particular model the functions will be the same. We 

hope the meaning is clear.
Your cooker should give you many years of trouble-free 

cooking if installed and operated correctly. It is important 

that you read this section before you start, particularly if you 

have not used a ceramic cooker before.

n

n

This appliance is designed for domestic cooking 

only. Using it for any other purpose could invalidate 

any warranty or liability claim. In particular, the 

oven should NOT be used for heating the kitchen – 

besides invalidating claims, this wastes fuel and may 

overheat the control knobs.

Installation and Maintenance

In the UK the electrical installation should be in accordance 

with BS 7671. Otherwise, all installations must be in 

accordance with the relevant instructions in this booklet, with 

the relevant national and local regulations, and with the local 

electricity supply companies’ requirements.
Make sure that the cooker is wired in and switched on.
Set the clock to make sure that all the ovens are functional – 

see the relevant section in this manual.
The cooker should be serviced only by a qualified service 

engineer, and only approved spare parts should be used.
Always allow the cooker to cool and then switch it off at the 

mains before cleaning or carrying out any maintenance work, 

unless specified otherwise in this guide.

Peculiar Smells

When you first use your cooker it may give off an odour. This 

should stop after use.
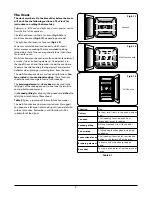
Before using your cooker for the first time, make sure that all 

packing materials have been removed and then, to dispel 

manufacturing odours, turn the ovens to 200 °C and run for at 

least an hour. 
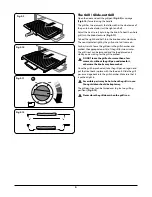
Before using the grill for the first time you should also turn on 

the grill and run for 30 minutes with the grill pan in position, 

pushed fully back, and the grill door open.
Make sure the room is well ventilated to the outside air 

(see 

‘Ventilation’

 below). People with respiratory or allergy 

problems should vacate the area for this brief period.

Ventilation

The use of a cooking appliance results in the production 

of heat and moisture in the room in which it is installed. 

Therefore, make sure that the kitchen is well ventilated: 

keep natural ventilation holes open or install a powered 

cookerhood that vents outside. If you have several hotplates 

on, or use the cooker for a long time, open a window or turn 

on an extractor fan.

Personal Safety

n

n

DO NOT modify this appliance.

n

n

This appliance is not intended for use by persons 

(including children) with reduced physical, sensory 

or mental capabilities, or lack of experience and 

knowledge, unless they have been given supervision 

or instruction concerning use of the appliance by a 

person responsible for their safety.

n

n

Children or infirm persons should be supervised to 

make sure that they do not play with the appliance.

n

n

CAUTION: A long term cooking process has to be 

supervised from time to time. A short term cooking 

process has to be supervised continuously.

n

n

Danger of fire: DO NOT store items on the cooking 

surfaces.

n

n

To avoid overheating, DO NOT install the cooker 

behind a decorative door.

n

n

Accessible parts will become hot during use and will 

retain heat even after you have stopped cooking. 

Keep babies and children away from the cooker and 

never wear loose–fitting or hanging clothes while 

the appliance is in use. 

n

n

DO NOT use a steam cleaner to clean the cooker.

Always be certain that the controls are in the OFF position 

when the oven is not in use, and before attempting to clean 

the cooker.

n

n

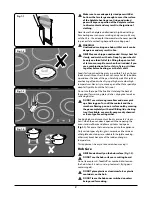
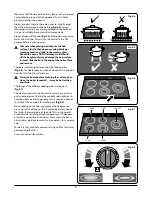
Take care when touching the marked cooking areas 

of the hob.

n

n

When the oven is on, DO NOT leave the oven door 

open for longer than necessary – otherwise the 

control knobs may become very hot.

Always keep combustible materials, e.g. curtains, and 

flammable liquids a safe distance away from your cooker.

n

n

DO NOT spray aerosols in the vicinity of the cooker 

while it is on.

Use dry oven gloves when applicable – using damp gloves 

might result in steam burns when you touch a hot surface. 

Do not use a towel or other bulky cloth in place of a glove – it 

might catch fire if brought into contact with a hot surface.

n

n

NEVER operate the cooker with wet hands.

n

n

DO NOT use aluminium foil to cover shelves, linings 

or the oven roof.

n

n

NEVER heat unopened food containers. Pressure 

build up may make the containers burst and cause 

injury.

n

n

DO NOT use unstable saucepans. Always make sure 

that you position the handles away from the edge of 

the hotplate.

Summary of Contents for ELAS90EC

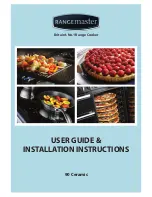
Page 1: ...90 Ceramic Britain s No 1 Range Cooker USER GUIDE INSTALLATION INSTRUCTIONS...

Page 2: ...sugar and serve immediately with cream or cr me fraiche FRUITY BAKED PUDDING Serves 4 6 Ingredients 3kg 6 lb skinned and boned loin of pork 2 x 70g packs prosciutto Grated zest of 2 lemons Bay leaves...

Page 3: ...nel and Doors 18 Ovens 19 The Tall Oven 19 Cleaning Table 20 6 Troubleshooting 21 7 Installation 23 Dear Installer 23 Safety Requirements and Regulations 23 Provision of Ventilation 23 Location of Coo...

Page 4: ...ii...

Page 5: ...re in the room in which it is installed Therefore make sure that the kitchen is well ventilated keep natural ventilation holes open or install a powered cookerhood that vents outside If you have sever...

Page 6: ...er try to move a pan of hot fat especially a deep fat fryer Wait until the fat is cool Do not use the top of the flue the slot along the back of the cooker for warming plates dishes drying tea towels...

Page 7: ...iners are suitable for hob cooking others may break because of the sudden change in temperature The ceramic surface should be washed after use in order to prevent it from becoming scratched or dirty H...

Page 8: ...etting required Higher settings are required for larger quantities of food Pots and pans should have thick smooth flat bottoms Fig 2 2 This allows the maximum heat transfer from the hob to the pan mak...

Page 9: ...the hob surface and remove There are indicator lights for each of the cooking areas Fig 2 6 The lights come on when a hob control is turned on and stays lit while the surface cools n n Always take car...

Page 10: ...ght by the grill control will come on For best results leave the grill pan in the grill chamber and preheat the appropriate part s of the grill for two minutes The grill trivet can be removed and the...

Page 11: ...ending on model The right hand tall oven is a fan oven Fig 2 15 Fan ovens circulate hot air continuously which means faster more even cooking The recommended cooking temperatures for a fan oven are ge...

Page 12: ...st It is also possible to bake on two shelves at one time although they will need to be swapped over during the cooking time as the heat at the top of the oven is greater than at the base when using t...

Page 13: ...nction Ovens The multi function oven has two controls a function selector and a temperature setting knob Fig 2 17 Turn the function selector control to a cooking function Turn the oven temperature kno...

Page 14: ...ll not operate unless the clock has been set Setting the minute minder To activate the minute minder turn the Timer knob to the right to the C minute minder setting it should click into position Fig 2...

Page 15: ...cancel any active programs Turn and hold the Timer knob to the clock symbol A for about 8 seconds On appears on the display Fig 2 26 While still holding the Timer knob turned to the clock symbol A tur...

Page 16: ...ck you must have two numbers clearly in mind the cook period and the stop time Note You cannot set a start time directly this is set automatically by setting the cook period and the stop time Press an...

Page 17: ...ll not come on The right hand oven can be operated as usual To activate the key lock Make sure that the clock is in manual mode and cancel any active programs Hold the Minute Minder C and Cook period...

Page 18: ...he door is open The maximum weight that can be held by the Handyrack is 5 5kg 12lb It should only be used with the supplied roasting tin which is designed to fit the Handyrack Any other vessel could b...

Page 19: ...er containers should be placed centrally Keep all trays and containers away from the back of the oven as overbrowning of the food may occur For even browning the maximum recommended size of a baking t...

Page 20: ...ize 20 40 minutes according to size 2 3 hours 45 60 minutes 40 45 minutes 2 to 3 hours 20 30 minutes 15 20 minutes 15 20 minutes per 500g Steaks according to thickness Conventional Oven Temperature C...

Page 21: ...a clean paper towel If a spill other than a sugary substance is on the hot zone do not clean until the unit has completely cooled down and then follow the instructions below Cleaning burned on spills...

Page 22: ...wo clips on each side Fig 5 3 For each side support the side rail with one hand and with the other hand lift the frame up and out of the side clips Fig 5 4 For safety push the side rails back into the...

Page 23: ...ining but helps to reduce the amount of manual cleaning needed These panels work better above 200 C If you do most of your cooking below this temperature occasionally remove the panels and wipe with a...

Page 24: ...ides and plinth Painted surface Hot soapy water soft cloth Splashback rear grille Enamel or stainless steel Hot soapy water soft cloth Cream cleaner with care if necessary Control panel Paint enamel o...

Page 25: ...wer failure In the event of a failure in the electrical supply remember to reset the clock to make sure that the timed oven continues to operate Food is cooking too slowly too quickly or burning Cooki...

Page 26: ...bulb should shatter unscrew the old bulb Screw in the new bulb clockwise and then screw the bulb cover back on Turn on the electricity supply and check that the bulb now lights The oven door is misal...

Page 27: ...ations in force and only in a well ventilated space n n Read the instructions before installing or using this appliance Provision of Ventilation This appliance is not connected to a combustion product...

Page 28: ...s of vinyl or laminate kitchen furniture are particularly prone to heat damage and discolouration We cannot accept responsibility for damage caused by normal use of the cooker to any material that de...

Page 29: ...tioning the Cooker Following Connection If you need to move the cooker once it has been connected make sure it is switched off at the supply switch before gripping under the fascia panel and lifting t...

Page 30: ...ED Note The cooker must be connected to the correct electrical supply as stated on the voltage label on the cooker through a suitable cooker control unit incorporating a double pole switch having a co...

Page 31: ...it the front handrail in position and secure using the 4mm screws Fitting the 1 piece Plinth Loosen the three screws along the front bottom edge of the cooker Hook the central keyhole over the central...

Page 32: ...r br b r br br r r b br br br bk r br w bk w bk r br bk bk br b b r br bk bk br b b br br br br b bk r b r b bk b br b br br bk b r b br bk br A B C D F G Code Description A Left hand front control B...

Page 33: ...bk br br br bk r A1 A2 A3 J J B4 B1 B2 D H B3 G1 G2 C4 J H C3 C1 C2 F Code Description A1 Grill energy regulator A2 Grill front switch A3 Grill elements B1 Left hand zoned oven thermostat B2 Left han...

Page 34: ...3 B3 B4 B2 B5 B6 B7 D2 I D1 D3 B8 D4 F G1 I H I H G2 I H Code Description A1 Grill front switch A2 Grill energy regulator A3 Grill elements B1 Left hand oven front switch B2 Left hand oven thermostat...

Page 35: ...B3 B4 B2 B5 B6 B7 D2 I D1 D3 B8 D4 F G1 I H I H G2 I H Code Description A1 Grill front switch A2 Grill energy regulator A3 Grill elements B1 Left hand oven front switch B2 Left hand oven thermostat B3...

Page 36: ...Forced air convection Multi function Multi function with Rapid Response Forced air convection Maximum power output 230V 50Hz 2 5kW 2 5kW 3 7kW 2 5kW Energy efficiency class on a scale of A more effic...

Page 37: ...33 Notes...

Page 38: ...34 Notes...

Page 39: ...ations concerning cleaning materials have been followed Has not been repaired by persons or organisations other than those authorised to act on behalf of AGA Rangemaster Exceptions Items not included...

Page 40: ...ed Office Juno Drive Leamington Spa Warwickshire CV31 3RG Search Rangemaster UK Rangemaster continuously seeks improvements in specification design and production of products and thus alterations take...

Reviews: