background image

20

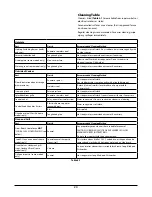
Hotplate

Part 

Finish

Recommended Cleaning Method

Hob top (including burner heads 
and caps)

Enamel or stainless steel

Hot soapy water, soft cloth. Any stubborn stains remove gently with 
a nylon scourer.

Ceramic/Induction hob

Toughened glass

Hot soapy water; cream cleaner/scourer if necessary.

Griddle plate (some models only)

Non-stick surface

Allow to cool. Wash in hot soapy water. Do not use abrasive 
cleaners/scourers. Dishwasher.

Warming zone (some models only) Toughened glass

Hot soapy water, cream cleaner/scourer if necessary.

Outside of Cooker

Part

Finish

Recommended Cleaning Method

Door, door surround and storage 
drawer exterior

Enamel or paint

Hot soapy water, soft cloth. 
Any stubborn stains, remove gently with a liquid detergent.

Stainless steel

E-cloth 

(electrical retailers)

 or microfibre all-purpose cloth


(supermarket).

Sides and plinth

Painted surface

Hot soapy water, soft cloth.

Splashback/rear grille

Enamel or stainless steel

Hot soapy water, soft cloth. Cream cleaner, with care, if necessary.

Control panel

Paint, enamel or stainless steel

Warm soapy water. Do not use abrasive cleaners on lettering.

Control knobs/handles & trims

Plastic/chrome, copper or 
lacquered brass

Warm soapy water, soft cloth.

Brass

Brass polish.

Oven door glass/Glass lid (some 
models only)

Toughened glass

Hot soapy water, cream cleaner/scourer if necessary.

Oven and Grill

Part

Finish

Recommended Cleaning Method

Sides, floor & roof of oven 

NOT 

COOK & CLEAN’ OVEN PANELS (see 

below)

Enamel

Any proprietary oven cleaner that is suitable for enamel.
CAUTION: CORROSIVE/CAUSTIC OVEN CLEANERS: FOLLOW 
MANUFACTURER’S INSTRUCTIONS.
Do not allow contact with the oven elements.

‘Cook & Clean’ oven panels (some 
models only)

Special enamel that partly 
cleans itself

This surface cleans itself at 200 °C and above, or the panels can be 
removed and washed with hot soapy water and a nylon brush.

Oven shelves, Handyrack, grill 
trivet, Handygrill rack (some 
models only)

Chrome

An oven interior cleaner that is suitable for chrome. Soap filled pad. 
Dishwasher.

Grill pan/meat tin (some models 
only)

Enamel

Hot soapy water. Soap filled pad. Dishwasher.

Table 5-1

Cleaning Table

Cleaners listed 

(Table 5-1)

 are available from supermarkets or 

electrical retailers as stated. 
For enamelled surfaces use a cleaner that is approved for use 

on vitreous enamel.
Regular cleaning is recommended. For easier cleaning, wipe 

up any spillages immediately.

Summary of Contents for Excel 110 Dual Fuel

Page 1: ...Excel 110 Dual Fuel Britain s No 1 Range Cooker USER GUIDE INSTALLATION INSTRUCTIONS...

Page 2: ...sugar and serve immediately with cream or cr me fraiche FRUITY BAKED PUDDING Serves 4 6 Ingredients 3kg 6 lb skinned and boned loin of pork 2 x 70g packs prosciutto Grated zest of 2 lemons Bay leaves...

Page 3: ...Hotplate Burners 16 Ceramic Hotplate 17 Grill 18 Control Panel and Doors 19 Ovens 19 Cleaning Table 20 6 Troubleshooting 21 7 Installation 23 Dear Installer 23 Safety Requirements and Regulations 23...

Page 4: ...ii...

Page 5: ...k and the grill door open Make sure the room is well ventilated to the outside air see Ventilation below People with respiratory or allergy problems should vacate the area for this brief period If You...

Page 6: ...ould be as dry as possible Frost on frozen foods or moisture on fresh foods can cause hot fat to bubble up and over the sides of the pan Carefully watch for spills or overheating of foods when frying...

Page 7: ...system Cooker Care As steam can condense to water droplets on the cool outer trim of the oven it may be necessary during cooking to wipe away any moisture with a soft cloth This will also help to pre...

Page 8: ...vice FSD that prevents the flow of gas if the flame goes out When a hotplate control knob is pressed in sparks will be made at every burner this is normal Do not attempt to disassemble or clean around...

Page 9: ...mum allowable pan base diameter is 260mm DO NOT use cooking vessels on the hotplate that overlap the edges Wok Burner The wok burner is designed to provide even heat over a large area It is ideal for...

Page 10: ...b to the pan making cooking quick and energy efficient Never use a round bottomed wok even with a stand The very best pans have bases that are very slightly curved up when cold If you hold a ruler acr...

Page 11: ...ay lit while the surface cools It is designed for cooking food on directly DO NOT use pans of any kind on it The griddle surface is non stick and metal cooking utensils e g spatulas will damage the su...

Page 12: ...n is a multi function oven while the right hand oven is a fan oven Above the right hand oven is the slow cook oven The Multi function Oven As well as the oven fan and fan element multi function ovens...

Page 13: ...need thorough cooking such as a large meat roast It is also possible to bake on two shelves at one time although they will need to be swapped over during the cooking time as the heat at the top of th...

Page 14: ...ng to retain moisture Make sure all dishes will fit into the oven before preparing the food Wrap washed and pricked jacket potatoes in foil before cooking Make sure that meat and poultry reach a safe...

Page 15: ...t Setting the Minute Minder To activate the minute minder turn the Timer knob to the right to the minute minder setting it should click into position Fig 2 29 Rotate the Adjusting knob to set the time...

Page 16: ...ymbol and then releasing it Key Lock When the key lock is activated the left hand oven is locked and will not come on The right hand oven can be operated as usual To Activate the Key Lock Make sure th...

Page 17: ...d by the Handyrack is 5 5kg 12lb It should only be used with the supplied roasting tin which is designed to fit the Handyrack Any other vessel could be unstable It can be fitted at two different heigh...

Page 18: ...always be pushed firmly to the back of the oven Baking trays with food cooking on them should be placed level with the front edge of the oven s wire shelves Other containers should be placed centrall...

Page 19: ...0 minutes according to size 2 3 hours 45 60 minutes 40 45 minutes 2 to 3 hours 20 30 minutes 15 20 minutes 15 20 minutes per 500g Steaks according to thickness Conventional Oven Temperature C Shelf Po...

Page 20: ...ly on the burner head Fig 5 1 The Wok Burner The wok burner can also be taken apart for cleaning When reassembling the wok burner Fig 5 2 turn over the large base ring and find the D shaped area Fig 5...

Page 21: ...per while the unit is still hot IMPORTANT Use an oven glove to protect your hand from potential burns Scrape the major spill or melted material from the cooking zone and push into a cold area Then tur...

Page 22: ...e side rail with one hand and with the other hand lift the frame up and out of the side clips Fig 5 8 For safety push the side rails back into the grill chamber If you need to remove the side rails to...

Page 23: ...e oven door glass since they can scratch the surface which may result in shattering of the glass Ovens Cook Clean Panels The ovens have side Cook Clean panels which have been coated with a special ena...

Page 24: ...aners on lettering Control knobs handles trims Plastic chrome copper or lacquered brass Warm soapy water soft cloth Brass Brass polish Oven door glass Glass lid some models only Toughened glass Hot so...

Page 25: ...abrasive cleaners as these will damage the surface 6 Troubleshooting An oven fan is noisy The note of the oven fan may change as the oven heats up this is perfectly normal The knobs get hot when I us...

Page 26: ...15W 230V lamp FOR OVENS It must be a special bulb heat resistant to 300 C Fig 6 1 Turn off the power at the circuit breaker Before removing the existing bulb turn off the power supply and make sure t...

Page 27: ...ety Installation and Use regulations The relevant Building IEE regulations In the Republic of Ireland the cooker must be installed in accordance with The installation must be carried out by a competen...

Page 28: ...hat this is carried out before installation After converting the appliance please attach the Gas Conversion sticker over the appropriate area of the data badge this will identify the gas type for whic...

Page 29: ...on We cannot accept responsibility for damage caused by normal use of the cooker to any material that de laminates or discolours at temperatures less than 65 C above room temperature We recommend a ga...

Page 30: ...y Bracket or Chain Unless otherwise stated a cooker using a flexible gas connector must be secured with a suitable stability device Suitable stability devices are shown in Fig 7 7 Fig 7 8 and Fig 7 9...

Page 31: ...most builders merchants The gas supply needs to terminate with a down facing bayonet The connector is located just below the hotplate level at the rear of the cooker If in doubt contact your supplier...

Page 32: ...y cause nuisance tripping so we recommend that the cooker is protected on an individual RCD Residual Current Device or RCBO Residual Current Breaker with Overload IF IN DOUBT PLEASE CONSULT A SUITABLY...

Page 33: ...Final Fitting Fitting the 2 piece Plinth Fit the inner plinth to the bottom front of the cooker using the 4 screws provided Fig 7 13 Fit the outer plinth 2 screws 1 each end to the inner plinth The he...

Page 34: ...completion n n DO NOT use reconditioned or unauthorised gas controls n n Disconnect from the electricity and gas supply before servicing n n Before electrical reconnection check that the appliance is...

Page 35: ...a wok burner Lift off a burner head Fit the pressure gauge to the jet Turn on and light one of the other burners Turn on and press in the control knob for the burner with the pressure gauge fitted Th...

Page 36: ...2 K J I2 I1 G1 F1 K K D C3 J J K F3 A2 B1 B2 F2 G2 G3 G4 H1 H2 K K A2 L B3 Code Description A1 Hob control A2 Hob elements B1 Grill control B2 Grill element left hand side B3 Grill element right hand...

Page 37: ...ternal 126 external 82 Large burner 40 3 0kW 134 3 0kW 210g h 87 Medium burner 32 1 7kW 109 1 7kW 119g h 68 Small burner 28 1 0kW 75 1 0kW 70g h 51 Ceramic Hob Front Element Rear Element Maximum power...

Page 38: ...34...

Page 39: ...ations concerning cleaning materials have been followed Has not been repaired by persons or organisations other than those authorised to act on behalf of AGA Rangemaster Exceptions Items not included...

Page 40: ...ed Office Juno Drive Leamington Spa Warwickshire CV31 3RG Search Rangemaster UK Rangemaster continuously seeks improvements in specification design and production of products and thus alterations take...

Reviews: