background image

23

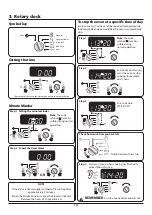
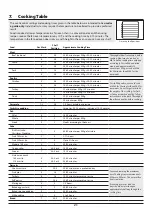
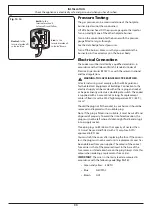
ArtNo.331-0005 Removing the grill rail

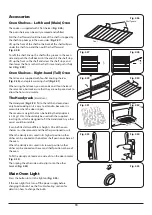
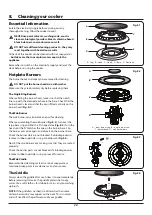
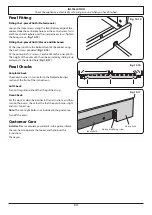
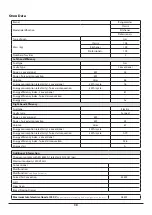
ArtNo.331-0004 Removing the grill frame

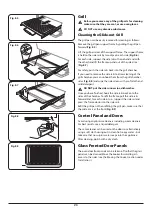
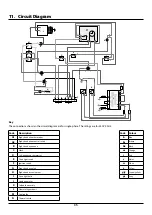
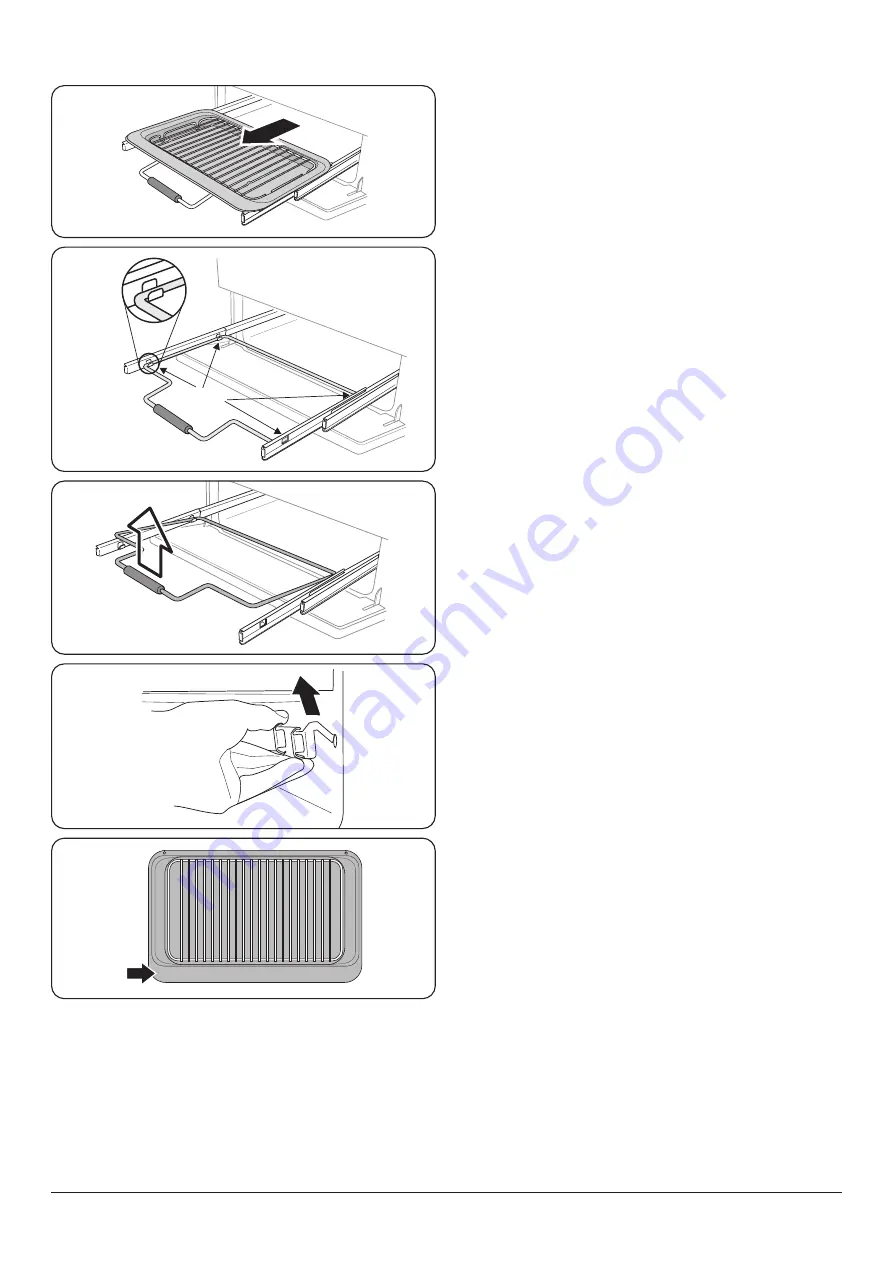
ArtNo.331-0003 Grill frame out, no pan

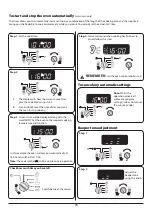
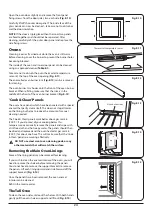
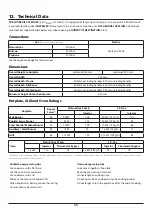
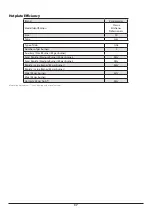
ArtNo.331-0001Grill pan pulled forwards
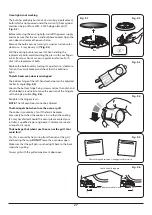
Fig. 8.6 

Fig. 8.7 

Fig. 8.8 

Fig. 8.9 

Grill


n

Before you remove any of the grill parts for cleaning. 

make sure that they are cool, or use oven gloves.


n

DO NOT use any abrasive substances.

Cleaning the Glide-out Grill

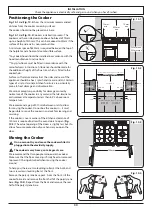
The grill pan can be easily removed for cleaning as follows:
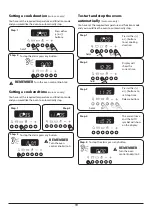
Remove the grill pan support frame by pulling the grill pan 

forward (

Fig. 8.5

).

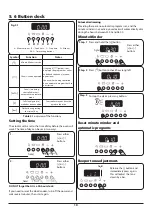
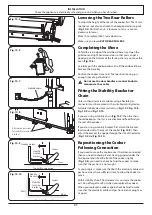
Lift the grill pan clear of the support frame. The support frame 

is held to the side rails by two clips on each side (

Fig. 8.6

).

For each side, support the side rail with one hand and with 

the other hand lift the frame up and out of the side clips  

(

Fig. 8.7

).

For safety, push the side rails back into the grill chamber.
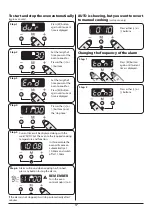
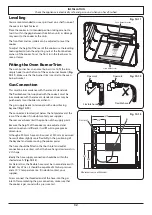
If you need to remove the side rails to allow cleaning of the 

grill chamber, you can unhook them from the grill chamber 

sides (

Fig. 8.8

) and wipe the sides clean with a soft cloth and 

mild detergent.


n

DO NOT put the side runners in a dishwasher.

Once you have finished, hook the side rails back onto the 

sides of the chamber. To refit the frame, pull the side rails 

forward and, for each side in turn, support the side rail and 

press the frame down into the side rails. 
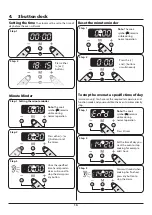
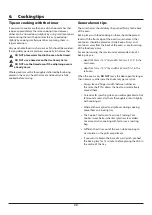
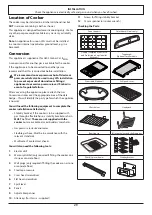
Refit the grill pan. When refitting the grill pan, make sure that 

the wide rim is at the front (

Fig. 8.9

).

Control Panel and Doors

Avoid using any abrasive cleaners including cream cleaners. 

For best results, use a liquid detergent.
The same cleaner can be used on the doors or, alternatively 

using a soft cloth wrung out in clean hot soapy water – but 

take care that no surplus water seeps into the appliance.
After cleaning, polish with a dry cloth.

Glass Fronted Door Panels

The oven door front panels can be taken off so that the glass 

panels can be cleaned. Move the cooker forward to gain 

access to the sides (see the ‘Moving the Cooker’ section under 

‘Installation’).

Fig. 8.5 

ArtNo.331-0006 Grill pan plan

Summary of Contents for PROP90NGF

Page 1: ...Classic Kitchener and Professional 90 Gas U111215 03 USER GUIDE INSTALLATION INSTRUCTIONS...

Page 2: ...acted via e mail Facebook Twitter message or Instagram comment 4 We cannot guarantee your kitchen will be professionally photographed 4 Any photographs received and professional photographs taken will...

Page 3: ...Door Panels 23 Ovens 24 Cleaning Table 25 9 Troubleshooting 26 10 Installation 28 Dear Installer 28 Safety Requirements and Regulations 28 Provision of Ventilation 28 Location of Cooker 29 Conversion...

Page 4: ...ii...

Page 5: ...and will retain heat even after you have stopped cooking Care should be taken to avoid touching heating elements The cooker should not be placed on a base To avoid overheating DO NOT install the cooke...

Page 6: ...llation and Use regulations Relevant Building IET regulations If You Smell Gas DO NOT turn electric switches on or off DO NOT smoke DO NOT use naked flames Turn off the gas at the meter or cylinder Op...

Page 7: ...t in fire n NEVER try to extinguish a fire with water but switch off the appliance and then cover the flame e g with a lid or a fire blanket NEVER leave a chip pan unattended Always heat fat slowly an...

Page 8: ...ow People with respiratory or allergy problems should vacate the area for this brief period Ventilation The use of a cooking appliance results in the production of heat and moisture in the room in whi...

Page 9: ...ible parts may be hot when the grill is in use Young children should be kept away Cooling Fan This appliance has a cooling fan which will operate when the appliance has been in use for a period of tim...

Page 10: ...sive cleaners as these will damage the surface DO NOT use steel wool oven cleaning pads or any other materials that will scratch the surface NEVER store flammable materials in the drawer This includes...

Page 11: ...flow of gas if the flame goes out When the igniter button is pressed in sparks will be made at every burner this is normal Do not attempt to disassemble or clean around any burner while another burne...

Page 12: ...estos or mesh mats are NOT recommended Fig 2 5 They will reduce burner performance and could damage the pan supports You should also avoid using unstable and misshapen pans that may tilt easily and pa...

Page 13: ...non stick and metal cooking utensils e g spatulas will damage the surface Use heat resistant plastic or wooden utensils n DO NOT put it crossways it will not fit properly and will be unstable Fig 2 1...

Page 14: ...urner goes out then the safety device has not held in Turn the grill control knob to 0 and wait for one minute Repeat the operation but hold the button and control knob in for slightly longer The low...

Page 15: ...oximately 10 C higher dishes cooked below approximately 10 C lower Fig 2 20 You can therefore cook dishes requiring different temperatures at the same time S Slow Cooking Left hand Oven The S setting...

Page 16: ...ee Table 2 1 The Fan Oven The right hand oven is a fan oven that circulates hot air continuously which means faster more even cooking The recommended cooking temperatures for a fan oven are generally...

Page 17: ...using the tall oven you can cook on all four shelves at the same time but make sure that they are well spaced out to allow the hot air to circulate The Handyrack Main Oven The Handyrack Fig 2 32 fits...

Page 18: ...normal operation Note The cook symbol remains visible during normal operation OR NOTE If the alarm is not manually switched off it will stop after approximately 2 minutes When the Minute Minder is act...

Page 19: ...set the time of day you want the oven to stop cooking Current time will be displayed along with the word AUTO Set the oven to the required cooking temperature and function Set the cook time Alarm will...

Page 20: ...on 4 3 button clock Minute Minder Setting the minute minder Note The cook symbol remains visible during normal operation Note The cook symbol remains visible during normal operation Note The cook symb...

Page 21: ...on ArtNo 306 0001 3 button clock Alarm will sound when cooking has finished press any button to stop the alarm If the alarm is not stopped it will stop automatically after 7 minutes Set the length of...

Page 22: ...e time of day Table 5 1 overview of the functions ArtNo 302 0002 6BC annotated ArtNo 302 0002 6BC annotated 1 2 Press either or buttons Press either or buttons Setting the time The clock must be set t...

Page 23: ...s automatically main oven only You have set the required temperature and function mode and you would like the oven to automatically stop ArtNo 302 0002 6BC annotated ArtNo 302 0002 6BC annotated ArtNo...

Page 24: ...Other containers should be placed centrally Keep all trays and containers away from the back of the oven as overbrowning of the food may occur For even browning the maximum recommended size of a bakin...

Page 25: ...r remainder Do not forget to include the weight of the stuffing For fresh or frozen prepacked poultry follow instructions on the pack Thoroughly thaw frozen poultry before cooking 6 3 4 15 20 minutes...

Page 26: ...that the burner head is level and that the cap is fitted centrally on the burner head Fig 8 1 The Wok Burner The wok burner can also be taken apart for cleaning When reassembling the wok burner Fig 8...

Page 27: ...chamber you can unhook them from the grill chamber sides Fig 8 8 and wipe the sides clean with a soft cloth and mild detergent n DO NOT put the side runners in a dishwasher Once you have finished hook...

Page 28: ...al enamel that partly cleans itself This does not stop all marks on the lining but helps to reduce the amount of manual cleaning needed The Cook Clean panels work better above gas mark 6 200 C If you...

Page 29: ...eaners on lettering Control knobs handles trims Plastic chrome copper or lacquered brass Warm soapy water soft cloth Brass Brass polish Oven door glass glass lid Toughened glass Hot soapy water cream...

Page 30: ...re in the electrical supply remember to reset the clock to make sure that the timed oven continues to operate Food is cooking too slowly too quickly or burning Cooking times may differ from your previ...

Page 31: ...rn on the circuit breaker and check that the bulb now lights The left hand oven door is misaligned The bottom hinge of the left hand oven door can be adjusted to alter its angle Fig 9 5 Loosen the bot...

Page 32: ...In the Republic of Ireland the cooker must be installed in accordance with The installation must be carried out by a competent person and installed in accordance with the current edition of IS813 Dome...

Page 33: ...for another gas is available for the cooker If the appliance is to be converted to another gas we recommend that this is carried out before installation n We recommend an overpressure shut off device...

Page 34: ...rniture and walls at the sides and rear of the appliance should be heat splash and steam resistant Certain types of vinyl or laminate kitchen furniture are particularly prone to heat damage and discol...

Page 35: ...e kept as short as is practicable and fixed firmly to the rear of the cooker If you are using a stability bracket first attach the bracket location device to the rear of the cooker Fig 10 8 Then adjus...

Page 36: ...rds Hoses may be purchased at most builders merchants The gas supply needs to terminate with a down facing bayonet Fig 10 12 The connector is located just below the hotplate level at the rear of the c...

Page 37: ...The cooker is supplied with a 3 core cable 2m long If a replacement cable is fitted it must be 250V high temperature PVC 85 C 1mm Should the plug not fit the socket in your home it should be removed...

Page 38: ...ing the 4 or 5 screws provided Fig 10 16 Fit the outer plinth 2 screws 1 each end to the inner plinth The height of the outer plinth can be adjusted by sliding it up or down via the slotted hole Fig 1...

Page 39: ...on A1 Right hand oven thermostat A2 Right hand oven control switch B Right hand oven neon C Clock D Left hand oven thermostat E Oven light switch F Ignition switch G Right hand oven fan H Right hand o...

Page 40: ...ate Bypass Screw Natural Gas 20 mb L P Gas Injector Injector Wok burner 62 4 0kW 148 4 0 kW 291 g h 103 Rapide Large Burner 40 3 kW 134 3 0 kW 218 g h 87 Semi Rapide Medium Burner 32 1 7kW 109 1 7 kW...

Page 41: ...of gas burners 5 Auxiliary Small Burner EE gas burner Semi Rapide Medium Burner EE gas burner 58 Semi Rapide Medium Burner EE gas burner 58 Rapide Large Burner EE gas burner 56 Rapide Large Burner EE...

Page 42: ...on Energy class A Right hand Efficiency Fuel type Electric Cavity type Fanned Power conventional kW Power forced air convection kW 2 5 Volume Litres 67 Energy consumption electricity conventional kWh...

Page 43: ...by persons or organisations other than those authorised to act on behalf of AGA Rangemaster Exceptions Items not included under the free 1 year guarantee include pan supports griddles wok rings bakin...

Page 44: ...cular appliance Clarence Street Royal Leamington Spa Warwickshire CV31 2AD England Consumer Services 44 0 1926 457628 Fax 44 0 1926 450526 E mail consumers agarangemaster co uk www rangemaster co uk F...

Reviews: