background image

3

2.  Hob Overview

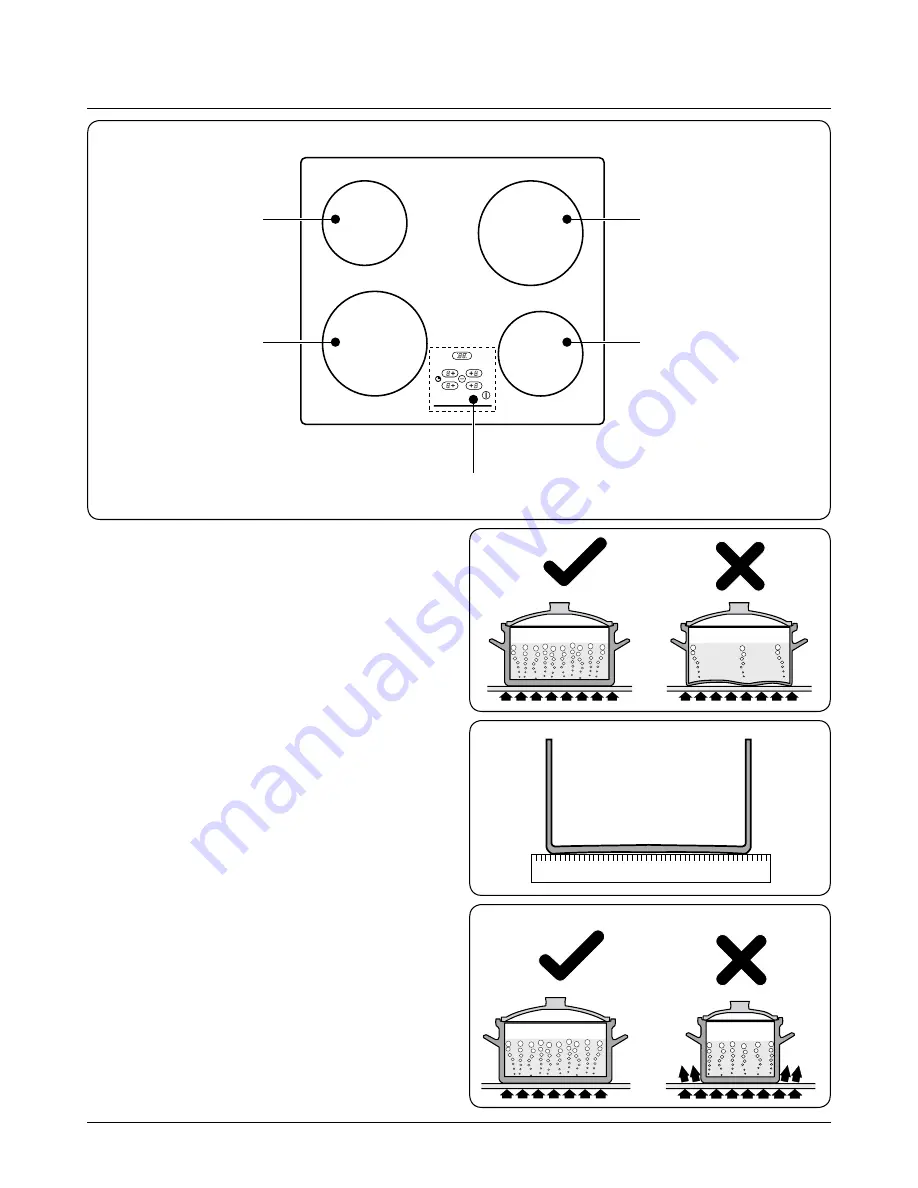
The ceramic hob comprises of four cooking zones containing 
heating elements with different ratings and diameters  
(Fig.2-1), each with a residual heat indicator. Each zone is 
controlled via the touch sensitive controls with an audible 
signal when operated.

The Hob

Use only pans that are suitable for ceramic hobs. We 
recommend stainless steel and enamelled steel pans as pots 
and pans with copper or aluminium bases leave traces on the 
hob that are difficult to remove. Glass-ceramic cookware is 
not suitable because of its poor conductivity. 

The kind of pan 

you use and the quantity of food affects the setting required. 
Higher settings are required for larger quantities of food

.

Pots and pans should have thick, smooth, flat bottoms  
(Fig.2-2). This ensures the maximum heat transfer from the 
hob to the pan, making cooking quick and energy efficient. 
Never use a round-bottomed wok, even with a stand.

The very best pans have bases that are very slightly curved 
up when cold (Fig.2-3). If you hold a ruler across the bottom 
you will see a small gap in the middle. When they heat up the 
metal expands and lies flat on the cooking surface.

Make sure that the base of the pan is clean and dry to prevent 
any residue burning onto the hob panel. This also helps 
prevent scratches and deposits.

Always use pans that are the same size as (or slightly larger 
than) the areas marked on the hob top (Fig.2-4). Using 
smaller pans wastes heat, and any spillage will be burnt on. 
Using a lid will help the contents boil more quickly.

ArtNo.315-0002 RC60 ceramic hob

ELECTRONIC CONTROL 

��������������������������

��������������������������

��������������������������

��������������������������

�����������������������������

ArtNo.312-0004 Correct pans ceramic

ArtNo.312-0005 Curved

bottomed pan ceramic

Fig.2-1

Fig.2-2

Fig.2-3

ArtNo.312-0006 Correct pan sizes

Fig.2-4

DocNo.022-0001 - Overview - RC60 ceramic

Summary of Contents for RC60

Page 1: ...RC60 Ceramic Hob RC60SS Ceramic Hob User Guide Installation Service Instructions U109915 02...

Page 2: ...Contents Before You Start 1 Hob Overview 3 Cleaning Your Hob 8 Troubleshooting 9 Installation 10 Circuit Diagram 13 Technical Data 14 Warranty After Sales Service 15...

Page 3: ...in use make sure that the hob is switched OFF Always keep combustible materials e g curtains and ammable liquids a safe distance away from your hob Do not spray aerosols in the vicinity of the hob wh...

Page 4: ...anything between the base of the pan and the hob surface e g asbestos mats aluminium foil Wok stand Care should be taken that no water seeps into the appliance Avoid heating an empty pan Doing so may...

Page 5: ...mum heat transfer from the hob to the pan making cooking quick and energy e cient Never use a round bottomed wok even with a stand The very best pans have bases that are very slightly curved up when c...

Page 6: ...g 0 and a ashing dot Fig 2 6 Note If further hob functions are not activated within 20 seconds it will automatically shut down To activate a cooking zone Select the required cooking zone by pressing t...

Page 7: ...ay Fig 2 11 Preheat Function This function allows for rapid heating up of the element to bring the selected cooking zone up to temperature Once the zone is at the required cooking temperature the powe...

Page 8: ...reduce the cooking time Interrupting the timer Select the required cooking zone the red dot will light up in the display Press the timer key and using the key reduce the cooking time to 00 This will...

Page 9: ...ght cooking zone key and the key simultaneously The L in each of the digital displays will be replaced by a 0 and a ashing dot After switching o the hob the child lock function will remain activated N...

Page 10: ...cular a Ceramic Hob Cleaner set with scraper More information is available in the Cookware Collection brochure supplied with your hob and on our website www rangemaster co uk Regular cleaning is recom...

Page 11: ...d in the hob surface Isolate the hob immediately from the power supply and arrange for its repair Do not use the hob until it has been repaired The hob is scratched Always use the cleaning methods rec...

Page 12: ...shower This appliance is designed for domestic cooking only Use for any other purpose could invalidate any warranty or liability claim This appliance should not be installed in a boat or caravan The...

Page 13: ...work surface to prevent liquid from entering into the cabinet A tape seal is supplied with the hob Carefully follow these instructions to correctly apply the seal Turn the hob over and place in on a s...

Page 14: ...pply can be made with either a plug and socket or be permanently wired via a double pole switch The hob is supplied with a 3 core cable 2m long If a replacement cable is tted it must be 250V high temp...

Page 15: ...13 7 Circuit Diagram ArtNo 080 0015 RG60 RGG60 circuit diagram N L A B Spark generator Ignition switch DocNo 091 0001 Circuit diagram RG60 RGG60 gas...

Page 16: ...top 5mm Below worktop 40mm 60mm including connection box Overall width 580mm see Positioning of the hob Overall depth 510mm Space for xing See Positioning of the hob Minimum space above hotplate 650mm...

Page 17: ...oice and the product code serial number The 2 years free maintenance for the operation of the appliance started from the date of purchase of this product Any cosmetic damage to the appliance must be r...

Page 18: ...16...

Page 19: ...17...

Page 20: ...www rangemaster co uk ArtNo 000 0003 CE logo DocNo 000 0001 Back cover Rangemaster...

Reviews: