background image

17

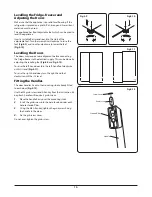
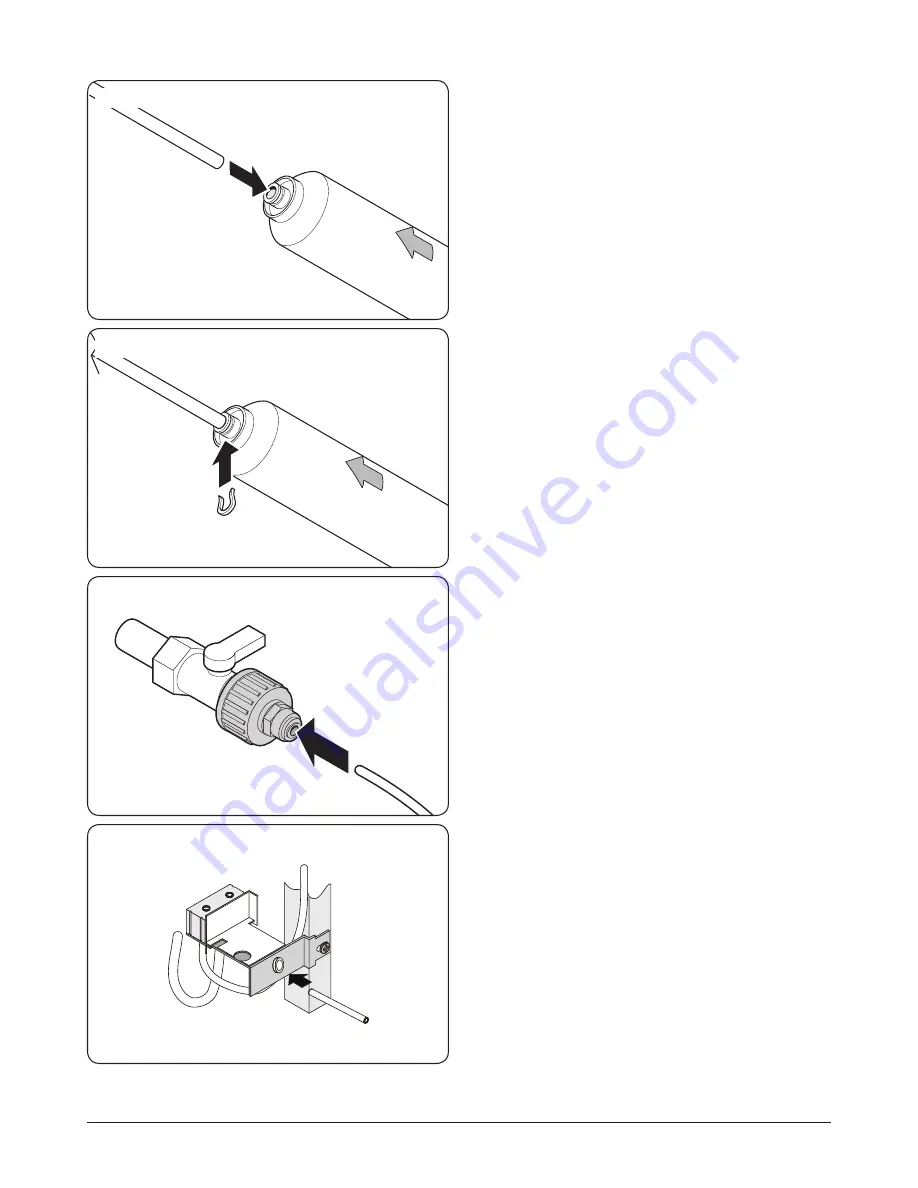
ArtNo.601-0010 - SxS 661-9 - Pipe to filter

Fig.4.13 

Electrical Supply Connection

Connect the appliance to the electrical supply (220-240 V ~ 

50 Hz) with the plug and lead, which are fitted.
Connections to the mains supply should be in accordance 

with local regulations.

n

n

The appliance must be plugged into an earthed 

socket.

n

n

Always make sure that the plug is accessible after 

the appliance has been positioned.

Water Supply Connection

n

n

It is recommended to have this product installed by 

a qualified technician.

Note: 

For further installation details refer to the instructions 

supplied with the water filter.
• 

Pressure of the cold water supplied to the automatic 

icemaker is between 1.5-8.5 bar.

• 

The water tube should be of an appropriate length, 

usually 8 metres, and should be free of bends after 

being inserted into place. If the water pipe is too long 

then the water pressure will be reduced, affecting the 

ice and cold water content.

• 

DO NOT connect water supply when the ambient 

temperature is below 0 °C, otherwise the water pipe 

may freeze.

• 

Always use potable/drinking water.

• 

Keep the water tube clear of heat sources.

• 

The water filter is there to filter impurities in the water, 

and to make ice clean and hygienic. 

It cannot sterilise 

or destroy anything

, so be certain to connect the water 

pipe to a drinkable water source.

Fitting the Water Filter

Measure out and cut the length of pipe required from the 

filter to the Fridge-freezer, and from the filter to the water 

supply. Make sure that you achieve a square cut using a sharp 

knife.
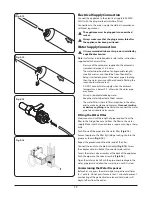
Push fit one of the pipes into the water filter 

(Fig.4.13)

.

Secure the pipe to the filter by sliding a locking clip into the 

groove as shown 

(Fig.4.14)

.

Repeat the procedure on the other end of the filter.
Connect the end into the plastic adaptor 

(Fig.4.15)

. Screw 

the adaptor onto a suitable ¾” connector water outlet.
Access the water valve assembly at the back of the appliance. 

Push the pipe into the valve assembly 

(Fig.4.16)

.

Open the water valve to flush the pipe, check leakage in the 

water pipe joints and allow the water to run until it is clear.

Comissioning the Water Dispenser

Before first use, press the water dispenser pad several times 

for 1 minute. Do not press for more than 1 minute to prevent 

overheating of the pad activator solenoid. Cold water will 

begin to flow from the outlet.

ArtNo.601-0005 - SxS 661-9 - Securing the pipe

Fig.4.14 

ArtNo.601-0014 - Pipe to BSP connector

Fig.4.15 

Fig.4.16 

Summary of Contents for SxS 15

Page 1: ...SxS 15 Refrigerator User Guide Installation Service Instructions U110489 01A...

Page 2: ...11 Safety 11 Automatic Defrosting 11 Alarm Function 11 Display Power Down 11 3 Food Storage Tips 12 Tips on Storing Fresh Food 12 Tips on Freezing Food 13 4 Installation 14 Positioning Your Appliance...

Page 3: ...ms before disposal it may even be best to remove the appliance door completely to prevent children from becoming trapped inside the appliance The appliance must be connected to the power supply safely...

Page 4: ...any event should you inhale or come into contact with R600a gas we advise you to consult your own doctor Caring for the Environment Disposing of Your Packaging Your new refrigerator was protected by...

Page 5: ...storage shelves 6 2 freezer door shelves 7 2 freezer drawers 8 2 crisper drawers 9 4 fridge door shelves 10 4 fridge storage shelves 11 Fridge LED light CFC free and frost free Super freeze super cool...

Page 6: ...etc 7 Cooked meats sausage etc 8 Fruits vegetables or salads Shelves The height of the shelves can be adjusted to fit your storage needs The shelves will not pull out accidentally when you remove foo...

Page 7: ...tilt the front upwards so that the restraining pegs are clear of the side guides Fig 2 5 and pull towards you Keep the shelf tilted to allow the retaining stops to clear the side guides When repositio...

Page 8: ...how often the freezer door is opened Do not store ice cubes which are produced during the first batch of cubes following appliance start up or after a prolonged break Discard these cubes To allow the...

Page 9: ...90 clockwise Fig 2 7 Reinstall the icebox making sure that the catch on the tray fits into the shelf slot n n By removing the ice box additional space for food storage is provided Please install the s...

Page 10: ...aker on off button C Freezer temperature button D Fridge temperature button E Function selector button F Function confirm button G Dispenser status icon H Filter change icon I Ice maker on icon J Quic...

Page 11: ...function is to chill food quickly so that the food remains fresh for as long as possible Use this feature before putting large quantities of food in to the fridge chamber at any one time The Quick Co...

Page 12: ...k Freeze mode is selected 2 Now press the OK button the S Frz icon will turn off Quick Freeze mode is now turned off Adjusting the Fresh Food Temperature Press the Ref Temp button Fig 2 14 The fridge...

Page 13: ...ith a phutt sound Hold the glass still for a further 2 3 seconds for ice 1 2 seconds for water after you have filled your glass and released the lever switch as additional water or ice may be produced...

Page 14: ...life Some foods like onions garlic bananas and root vegetables are better stored at room temperature than in the fridge Melon pineapples and bananas can go directly into the freezer after preparing f...

Page 15: ...pe and when it is safe to eat Take food from the freezer to defrost when needed Defrosted food cannot be refrozen unless it is cooked Do not put too much fresh food into the freezer at once This could...

Page 16: ...the refrigerator close to a corner sufficient spacing must be left for opening the doors and removing the shelves Fig 4 2 This appliance should be at least 100mm from any electric or gas cooker and 30...

Page 17: ...llar as shown Fig 4 4 and remove the water pipe Remove the top cap The Freezer Door 1 Undo the hinge cover screw and remove the cover Fig 4 5 Disconnect all wires except for the grounding wire 2 Undo...

Page 18: ...lling feet Fig 4 9 and Fig 4 10 To raise the left hand door turn the left hand foot clockwise until it is level Fig 4 11 To raise the right hand door turn the right hand foot clockwise until the it is...

Page 19: ...rces The water filter is there to filter impurities in the water and to make ice clean and hygienic It cannot sterilise or destroy anything so be certain to connect the water pipe to a drinkable water...

Page 20: ...steel parts make sure your hands are not wet when touching the parts n n DO NOT use HOT water to clean the glass shelves as they may break or crack n n After installing a new water filter discard all...

Page 21: ...1 Try to reduce the frequency of opening doors 2 1 2 The doors are left open 2 1 2 1 Take extra care to keep gaskets sealing well around the perimeter of the doors Keep gaskets clean and dirt free 2 2...

Page 22: ...upply Cold water ice dispenser 6 1 Cold water not dispensing 6 1 1 The freezer or refrigerator door is not fully closed 6 1 1 1 Close all appliance doors The water supply pipe is not open Open the wat...

Page 23: ...ck the electrical supply to the room Call the local electricity company 9 2 The fridge operates frequently or operates for a long time 9 2 1 The room temperature or ambient temperature is high 9 2 1 1...

Page 24: ...number is located inside the refrigerator on the top left hand side The 2 years free maintenance for the operation of the appliance started from the date of purchase of this product Any cosmetic damag...

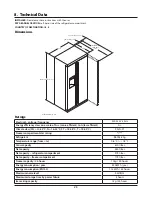
Page 25: ...f A more efficient to G less efficient A Climate class SN 10 32 C N 16 32 C ST 18 38 C T 18 43 C SN N ST Freezer compartment star rating Refrigerant R600a 80g Temperature range from to 0 8 C 18 C Gros...

Page 26: ...33 Notes...

Page 27: ...34 Notes...

Page 28: ...w rangemaster co uk DocNo 000 0001 Back cover Rangemaster Clarence Street Royal Leamington Spa Warwickshire CV31 2AD England Tel 44 0 1926 457400 Fax 44 0 1926 450526 E mail consumers rangemaster co u...

Reviews: