background image

26

WARNING - SERVICING TO BE CARRIED OUT ONLY BY AN AUTHORISED PERSON

Disconnect from electricity before servicing. Check appliance is safe when you have finished. 

LH oven

Pull cooker forward to gain access to the 
cover box at the rear of the cooker. Remove 
the screws securing the cover and lift clear.

Feed the thermostat capillary out of the oven. 
Disconnect wiring from thermostat. Remove 2 screws 
holding thermostat to mounting panel. Fit new 
thermostat and reassemble in reverse order. Ensure 
that the phial is clipped to the oven back with the phial 
centrally positioned between the clips.

Check operation of thermostat.

8.  To Change Grill Controller 

Lift up the ceramic hob top (see 2). Remove control 
panel (see 4). Disconnect wiring from controller. 
Remove 2 screws holding controller to mounting panel. 
Fit new controller and reassemble in reverse order. 
Check for correct operation.

9.  To Remove Grill Door

Remove the left hand side panel (see 1). Remove the 
control panel (see 4). Remove the centre cover strip 
(5 screws, 2 top, 2 bottom, 1 in middle). Remove the 
two countersunk screws (1 each side) securing the grill 
hinge arms to the front of the grill chamber.

NOTE: The arms are spring tensioned. Carefully remove 
the grill door. Retain the gaskets.

Reassemble in reverse order ensuring that the gasket 
is fi tted between the hinge arm and the front of the grill 
chamber.

10. To Remove Main Oven Door

Open oven door and remove Handyrack (where fi tted) 
by springing one side out of the bracket on the door and 
sliding the other side free. Support the door and remove 
the two screws securing the upper hinge and packing to 
the cooker front. Remove the door from the lower hinge 
by lifting slightly and moving outwards.

Reassemble in reverse order.

11. To Change Main Oven Door Outer Panel

Move the cooker forward to gain access to the sides.

Open the oven door slightly and remove the front panel 
fi xing screws from the door sides (two each side). 

Carefully lift off the outer door panel. 

Remove door handle from panel by unscrewing 2 
retaining nuts. Fit door handle to new panel

Fit panel to door. Reassemble in reverse order.

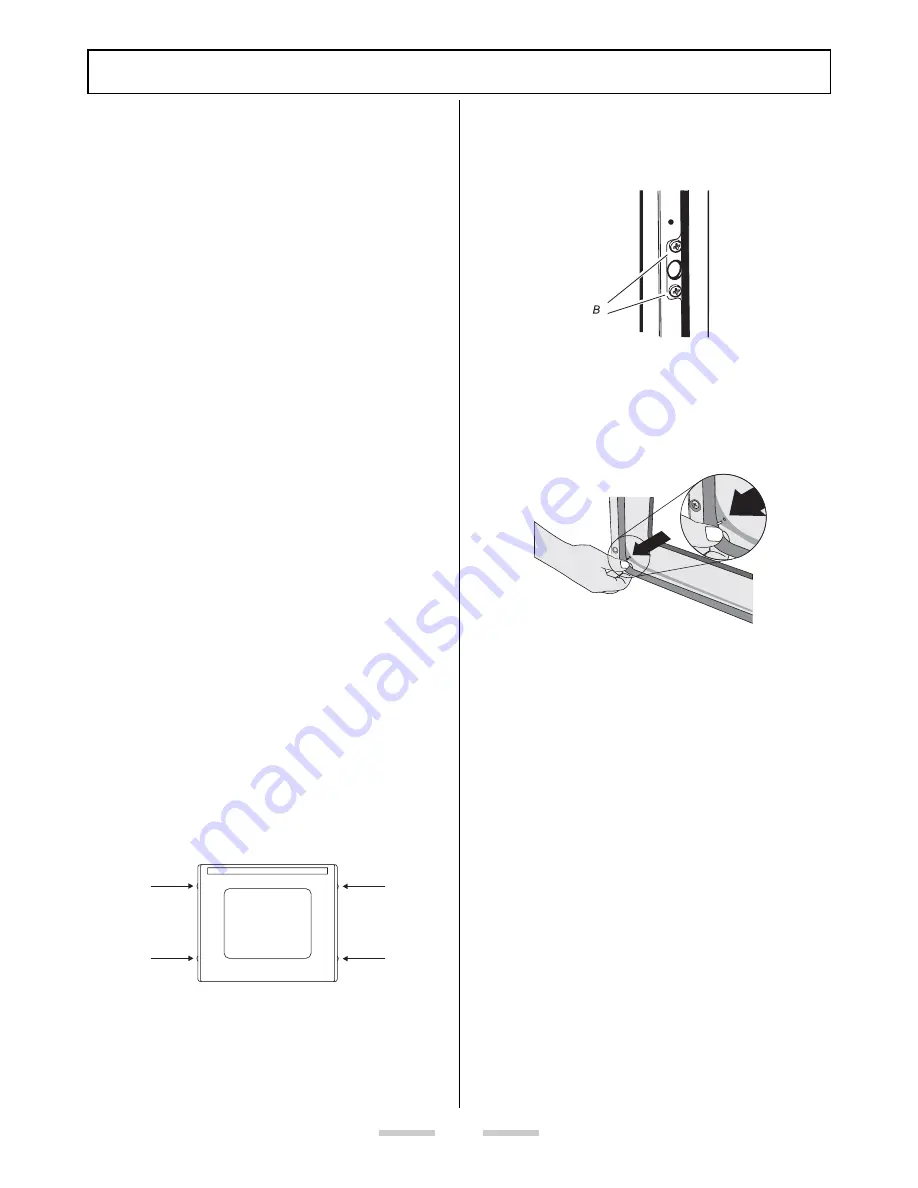
12. To Change Main Oven Door Latch

Remove outer door panel (see 15). Remove screws 
‘B’ holding latch assembly to inner door panel. Fit new 
catch and reassemble in reverse order.

Check correct door operation.

13. To Change Oven Door Seal

Open oven door. The seal is held in place by small 
hooks on the rear face. At the corner pull seal diagonally 
away from the door centre until that hook is released. 
Proceed to the next hook and release it in a similar way, 
and so on. Use force if the hooks are stiff, as the old 
seal will be discarded.

When fi tting new seal, position the seal join at the 
bottom. Hook the new seal in one of the corner holes of 
the door, and proceed round the door snapping in each 
hook in turn.

14. To Adjust Main Oven Door Catch Keep

Open oven door, slacken off locknut at base of keep, 
and screw in or out as required until required fi t is 
obtained. Retighten locking nut.

Summary of Contents for Toledo 90 Gas

Page 1: ...90 Ceramic Electric Users Guide Installation Service Instructions U102270 05...

Page 2: ...that no water seeps into the appliance During use and afterwards the appliance will be warm so be careful with little children If the younger members of your family are allowed into the kitchen we st...

Page 3: ...Page 10 Main Oven shelves Page 10 The Handyrack Page 11 Oven light Page 11 Tall oven shelves Page 11 Oven cooking guide Page 12 Cleaning your cooker Page 13 Moving your cooker Page 16 Troubleshooting...

Page 4: ...y residue burning onto the hob panel This also helps prevent scratches and deposits such as lime specks 4 Always use pans that are the same size as or slightly larger than the areas marked on the hob...

Page 5: ...d off with care immediately Never let sugar spillage cool before trying to remove it If sugar or foods with high sugar content aluminium foil or plastic items are accidentally allowed to melt on the h...

Page 6: ...pan grid slide the grill pan onto the side supports Adjust the heat to suit by turning the knob Make sure it is pushed right in and touches the back stop Never close the grill door when the grill is o...

Page 7: ...lle at the rear of the hotplate This is perfectly normal As this steam can condense to water droplets on the cool outer trim of the oven it may be necessary during cooking to wipe away any moisture wi...

Page 8: ...T then press once to stop the beep press again to return to manual cooking To start and stop the oven automatically Before you set the clock you must have two numbers clearly in mind The cook period w...

Page 9: ...on the oven ovens first Then you can adjust either of them manually in the normal way You can set the oven to turn on any time over the following 24 hour period If you want to cook more than one dish...

Page 10: ...d them The Cook Clean oven liners see Cleaning your cooker work better when fat splashes are avoided Cover meat when cooking To reduce fat splashing when you add vegetables to hot fat around a roast d...

Page 11: ...standing on the base of the oven When the Handyrack is used in its lowest position other dishes can be cooked on the second shelf position of the oven or standing on the base of the oven To fit the Ha...

Page 12: ...g 20 25mins 190 C 15 20mins per 500g 15 20mins Turkey 150 C 20 25mins per 500g 20 25mins 190 C 15 20mins per 500g 15 20mins Stuffed Poultry Cook at 200 C or at 200 C for 20mins then 160 C for remainde...

Page 13: ...should be washed in hot soapy water After grilling meats or any foods that soil leave to soak for a few minutes in the sink immediately after use Stubborn particles may be removed from the grid by usi...

Page 14: ...d the hob is cool Remove excess burned on substance with a single edged razor scraper Hold the scraper at approximately a 30 angle to the surface and scrape off the burned on matter as you would scrap...

Page 15: ...r scourer if necessary Oven and Grill Part Finish Recommended Cleaning Method Sides floor roof of oven NOT COOK CLEAN OVEN PANELS see below Enamel Any proprietary oven cleaner that is suitable for ena...

Page 16: ...ay be required to move it There are two levelling rollers at the back and also two screw down levelling feet at the front Open the grill door and right hand oven door so that you can get a good grip o...

Page 17: ...the back stop when grilling If there is an installation problem and I don t get my original installer to come back to fix it who pays You do Service organisations will charge for their call outs if t...

Page 18: ...nformation on the key lock feature of the clock Oven temperature getting hotter as the cooker gets older If turning the knob down has not worked or only worked for a short time then you may need a new...

Page 19: ...e allowed to sit or stand on any part of the appliance Teach them not to play with controls or any other part of the cooker Never store anything of interest to children in cabinets above a cooker chil...

Page 20: ...ypes of glass glass ceramic earthenware or other glazed containers are suitable for hob cooking others may break because of the sudden change in temperature Use proper pan size select pans having flat...

Page 21: ...ny Installer s Telephone number Installation Regulations This appliance must be installed by a qualified electrician to comply with the relevant regulations and also the local electricity supply compa...

Page 22: ...of the cooker to any material that de laminates or discolours at temperatures less than 65 C above room temperature For safety reasons curtains must not be fitted immediately behind the cooker We rec...

Page 23: ...fold the rear edge of pack base tray Open the grill door and the Tall oven door Grip under the facia panel and lift the front of the cooker Carefully push the cooker backwards off the pack base Remove...

Page 24: ...see fig Check that the links are correctly fitted and that the terminal screws are tight Secure the mains cable using the cable clamp This shows the single phase connection Current Operated Earth Leak...

Page 25: ...electricity supply Pull off the push fit control panel end caps at each end and remove the end fixing screws under the end cap Pull off all the control knobs Open the grill and oven doors and remove t...

Page 26: ...n oven door and remove Handyrack where fitted by springing one side out of the bracket on the door and sliding the other side free Support the door and remove the two screws securing the upper hinge a...

Page 27: ...to gain access to the rear Remove screws securing the electric cover to the back sheet and remove cover Disconnect the 3 terminals connected to the fan noting their position Remove oven inner back se...

Page 28: ...appliance is safe when you have finished 22 To change Main oven light bulb Disconnect from electricity supply Remove the oven inner back see 15 The oven light cover is now accessible Unscrew the cover...

Page 29: ...regulator D Right hand front hob energy regulator E Earth terminal F Right hand end hob energy regulator H Clock I Left hand oven thermostat J Right hand oven thermostat K Grill energy regulator L Lin...

Page 30: ...See Positioning of Cooker Minimum space above hotplate 650mm Ratings Total Load At 230V 50Hz 14 8kW approximate total including oven lights oven fan etc Hob Main Oven Tall Oven Ovens Forced air conve...

Page 31: ...31...

Page 32: ......

Reviews: