background image

ALTERNATE MICROPHONES AND INSTALLATION

For best results, the user should select a low-impedance dynamic type

microphone or a transistorized microphone. Transistorized type microphones
have low output impedance characteristics. The microphones  must be
provided with a four-lead cable. The audio conductor and its shielded lead
comprise two of the leads. The third lead is for transmit control and fourth is
for receiving control.

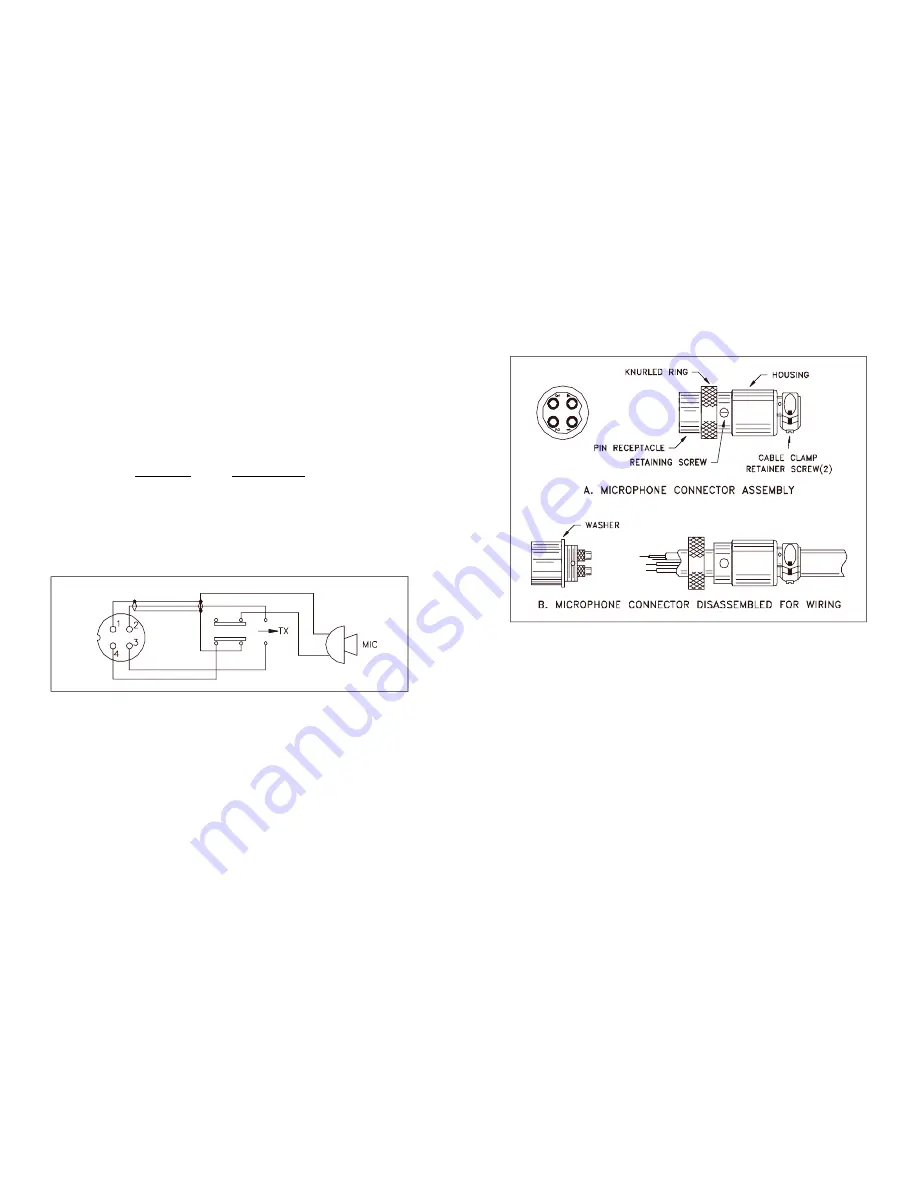
The microphone should provide the functions shown in schematic below.

4 WIRE MIC CABLE

Pin Number

Mic Cable Lead

1

Audio Shield

2

Audio Lead

3

Transmit Control

4

Receive Control

Fig. 1

 Your transceiver microphone schematic.

If the microphone to be used is provided with precut leads, they must be

revised as follows.

1.


Cut leads so that they extend 7/16" beyond  the plastic  insulating jacket
of the microphone cable.

2.


All leads should be cut to the same length. Strip the ends of  each wire
1/8" and tin the exposed wire.

Before beginning the actual wiring, read carefully the circuit and wiring

information provided with the microphone you select. Use the minimum heat
required in soldering the connections. Keep the exposed wire lengths  to a
minimum to avoid shorting when the microphone plug is reassembled.

Fig. 2

 Microphone plug wiring

To wire the microphone cable to the plug provided, proceed as follows :

1.


Remove the retaining screw.

2.


Unscrew the housing from the pin receptacle body.

3.


Loosen the two cable clamp retainer screws.

4.


Feed the microphone cable through the housing, knurled ring and washer
as shown Figure 2.

- 12 -

- 13 -

Summary of Contents for VX-129CN

Page 1: ...nted In Malaysia PD010704 VX 129CN SOLID STATE 40 CHANNEL AM MOBILE CB RADIO OWNER S MANUAL 129 NORMAL LOW PA OFF CAL OFF OFF MIC GAIN VOL SQ RF GAIN SWR CAL SWR S RF ANL CB NB TONE ANT CLARIFY CH9 TX...

Page 2: ...ning The Antenna for Optimum SWR 5 External Speaker 6 Public Address 6 CHAPTER 3 Operation 7 Front Panel 7 Rear Panel 9 Frequency Chart 10 Procedure to Receive And Transmit 11 Alternate Microphone And...

Page 3: ...g Also provide a good electrical connection to the chassis of the vehicle Proceed as follows to mount the transceiver 1 After you have determined the most convenient location in your vehicle hold the...

Page 4: ...t the transceiver will not operate at maximum efficiency without a ground plate unless the vessel has a steel hull Before installing the transceiver in a boat consult your dealer for information regar...

Page 5: ...tion of the microphone and speaker is important when operating the PA at high output levels CHAPTER 3 OPERATION FRONT PANEL 1 MICROPHONE JACK Used to connect microphone for voice source 2 MIC GAIN CON...

Page 6: ...operate when you are in the PA mode In the CB position the PA function is disabled and the radio will transmit and receive on the speaker that is connected 14 TONE SWITCH HI LO This switch changes to...

Page 7: ...mouth and speak clearly in a normal voice This transceiver comes complete with a low impedance dynamic microphone B PROCEDURE TO RECEIVE 1 Be sure that power source microphone and antenna are connect...

Page 8: ...sed is provided with precut leads they must be revised as follows 1 Cut leads so that they extend 7 16 beyond the plastic insulating jacket of the microphone cable 2 All leads should be cut to the sam...

Page 9: ...rtion of the pin receptacle body Note the location of the screw clearance hole in the plug housing with respect to the threaded hole in the pin receptacle body When the housing is completely threaded...

Page 10: ...fice or home 7 Make friends for you as you travel 8 Provide local information to find your destination 9 Help law enforcement officers by reporting drunk and reckless drivers USE CH 9 FOR EMERGENCY ME...

Page 11: ...17...

Reviews: