background image

For technical support, contact us at 1-800-565-5321

 3068-DL Installation Guide


|  REV. D2  |  Page

 9

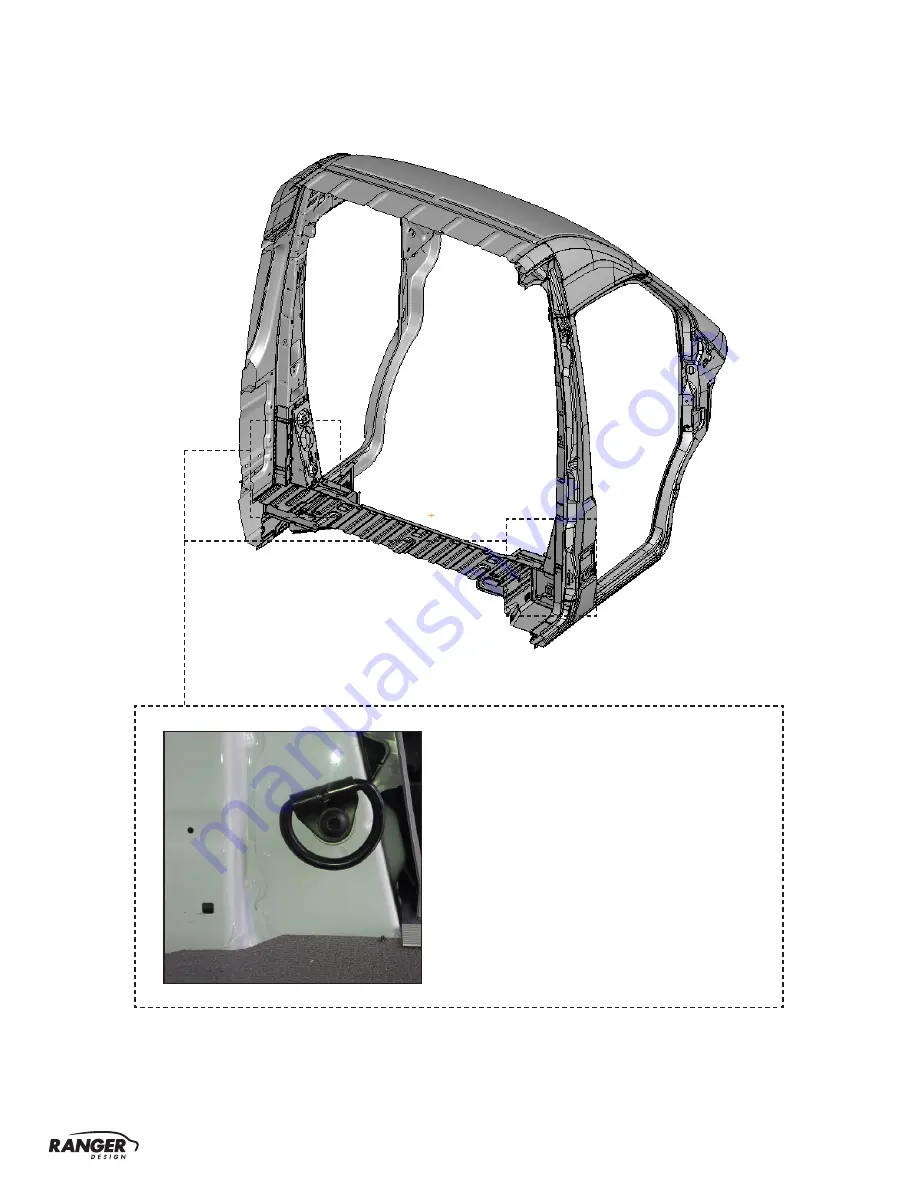
2.2.3

 Floor preparation. 

TOOLS

q

  Cordless Impact

q

  T40 Torque Bit

Put the assembled partition on the side, 
then remove the two D-rings in the pillars, 
for re-use.

Summary of Contents for 3068-DL

Page 1: ...INSTALLATION GUIDE 3068 DL STRAIGHT PARTITION Sprinter Sliding Door Aluminum ...

Page 2: ...q Cordless Drill q Cutter q Mallet q Plusnut Tool q Tape Measure q T40 Torque Bit q 3 8 Drill Bit q 7 16 Socket q 1 2 Socket q 9 16 Wrench q 3 16 Driver Bit q 1 1 Setup q 1 2 Partition Assembly 3 4 5 Phase 1 Assembly q 2 1 Tips On How To Attach a Plusnut q 2 2 Vehicle Preparation q 2 3 Sliding Door Partition Installation 6 7 9 10 13 Phase 2 Installation ...

Page 3: ...cket 1 30 052 Floor Bracket 1 30 500 Edge Trim QTY in Inches 28 70 350 Grab Handle 1 79 932 Warning Label Bilingual 1 30 0530 Passenger Side Panel w Sliding Door 1 30 6805 Driver Side Panel 1 94 3035 Assembly Fastener Bag 1 94 6093 Assembly Fastener Bag 1 96 3022 Installation Fastener Bag 1 1 1 1 Unpack components compare with the bill of materials 30 500 30 051 30 052 30 6805 30 0530 70 350 ...

Page 4: ...D ZINC 98 116 8 Serrated Nut 5 16 18 ZINC 94 116 8 Hex Bolt 5 16 18 3 4 GR 5 ZINC 90 204 8 8 90 204 Hex Bolt 5 16 3 4 98 116 Flat Washer 94 116 Serrated Nut Flat Washer 1 4 3 4 OD ZINC 98 112 17 Plusnut 250 94 130 17 Lock Washer Regular 1 4 ZINC 98 118 17 Hex Bolt 1 4 20 1 1 4 GR 5 ZINC 90 118 17 17 90 118 Hex Bolt 1 4 1 1 4 98 118 Lock Washer 98 112 Flat Washer 94 130 Plusnut 250 Serrated Nut 1 4...

Page 5: ...ASSEMBLY TOOLS q Mallet q Cutter TOOLS q Cordless Impact q 3 16 Driver Bit HARDWARE USED 2 90 893 Cap Screw 1 4 3 4 94 112 Serrated Nut 1 2 1 Remove all the PVC from all the parts then attach the grab handle on the passenger side panel 1 2 2 Remove all the PVC from all the parts then attach the edge trims on these locations ...

Page 6: ...t using the 6490 plusnut tool 6490 HARDWARE USED Flat washer 1 4 Flat washer 1 4 BS 3 4 OD TOOLS q Cordless Impact q 7 16 Socket q 9 16 Wrench TIPS STEP 1 Assemble the 6490 plusnut tool with the hardware needed plusnut and the 9 16 wrench as shown FORWARD REVERSE TIPS STEP 2 Attach the plusnut in the hole by turning the bolt forward using an impact with a 7 16 socket until the plusnut locks then r...

Page 7: ... INSTALLATION 2 2 VEHICLE PREPARATION TOOLS q Cordless Impact q 1 2 Socket HARDWARE USED 4 90 204 Hex Bolt 5 16 3 4 98 116 Flat Washer 94 116 Serrated Nut Lift the driver side panel and passenger side panel w sliding door inside the van put the panels in place then attach the top bracket on the driver and passenger side panels ...

Page 8: ... HARDWARE USED 17 Attach plusnuts in the 15 holes TOOLS q Cordless Drill q 3 8 Drill Bit or Step Drill Enlarge all the holes in the van that are aligned with the holes of the partiton using 3 8 drill bit or step drill NOTE Using the assembled partition as a template check the alignment of the holes with the holes of the van Make new 3 8 holes as necessary ...

Page 9: ...ntact us at 1 800 565 5321 3068 DL Installation Guide REV D2 Page 9 2 2 3 Floor preparation TOOLS q Cordless Impact q T40 Torque Bit Put the assembled partition on the side then remove the two D rings in the pillars for re use ...

Page 10: ...llation Guide REV D2 Page 10 PHASE 2 INSTALLATION 2 3 SLIDING DOOR PARTITION INSTALLATION 2 3 1 Floor bracket installation Attach the floor bracket to the floor re using the 2 D ring bolts HARDWARE USED 2 Use the D ring bolt TOOLS q Cordless Impact q T40 Torque Bit ...

Page 11: ...ion in place then bolt the driver and passenger side panels to the van and floor bracket HARDWARE USED 4 TOOLS q Cordless Impact q 1 2 Socket 90 204 Hex Bolt 5 16 3 4 98 116 Flat Washer 94 116 Serrated Nut HARDWARE USED 12 TOOLS q Cordless Impact q 7 16 Socket 90 118 Hex Bolt 1 4 1 1 4 98 118 Lock Washer 98 112 Flat Washer ...

Page 12: ...ntact us at 1 800 565 5321 3068 DL Installation Guide REV D2 Page 12 2 3 3 Attach the top bracket to the van TOOLS q Cordless Impact q 7 16 Socket HARDWARE USED 5 90 118 Hex Bolt 1 4 1 1 4 98 118 Lock Washer 98 112 Flat Washer ...

Page 13: ...echnical support contact us at 1 800 565 5321 3068 DL Installation Guide REV D2 Page 13 2 3 4 Apply the warning label on the passenger side panel NOTE Put the warning label in a place where it s easy to see ...

Page 14: ...r technical support contact us at 1 800 565 5321 3068 DL Installation Guide REV D2 Page 14 Congratulations you have successfully installed your Sliding Door Partition Thank you for doing business with us ...

Reviews: