TO REMOVE THE
APPLICATOR FROM THE
WORK SITE
1. Flush the applicator. (Refer to "Flushing Pro-
cedures" in the "Maintenance" section.)
2. Ensure all fluid and air pressure hoses are
bled from the system prior to removing line. With
a wrench, loosen and unscrew the fluid hose nut.
Remove the fluid hose assembly.
3. With a wrench, lock the air fitting in place and
loosen the air hose nut using a second wrench.
Completely unscrew the nut and remove the air
hose assembly.
4.
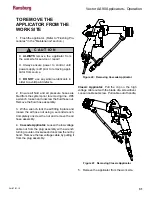
Cascade Applicator:
Loosen the low voltage
cable nut from the plug assembly with a wrench
turning counter-clockwise and unscrew the nut by
hand. Remove the low voltage cable by pulling it
from the plug assembly.
Classic Applicator:
Pull the clip on the high
voltage cable out with the blade of a screwdriver.
Loosen cable set screw. Pull cable out of handle,
ALWAYS
remove the applicator from
the work site for service or repair!
Always ensure power to control unit/
power supply is off prior to removing appli-
cator from source.
DO NOT
use any silicone lubricants in
order to avoid paint defects.
C A U T I O N
!
Figure 40: Removing Cascade Applicator
Figure 41: Removing Classic Applicator
5. Remove the applicator from the work site.
Vector AA90 Applicators - Operation
31
AH-07-01.10

