SECTION 11: O
PERATION AND
M
AINTENANCE
33 of 59
11.2.2 Start-Up the Gas Valve (All Gases)
11.2.2.1 Check Burner Gas Pressure (Single
Stage)
1. Remove the plug in the outlet (burner) pressure
test point and connect a pressure tap and a
manometer. Page 31, Figure 13.
2. With the burner firing, measure the pressure on
the manometer. To adjust the burner pressure,
remove the regulator cover from the valve and
turn the regulator adjustment screw to set the
required burner pressure as stated in the
Technical Data Table for the correct gas and
model on Page 56, Section 16.3 and Page 58,
Section 16.6.
11.2.2.2 Check Burner Gas Pressure (Two Stage)
1. Remove the plug in the gas valve outlet pres-
sure test point and connect a pressure tap and
a manometer. See Page 31, Figure 14.
2. With the unit operating in high fire or low fire,
measure the outlet pressure on the manometer.
Measure burner pressure in both operating
modes. To adjust the burner pressure, remove
plastic cover from regulators and adjust High
and/or Low regulators as needed. Required
burner pressures are indicated in the Technical
Data Table for the correct gas and model on
Page 56, Section 16.3 and Page 58, Section
16.6.
3. To set the high fire rate, adjust the high fire
adjustment on the gas valve. To set the low fire
rate (with the unit running in low fire), adjust the
low fire adjustment on the gas valve.
11.2.2.3 Check Burner Gas Pressure
(Modulating)
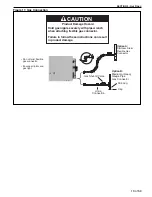
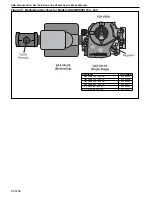
1. Loosen screw in outlet pressure tap shown on
Page 32, Figure 15 and connect manometer.
Gas pressure is NOT measured at Honeywell
single stage gas valve.
2. With burner firing, measure pressure on
manometer. To measure high fire burner
pressure, disconnect modulating thermostat
signal and apply 10 VDC to modulating input
connections (polarity sensitive). To adjust high
fire burner pressure, remove regulator cover
from Honeywell single stage gas valve and turn
regulator adjustment screw to set required
burner pressure as stated in the Technical Data
Table for the correct gas and model on Page
56, Section 16.3 and Page 58, Section 16.6.
3. To measure low fire burner pressure disconnect
10 VDC signal to modulating valve.
NOTE:
Low fire burner pressure is set at factory and
not field adjustable. (modulating)
NOTE:
If the correct burner pressure cannot be
reached, then check the inlet pressure to the valve
with the burner firing. See Technical Data Table on
Page 56, Section 16.3 and Page 58, Section 16.6
for inlet pressure requirement.
Do not continue to adjust the regulator if the
pressure is not changing.
If the inlet pressure is too low to allow correct burner
pressure setting, then the gas inlet pressure must be
corrected before completing the start-up.
11.2.2.4 Check Gas Rate (Single and Two Stage)
1. After burner pressure adjustment, allow the
heater to operate for at least 15 minutes and
then re-check settings. Adjust pressure setting
if necessary.
2. Check gas flow rate at gas meter.
NOTE
: For two stage valve (High/Low
operation) check gas flow in both operating
modes.
3. Turn off heater and electrical supply.
4. Remove the manometer and refit all covers to
the valve and tighten the screw of the outlet
pressure tap.
11.2.2.5 Check Gas Rate (Modulating)
1. After burner pressure adjustment, allow heater
to operate for at least 15 minutes and then re-
check settings. Adjust pressure setting if neces-
sary.
2. Check high/low fire gas flow rate at gas meter.
To place heater into high fire, disconnect
modulating thermostats signal and apply 10
VDC to modulating input connections.
3. To place heater into low fire, disconnect 10
VDC from modulating input connections.
4. Turn off heater and electrical supply.
5. Remove manometer, tighten outlet pressure tap
screw and replace modulating thermostat
signal wires.
Summary of Contents for UHAM 150
Page 2: ......
Page 4: ......
Page 8: ......
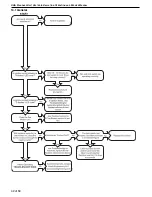
Page 50: ...UHA STANDARD UNIT HEATER INSTALLATION OPERATION AND SERVICE MANUAL 42 of 59 14 1 General ...
Page 65: ...SECTION 16 SPECIFICATIONS 57 of 59 16 4 Dimension Data for Models UHA T M X S 300 400 ...
Page 68: ......
Page 69: ......
Page 70: ......
Page 71: ......
Page 72: ......

