3
TABLE OF CONTENTS
Quick Reference .............................................................................................................3
Break-In .........................................................................................................................3
Prototype History ............................................................................................................5
Checking and Adjusting Your Model .................................................................................5
Missing or Damaged Parts ...............................................................................................6
Removing the Shell ..........................................................................................................7
Optional Detail Parts .......................................................................................................7
Operation – DC (Silent) .................................................................................................11
Installing a Silent DCC Decoder ......................................................................................11
Operation – DC (Sound) ................................................................................................11
Operation – DCC with Sound .........................................................................................12
•
Locomotive Address .........................................................................................13
•
Turn On the Sound ...........................................................................................13
•
Functions .......................................................................................................13
•
Functions: More Information .............................................................................14
•
Sound Volume Settings .....................................................................................16
•
Sound Volume Settings Chart ............................................................................16
•
Factory Reset ..................................................................................................17
•
Awesome Slow Speed Thingy ...........................................................................17
•
More Information ............................................................................................17
Limited Lifetime Warranty ..............................................................................................18
Acknowledgements ......................................................................................................18
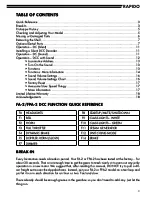
FA-2/FPA-2 DCC FUNCTION QUICK REFERENCE
F0
HEADLIGHTS
F8
STARTUP/MUTE/SHUTDOWN
F1
BELL
F9
CLASS LIGHTS - WHITE
F2
HORN
F10 CLASS LIGHTS – GREEN
F3
FULL THROTTLE
F11 STEAM GENERATOR
F4
DYNAMIC BRAKE
F12 SWITCHING MODE
F5
DOPPLER HORN (SLOW)
F14 BRAKE
F7
DIMMER
BREAK-IN
Every locomotive needs a break-in period. Your FA-2 or FPA-2 has been tested at the factory... for
about 30 seconds. That is not enough time to get the gears to mesh nicely or to even out any jerky
operation in a new motor. We suggest that, after reading this manual, DO NOT try to pull a 40-
car freight extra over the Appalachians. Instead, put your FA-2 or FPA-2 model on a test loop and
just let it run in each direction for an hour or two. Fast and slow.
There already should be enough grease in the gearbox so you don’t need to add any. Just let the
thing run.


